This post contains affiliate links. Please see our disclosure policy.

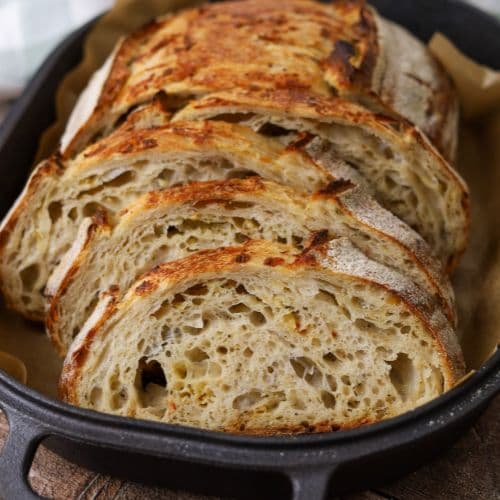
You are going to love everything about this Italian Herb and Cheese Sourdough Bread! The flavors, the aromas, the crunch … seriously there is nothing you will not fall in love with! And even better, it’s so easy to pull together, yet will yield you a sourdough loaf that everyone will be impressed by (trust me on this, everyone is going to ask you to bake this on repeat)!
And if you love adding flavors to sourdough bread, then you might also enjoy making this roasted garlic sourdough bread or this olive sourdough bread.

Why You’ll Love This Recipe!
Super Easy – the inclusions in this loaf are added during the stretch and fold process, making it a very easy loaf to make, no matter where you are at in your sourdough journey.
Tastes Better Than Subway – if you’re like me and LOVE ordering Italian Herb and Cheese bread at Subway then you are going to fall in love with this recipe. It is so much better than Subway because, well it’s sourdough!! I always order Italian Herb & Cheese bread with chicken schnitzel, ranch dressing and extra jalapeños – so good! But this flavored sourdough gives it a serious run for its money!
Uses Dried Herbs – I’ve developed this recipe using dried herbs to ensure it’s super easy to pull together. The herbs don’t hamper fermentation so they can be added during the stretches and folds, easy peasy! Just don’t add dried garlic to your herb mix as this will affect fermentation.

Ingredients
- Sourdough Starter – you’ll need an active and bubbly sourdough starter that’s been fed and is at it’s peak to make this recipe. You can read more about the best time to use your sourdough starter here.
- Water – I’ve made this recipe using 350g of water. You can increase or decrease the hydration level to suit your own technique. I’ve written more on sourdough hydration here.
- Bread Flour – as always I recommend baking sourdough using a good quality bread flour to ensure you have strong gluten development.
- Salt – I still add salt to my dough, even when adding all the salty cheeses. Salt not only adds flavor to your dough, it also strengthens the gluten too, so you don’t want to leave it out. You can read more about the role of salt in sourdough bread here.
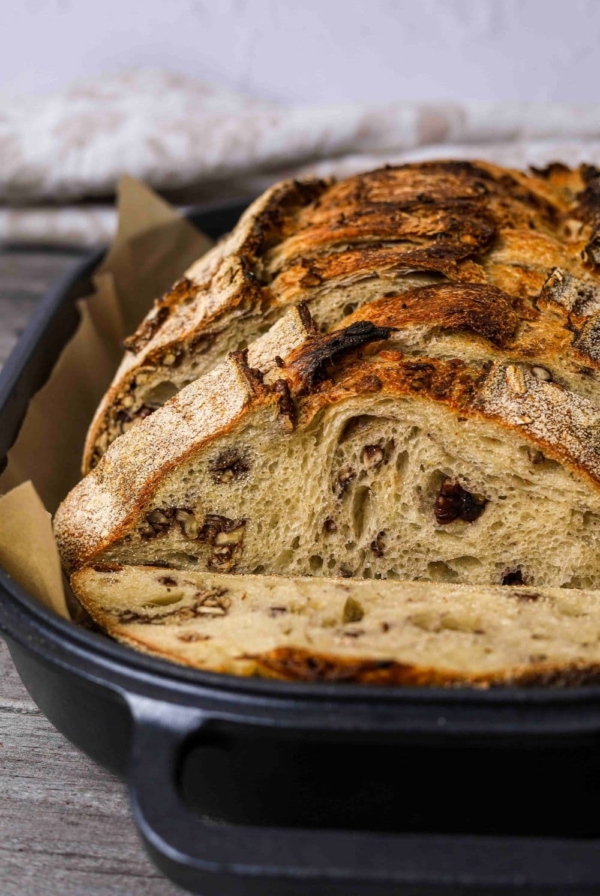
- Cheese – I’ve used a mix of romano, parmesan, mozzarella, cheddar but you can use any cheese you like. To be honest, I use whatever I have in the fridge and this recipe is a great way to use up lots of little bits of cheese that you might normally throw away. Just stick to the weight I’ve given in the recipe to make sure you don’t overload your dough and cause it to collaspe.
- Italian Herbs – I’ve used dry herbs because I feel like it gives the best flavor (my Italian herb mix contains basil, oregano, thyme, rosemary and marjoram). I tested this loaf with fresh herbs and the dried herbs won out every time! I wanted to recreate the flavor I love from Subway, so if you’re not overly concerned with that, then by all means you can use fresh herbs. Dried herbs are great for convenience though and mean that I can pull this bread off at any time of year (even winter when there’s not much growing in the herb garden).

How To Make Sourdough Italian Herb & Cheese Bread
This is a definitely favorite in our house. The bonus here is that it’s so easy to make! The fact that it’s made with dried Italian herbs that are always in our spice draw and we can use any cheese that is in our refrigerator make this loaf very achievable without too much planning.
Pre Mix & Autolyse
Weigh out your starter and water in a glass or ceramic bowl. Mix them together. Then add your flour and salt and mix altogether with a spatula. The dough will be fairly shaggy and only just brought together. Cover your bowl with cling film or a damp tea towel and let it sit for around 1 hour.
Forming Up Your Dough
Work your way around the bowl, grabbing the dough from the outside, stretching it up and over itself until a smooth ball is formed. You shouldn’t need more than about 20-25 folds to form the ball. Once the dough has formed into a smooth ball, pop the cling film back on and let it rest for 30 minutes.
Stretch & Fold
You need to add the cheese and Italian herbs to your dough during the stretch and fold phase. It’s very easy to do! Try to add them around the second or third set of stretch and folds. So do your first set of stretch and folds with the dough as is and then add the cheese and herbs on the second (or third) set depending on how your dough is behaving.
Try to do around 4 sets of stretch and folds with around 15 to 30 minutes between each set.

Bulk Ferment
Once you’ve finished your stretch and folds, place the cling film or damp tea towel back over your dough and let it rest and ferment at room temperature. Ideally you want the dough to double before you shape it.
Shaping Your Dough
Once your dough has finished its first ferment, it’s time to give it some shape and surface tension.
I think this recipe lends itself to a batard however it’s completely up to you what shape you would like. Check out instructions on shaping a sourdough batard here.

Before you place your dough into your banneton, give it a good dusting of rice flour or semolina. Place your shaped dough into the banneton, seam side up.
Cold Ferment
Now your dough is in it’s “shaping container” cover it loosely with a plastic bag or damp tea towel and place into the fridge. I use a large plastic bag to cover it – I just reuse it each time.
Try to leave it in the fridge for a minimum 5 hours up to a maximum of around 36 hours. I generally bake this loaf somewhere around the 12 hour mark.

Preparing to Bake Your Sourdough
Once you’re ready to bake your sourdough, you’ll need to preheat your oven to 230C/450F. Place your Dutch Oven into the oven when you turn it on so it gets hot.
Baking Your Sourdough
Now it’s time to bake! When your oven is at temperature. Take your sourdough out of the fridge. Gently place it onto a piece of baking paper.
Gently score your bread with a lame, clean razor blade or knife. Carefully take your Dutch oven out of the oven. Place the sourdough into the pot using the baking paper as a handle. Put the lid on and place into the hot oven.
BAKE TIME:
30 Minutes with the lid on at 230C/450F
plus 10-15 Minutes with the lid off at 210C/410F
If you’re worried about the base of your bread burning, place a baking sheet on the shelf underneath your Dutch Oven – it works!
When you remove your dough from the oven, carefully remove it from the Dutch oven as soon as possible and place on a wire rack to cool.

Baking Timeline
This is a sample baking timeline for making an Italian herb and cheese sourdough loaf. You will need to adjust the times to suit your own temperature and environment, but this timeline works well for my sourdough starter and kitchen temperature.
| TIME | PROCESS |
|---|---|
| 9 am | Premix and autolyse for around an hour, forming up the dough and leaving to rest for another 30 minutes before stretch and folds. |
| 11 am | 1st stretch and fold. |
| 11.30 am | 2nd stretch and fold – add the dried Italian herbs and cheese ensuring they are mostly worked into the dough. |
| 12 pm | 3rd stretch and fold – continue working the dried Italian herbs and cheese into the dough. |
| 12.30 pm | 4th stretch and fold. |
| 1 pm | Bulk fermentation at room temperature. |
| 6 pm | Shape dough into a batard, place into banneton and then into fridge for cold fermentation. |
| 9 am | Wake and bake! The next morning, you can get up, make a coffee and bake your sourdough Italian herb and cheese loaf! |
How To Store + Freeze
Like most sourdough loaves, this sourdough bread is always best on the day it is baked. I find that it is best eaten within around 24 hours of baking. After this time, it makes amazing toast and is incredible under poached eggs! And did I mention sourdough grilled cheese?
This loaf freezes very well and you find my instructions for freezing sourdough bread here.

Frequently Asked Questions
Yes! This recipe works incredibly well in a loaf pan. I recommend reading this post about making sourdough in a loaf pan to get all the details for how to do this.
You can add garlic to this Italian herb and cheese loaf. There are a few ways you can do this. You can add roasted cloves of garlic at shaping in the same way that I do in this roasted garlic sourdough loaf or you can add garlic powder at shaping too. Just sprinkle if over the dough as you shape. I don’t recommend adding any type of garlic prior to shaping.
You could definitely shape this dough into subway rolls, however, I would recommend using this recipe for sourdough sandwich rolls instead. This recipe also includes a variation for Italian herb and cheese as well (it really is our family’s favorite flavor).

Italian Herb & Cheese Sourdough Bread
Equipment
- Mixing Bowl
- Digital Scale
- Banneton
- Dutch Oven
Ingredients
- 50 g Sourdough Starter
- 350 g Water
- 500 g Bread Flour
- 10 g Salt
- 150 g Cheese, (I've used romano, parmesan, mozzarella, cheddar but you can use any cheese you like)
- 5 g Italian Herbs, (I've used dried herbs)
Instructions
- Pre Mix & Autolyse:Weigh out your starter and water in a glass or ceramic bowl. Mix them together.Then add your flour and salt and mix altogether with a spatula. The dough will be fairly shaggy and only just brought together.Cover your bowl with cling film or a damp tea towel and let it sit for around 1 hour.
- Forming Up Your Dough:Work your way around the bowl, grabbing the dough from the outside, stretching it up and over itself until a smooth ball is formed. You shouldn't need more than about 20-25 folds to form the ball.Once the dough has formed into a smooth ball, pop the cling film back on and let it rest for 30 minutes.
- Stretch & Fold – Creating Structure:You need to add the cheese and Italian herbs to your dough during the stretch and fold phase. It's very easy to do! Try to add them around the second or third set of stretch and folds. So do your first set of stretch and folds with the dough as is and then add the cheese and herbs on the second (or third) set depending on how your dough is behaving. Try to do around 4 sets of stretch and folds with around 15 to 30 minutes between each set.
- Bulk Ferment:Once you've finished your stretch and folds, place the cling film or damp tea towel back over your dough and let it rest and ferment at room temperature.
- Shaping Your Dough:Once your dough has finished its first ferment, it's time to give it some shape and surface tension. I think this recipe lends itself to a batard however it's completely up to you what shape you would like. Before you place your dough into your banneton, give it a good dusting of rice flour. Place your shaped dough into the banneton, seam side up.
- Cold Ferment:Now your dough is in it's "shaping container" cover it loosely with a plastic bag or damp tea towel and place into the fridge. I use a large plastic bag to cover it – I just reuse it each time.Try to leave it in the fridge for a minimum 5 hours up to a maximum of around 36 hours. The longer you leave it the better your bread will be! A longer cold ferment creates beautiful blisters on your crust and a deeper sourdough flavour. A blistery, cheesey crust is just out of this world, trust me!
- Preparing to Bake Your Sourdough:Once you're ready to bake your sourdough, you'll need to preheat your oven to 230C/450F. Place your Dutch Oven into the oven when you turn it on so it gets hot. Try to preheat for around 1 hour to ensure your oven is super hot – but you know your oven so just adjust this time if you need to.Leave your dough in the fridge until the very last minute – placing a cold dough into a hot oven will give you a great "spring".
- Baking Your Sourdough:Now it's time to bake!When your oven is at temperature. Take your sourdough out of the fridge. Gently place it onto a piece of baking paper.Gently score your bread with a lame, clean razor blade or knife.Carefully take your dutch oven out of the oven. Place the sourdough into the pot using the baking paper as a handle. Put the lid on and place into the hot oven. BAKE TIME:30 Minutes with the lid on at 230C/450F plus10-15 Minutes with the lid off at 210C/410FIf you're worried about the base of your bread burning, place a baking sheet on shelf underneath your Dutch Oven – it works!
- Finishing Your Bake:When you remove your dough from the oven, carefully remove it from the dutch oven as soon as possible and place on a wire rack to cool.
Notes
- Notes on Sourdough Starter – This recipe is based on you having an active starter that you have fed a few hours before starting your bake. For information on whether your starter is ready, go here.
- Notes on Stretch & Folds – If you are going to do the stretch & folds on your bench top, spray your surface with water mist rather than using flour.
- Notes on Bulk Fermentation – If your home is warm then your dough will ferment a lot faster and could be done in as little as a few hours. If it’s colder, it will take longer, possibly overnight. I would recommend that you try to do your first few bulk ferments during daylight hours so that you can watch your dough closely.
Once you’re more familiar with the process – and the temperature of your home – you will be able to do overnight ferments.
You will know your dough is ready to move to the next stage when it has *just* doubled in size. It will be fairly wobbly and full of bubbles. You should be able to see large air bubbles under the surface of the dough.
You don’t want to let it go any further than doubled as it will be over fermented. If you want to do an overnight ferment, but your home is warm, consider using a little less starter (ie 25g).
Less starter means your dough will take longer to ferment and you will reduce the risk of over fermenting your dough. You’ll find more information on these topics here:
When is my bulk ferment finished? What is the difference between cold ferment and bulk ferment? Why does the amount of starter matter?
- Notes on Baking – If you’re worried about the base of your bread burning, place a baking sheet on shelf underneath your Dutch Oven – it works! If you’re worried about your bread not being cooked all the way through, turn the oven off and place your dough straight onto the oven rack. Leave the door ajar and let your bread rest there for a few hours. Remember not to cut into your loaf too soon – you’ll need to let it cool for at least a few hours (4-6 is best).
Nutrition
Nutrition information is automatically calculated, so should only be used as an approximation.
Like this? Rate and comment below!


Just made this loaf and it looks fantastic. Have company coming and thought I would try it. I am going to freeze it till desired time to eat it. So, I haven’t actually tasted it yet. Hence the 4 stars. If it tastes as good as it looks it would give five stars.
Thank you for sharing the recipe!
I am going to make this it sounds delicious! My question is the herbs are they purchased premixed Italian mix ? Or do you make your own?
I’ve just used a store bought Italian herb mix for this loaf, but you can definitely mix your own to suit you tastes if you prefer.
I made this recipe as a total novice to the sourdough world and it came out near perfect! Even cheese distribution, beautiful uniform crumb and a soft crust that was easy to cut through and a great chew! I would make this recipe again and again!
Oh, wow, we are having this now! This a fantastic recipe. Thank you!
Omg! So good!! Was like pizza bread. Was hard not to eat the entire loaf in one sitting.
So glad you loved it! xo
I made your recipe for Italian Herb and Cheese sourdough bread and it turned out beyond on my expectations! It was easy and very delicious! My husband is a big fan of this bread too! Your bread recipe gets all the stars! Thank you for sharing your recipes!
Just made this recipe and now in the fermentation process. I just re-read about the herbs and checked my bottle. There is dried garlic mixed in with the herbs. How much will this affect the fermentation? I didn’t see that at first or I wouldn’t have bought this brand.
Thanks,
D
It should be ok, it would probably be a very small amount of garlic, so you should be good. It’s more when you add straight garlic that you would have issues 🙂
Can I used shredded cheese mix for this, or do I need to shred the cheese myself? Also, will it work if I mix the ingredients at the shaping stage instead?
Thanks!
I have used both and it’s turned out fine – we always have pre shredded mozzarella in the fridge so I usually throw that in. Parmesan and other cheeses I do shred myself 🙂
I want to make an Italian roll similar to cinnamon rolls. I’d be adding pesto & cheeses, then rolling like cinnamon rolls. Do you have a recommendation on recipe to use for the dough?
You can use the dough in this recipe 🙂 Sourdough Pinwheels with Ham & Cheese [easy + delicious]
Bloody Awesome. Brian Julian
Could this be baked in a loaf pan for sandwich bread?
Absolutely you can bake it in a loaf pan 🙂
I made this loaf this morning after 36 hours in the fridge. It tastes absolutely delicious. This will definitely become a frequent favorite.