Sourdough Ciabatta Rolls [step by step recipe with photos]
This post may contain affiliate links.
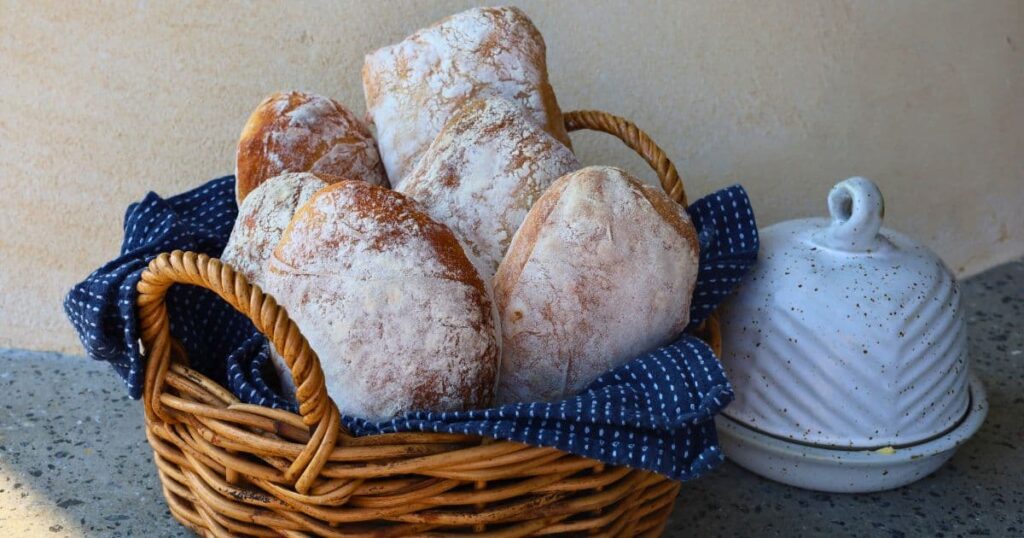
If you've ever wanted to bake sourdough ciabatta rolls at home using your own sourdough starter, then you've come to the right place! There's something utterly captivating about the rustic crust, the chewy texture, and the mouthwatering flavor of these sourdough ciabatta rolls.
While they do take quite a while to create, due to the extended cold fermentation, the actual hands on time is minimal. They are also really easy, so even if you're just starting your sourdough journey, these sourdough ciabatta rolls are very achievable.
If you love making Italian style sourdough breads, then check out this sourdough focaccia, sourdough Pane di Casa and sourdough grissini recipes.
Why You'll Love This Recipe!
Distinctive Flavor and Aroma - Sourdough ciabatta bread boasts a unique flavor that comes from the long fridge fermentation time. It really will satisfy your cravings for really flavorful sourdough bread!
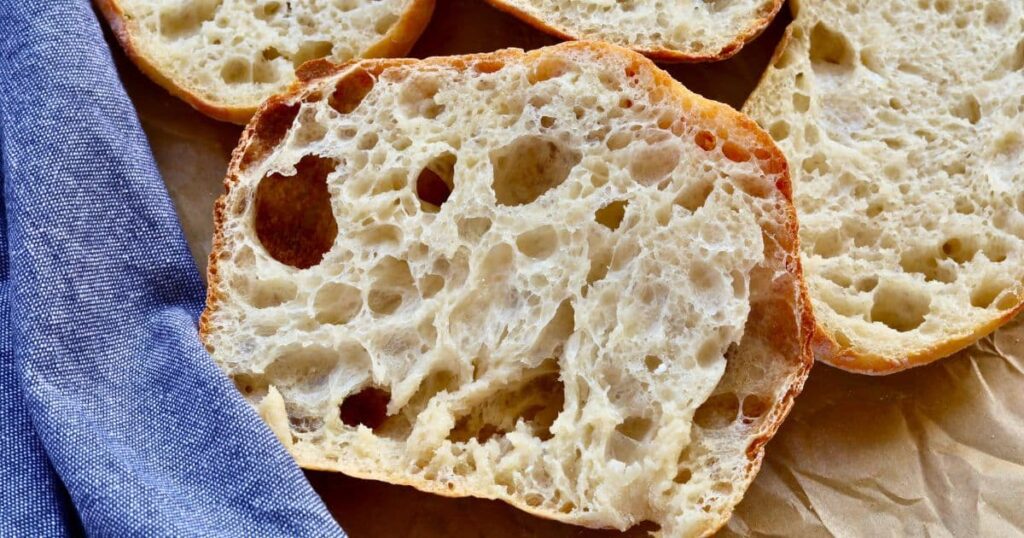
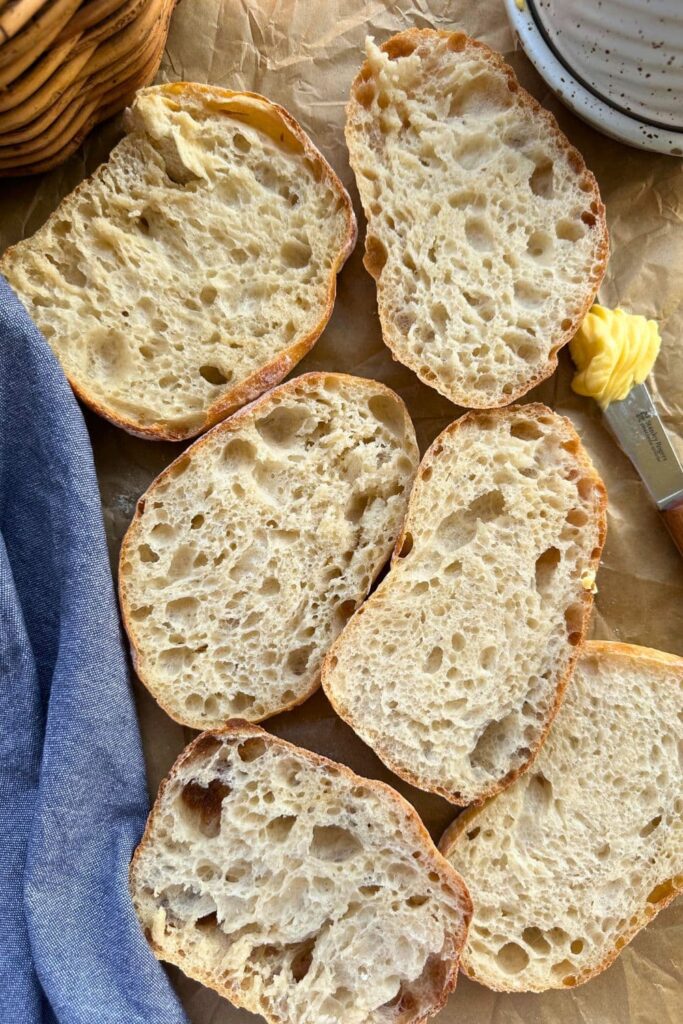
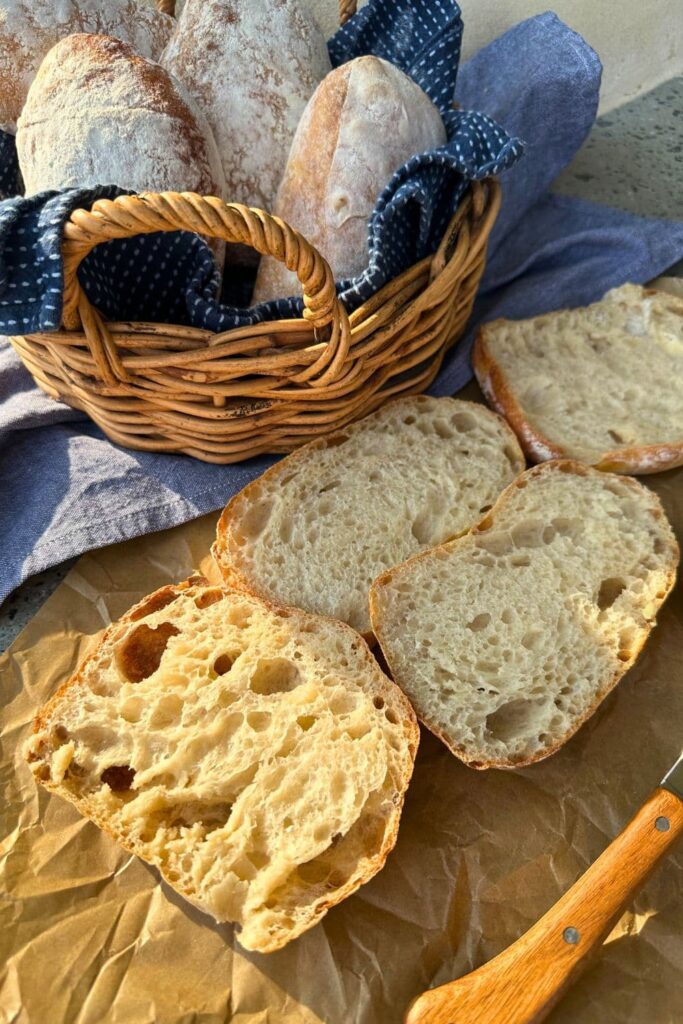
Chewy Texture with Airy Crumb - The hallmark of ciabatta bread is its chewy, open-textured crumb and a thin, crisp crust. Each bite reveals a delightful interplay between the crust's crunchiness and the soft, airy interior. This textural contrast is both satisfying and addictive, it's a bit like a good sourdough baguette.
Versatility - Sourdough ciabatta is versatile and can be enjoyed in various ways. It's perfect for crafting sandwiches, bruschettas, or panini. It's also a fantastic accompaniment to soups and salads, thanks to its ability to absorb flavors while retaining its structure.
What is Sourdough Ciabatta?
Ciabatta bread is an Italian rustic bread known for its elongated, flat shape, open crumb structure, and crispy crust. The name "ciabatta" means "slipper" in Italian, which is a reference to its shape, resembling a flat, slightly elongated slipper or a flip-flop.
It is believed to have been developed in the 1980s by Italian bakers, particularly in the Veneto region, in response to the desire for a bread that resembled traditional French baguettes but with an Italian twist.
Ciabatta's distinctive characteristics, including its chewy texture and open crumb, make it a popular choice for sandwiches, bruschettas, and other culinary creations. It is celebrated for its simplicity, showcasing the essential elements of flour, water, yeast (in this case, wild yeast from a sourdough starter), and salt, all combined to create a bread that has become a staple in Italian cuisine.
What Equipment Do You Need?
While sourdough ciabatta rolls are relatively easy to make, there are a few pieces of baking equipment that I highly recommend to make your life easier. Ciabatta dough is a really slack dough and these tools will make your handling of the dough much easier.
- Kitchen Scale
- Silicon Dough Scraper
- Metal Bench Scraper or Dough Knife
- Bread Peel or Pizza Peel
- Baking Stone or Pizza stone
If you love checking out what everyone else uses to bake sourdough, make sure you check out this post where I show you exactly what equipment I use to bake sourdough bread in my kitchen.
How To Make Sourdough Ciabatta Rolls
Like I said earlier, sourdough ciabatta rolls aren't necessarily hard to make. They do require a lot of patience due to the long cold ferment which develops the flavor in the dough.
Feed Your Sourdough Starter
Traditional ciabatta bread is made using a preferment or biga. In this sourdough ciabatta recipe, your sourdough starter is the preferment, so ensure your sourdough starter is active and at room temperature. It should be fed within 6 to 8 hours of making your sourdough ciabatta bread.
If you're looking for some information on how to know when your sourdough starter is ready to use, this will show you the best time to use sourdough starter.
Mix the Dough
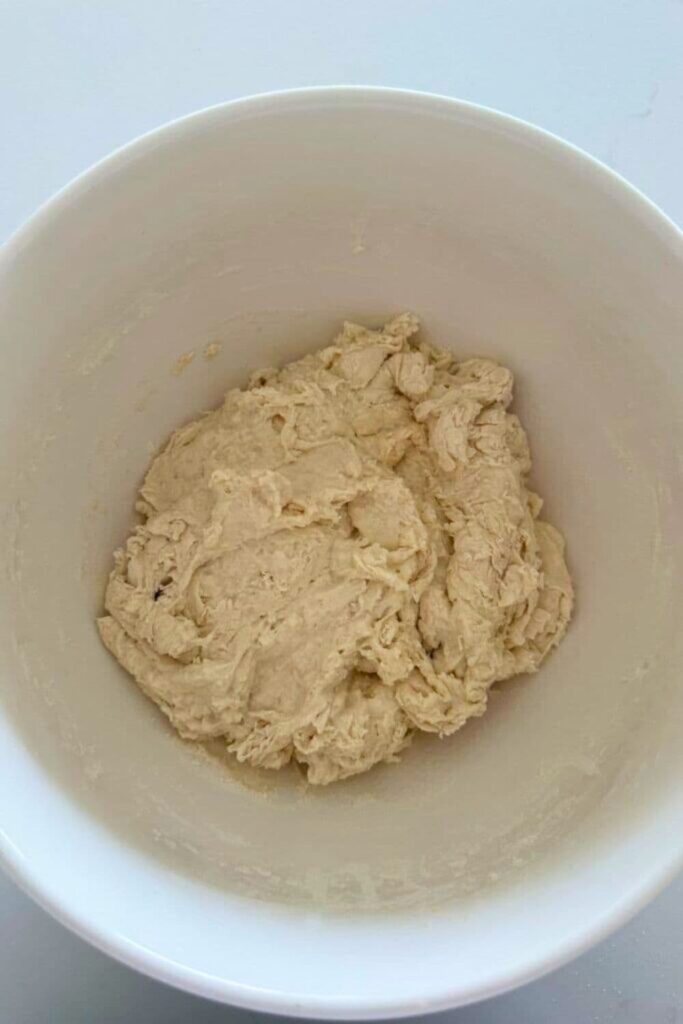
In a large mixing bowl, combine 100g of active sourdough starter and 360g of water until the sourdough starter is well dissolved. Then add the flour and salt and mix until all the ingredients come together into a shaggy dough.
Autolyse
Cover the bowl with a plastic cover or damp cloth and let the dough rest for about 30 minutes to 1 hour. This autolyse process allows the flour to fully hydrate.
Stretch and Fold
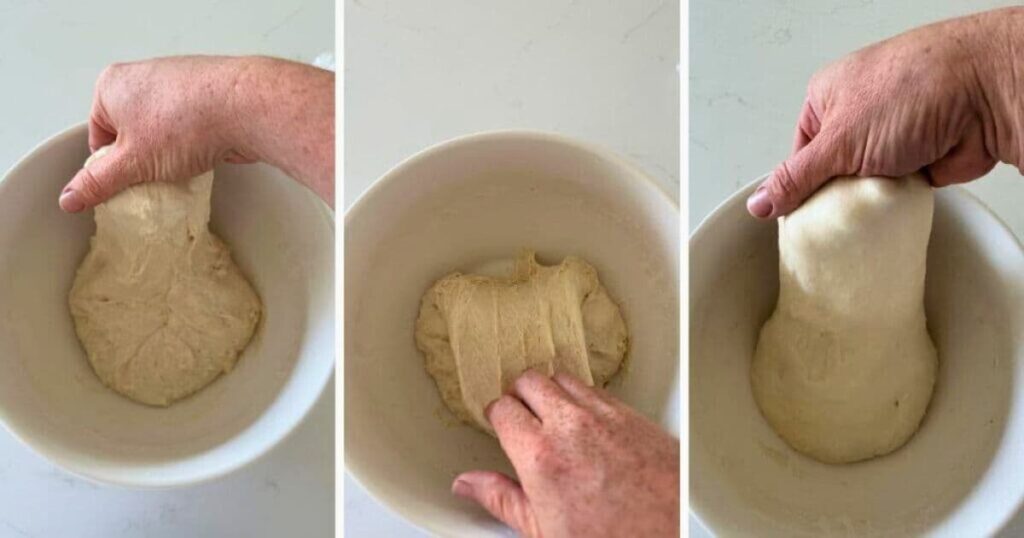
Over the next 2 hours, you will need to gently stretch and fold the dough. Try to do 2 to 4 sets of stretches and folds during this 2 hour period.
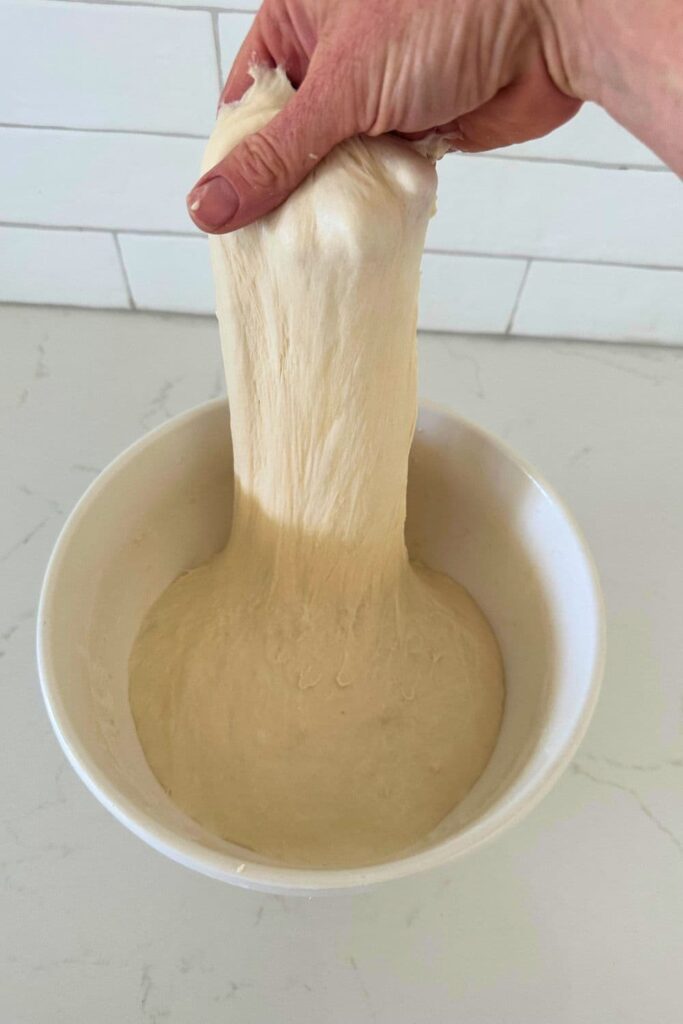
To fold, wet your hands and lift one side of the dough, stretch it, then fold it over the center. Repeat with all four sides of the dough. The dough will gain strength and elasticity as you stretch and fold.
Bulk Fermentation (First Rise)
Cover the bowl and let the dough sit at room temperature until it rises around 50%. This is a very high hydration dough so it won't take as long as a regular sourdough loaf - the exact time will depend on the strength of your sourdough starter, temperature of the water you used, temperature of your kitchen etc.
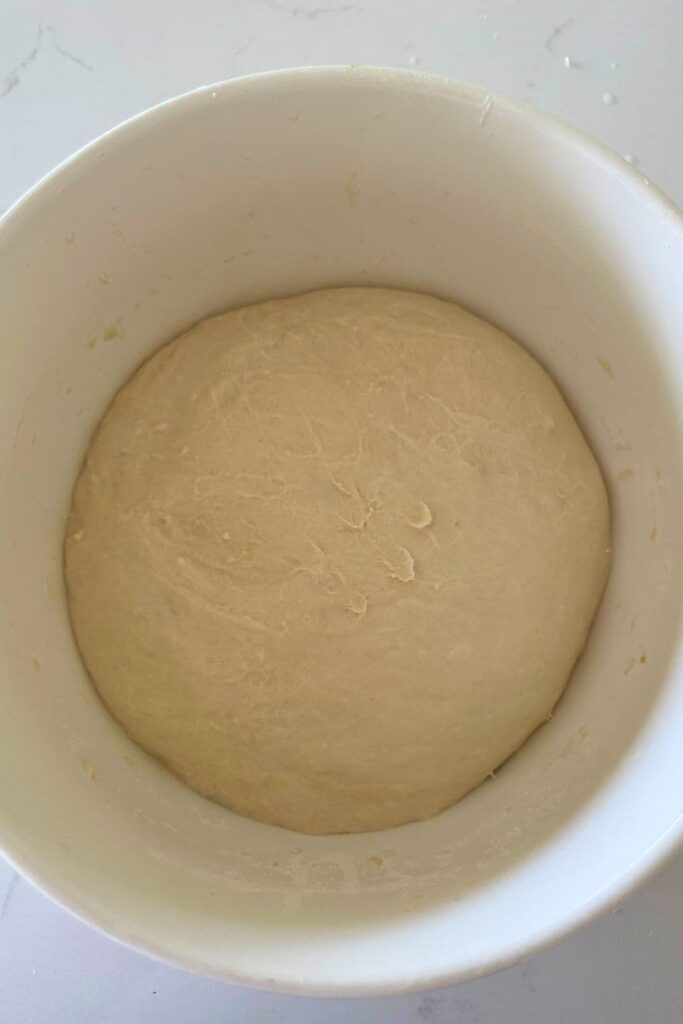
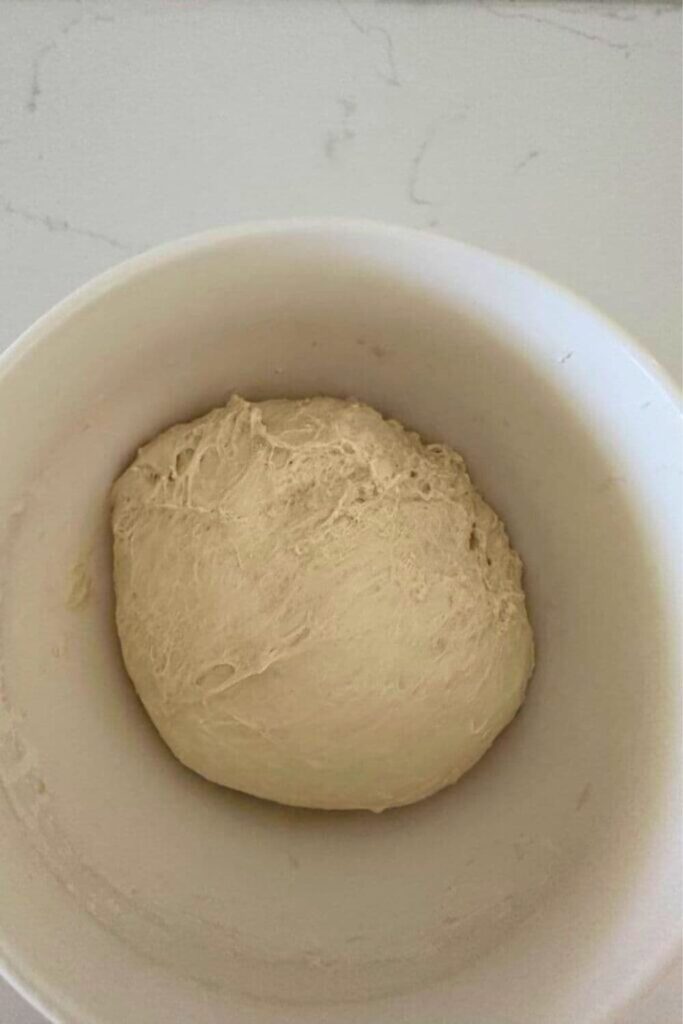
Once the dough has risen, gently pull the edges of the dough into the centre to create a sticky ball. Cover and place in the fridge for around 8 to 12 hours (you can leave it up to 24 hours if you like, but I find I get best results from 12 hours).
Divide and Shape
When you are ready to shape the sourdough ciabatta dough, take the bowl out of the fridge. Generously dust a clean surface with lots of all purpose flour.
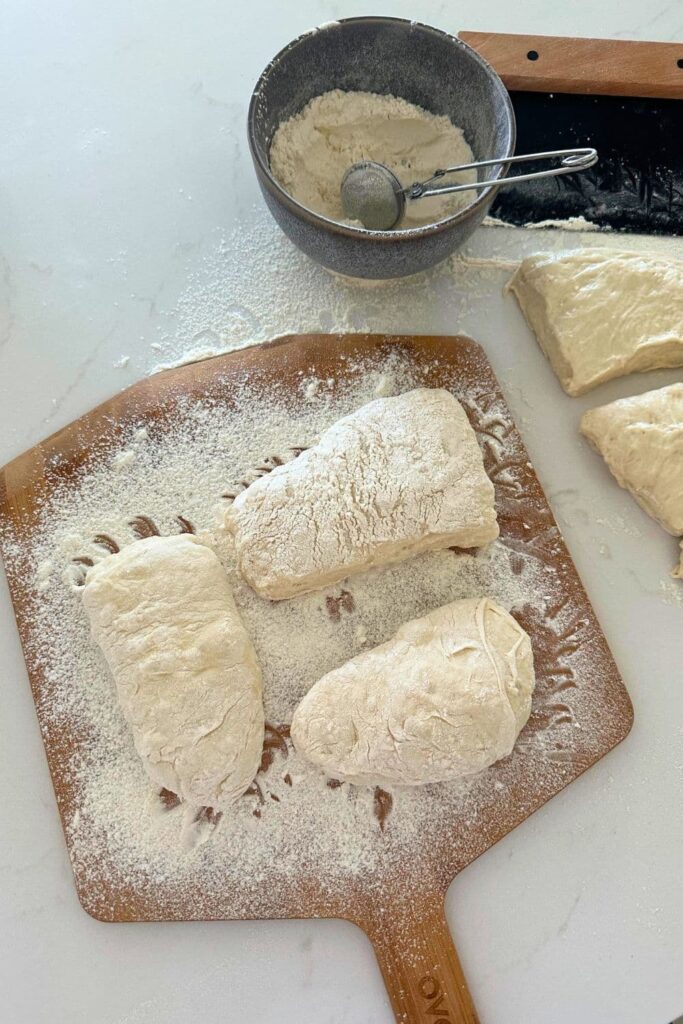
Use a silicone dough scraper to flip the sourdough ciabatta dough out onto the floured countertop with the sticky side on the top.
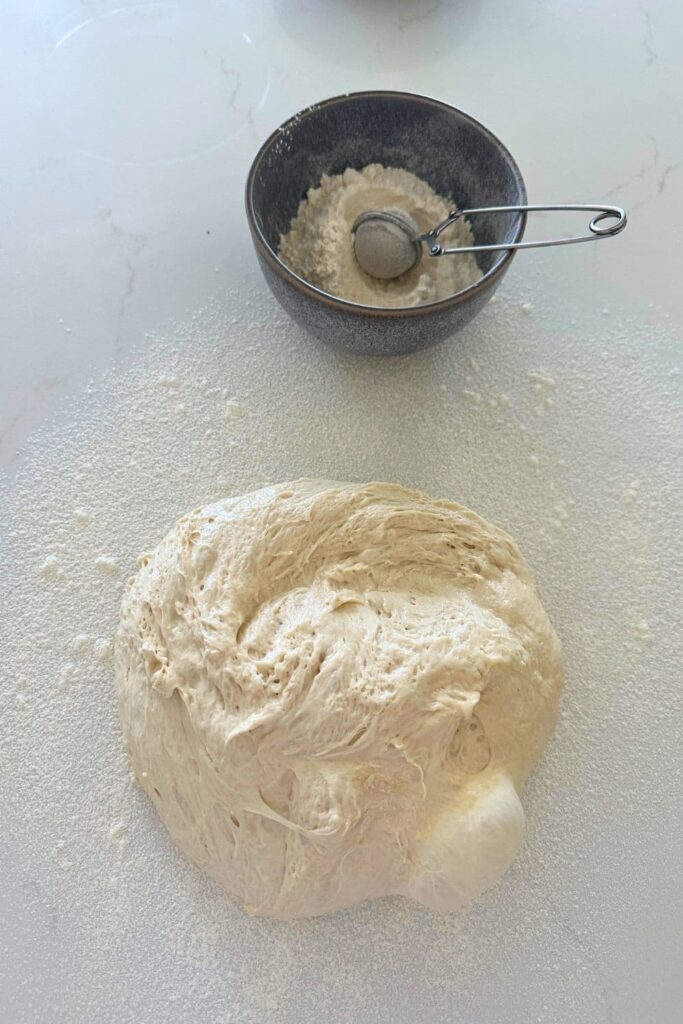
Gently pull the dough out into a rough rectangle. It definitely doesn't have to be perfect, this is rustic Italian bread. Generously cover the top of the dough surface in flour (this will help with the next step).
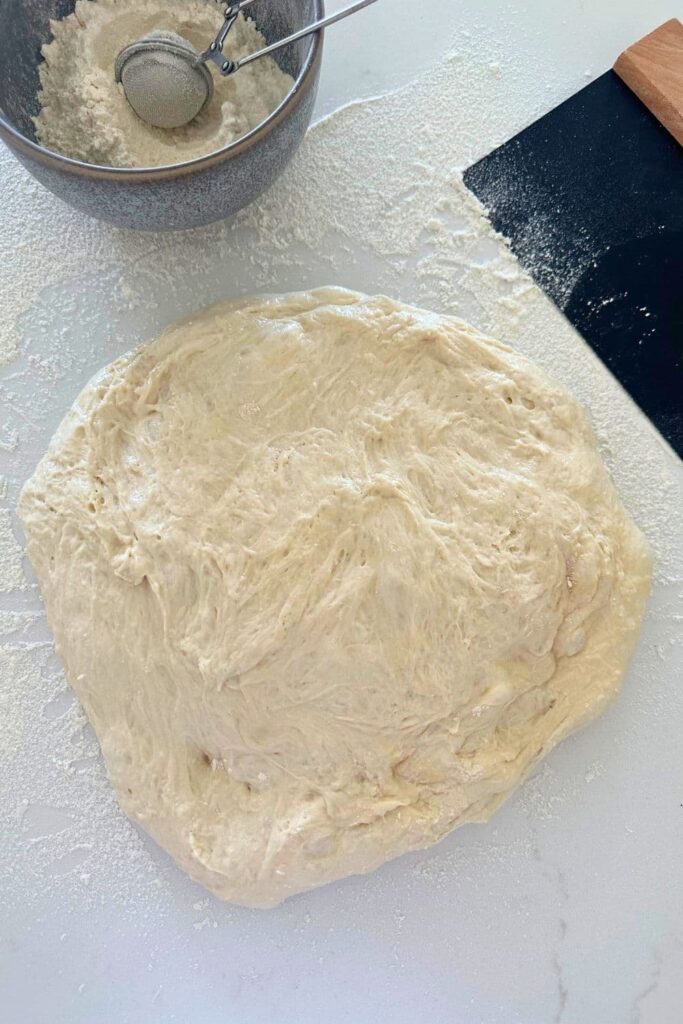
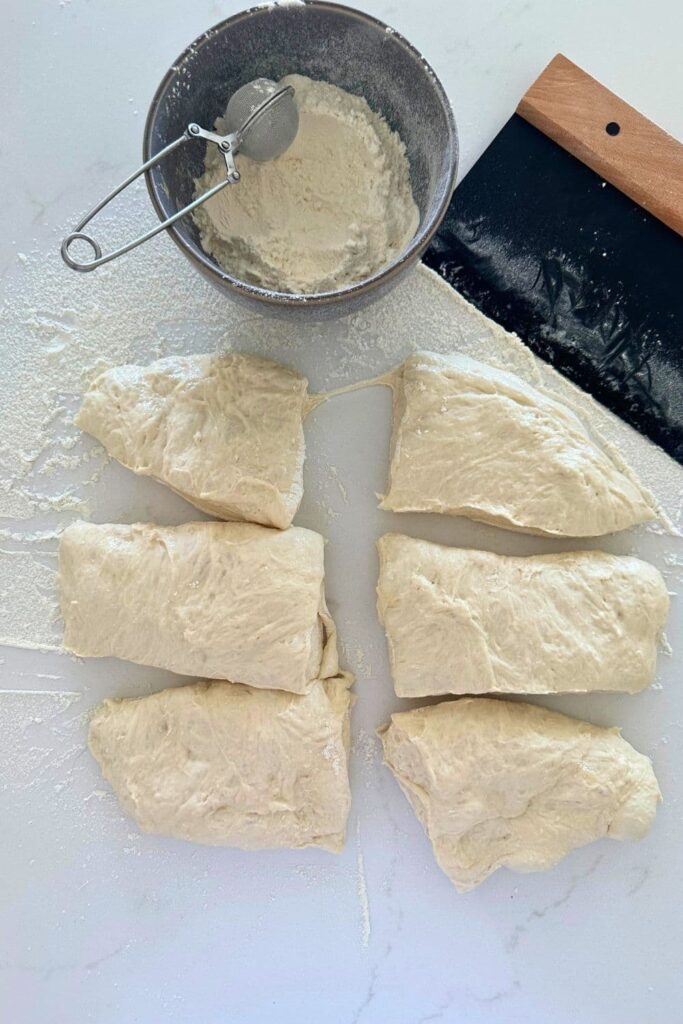
Use a metal dough scraper to cut the dough into 6 fairly equal pieces. Alternatively, you can cut the dough down the middle and create two equally shaped loaves. You can see that mine are very rustic and not measured at all, so don't stress too much about cutting the dough into pieces.
Final Proof
Take a baking peel or pizza peel and generously cover it in all purpose flour. If there are any odd shaped rolls, you can gently pull the edges together to neaten them up, or just leave them as they are.
Sprinkle the top of the rolls with a generous amount of flour and gently transfer them to the prepared baking peel.
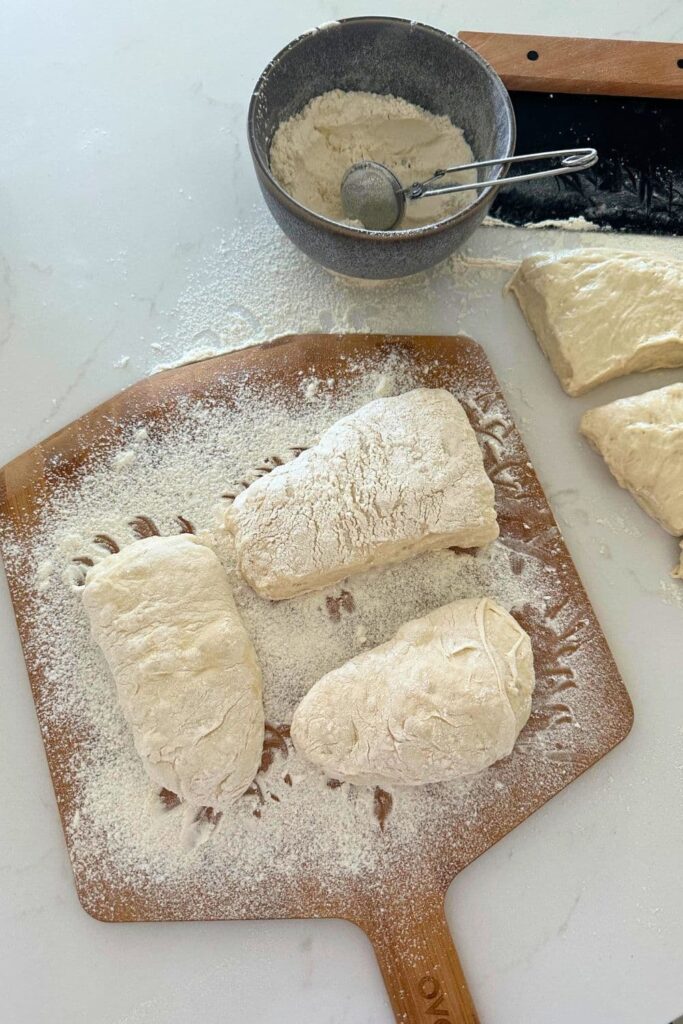
Allow the sourdough ciabatta rolls to proof at room temperature until they have visibly puffed up and developed a slightly airy texture. Remember you were working with cold dough, so this might take a bit longer than you'd expect.
I don't cover my sourdough ciabatta rolls while they proof, but you can if you want to. I just put a fly net dome over them to stop the flies, but that's it.
Preheat the Oven
When your sourdough ciabatta rolls are ready to bake, preheat your oven to 475°F (245°C) with a baking stone placed on the middle rack.
Baking
When you're ready, carefully transfer the ciabatta rolls to the hot baking stone in the oven (if you've added enough flour they should easily slide across).
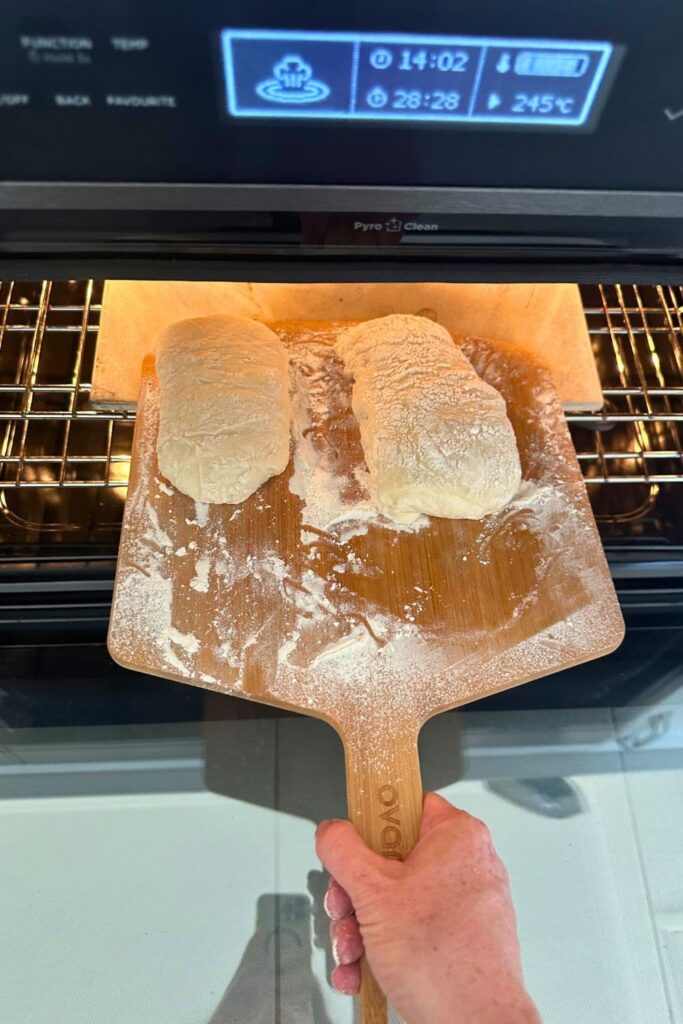
Bake for about 20 minutes, or until the rolls are golden brown and have a crisp crust.
Cool and Enjoy
Allow the ciabatta rolls to cool on a wire rack. Once cooled, they're ready to be enjoyed with your favorite spreads or as sandwich rolls.
Tips for Making the Best Sourdough Ciabatta
Sourdough ciabatta rolls are really easy to make, but there are definitely some things you can do to ensure you get the best result, especially when you first start making them.
- Use plenty of flour - I never use flour when shaping dough ... except when I'm making sourdough cibatta because the wet dough is notoriously sticky! Don't be afraid to use lots of flour, especially on the bread peels, or the dough won't slide off into the oven.
- Happy Sourdough Starter - in traditional Italian cibatta bread, they use a preferment or "biga". Because we are using a sourdough starter, we don't need to create a "biga". For this reason, you need to make sure that your sourdough starter has been fed and is very active and bubbly.
- High Hydration Dough: Sourdough ciabatta benefits from a high-hydration dough, typically around 75-80%. This ensures a wet and sticky dough, resulting in the characteristic large, irregular holes and airy texture in the finished bread. You can read more about hydration in sourdough bread here.
- Extended Fermentation: Allow your dough to undergo a slow and extended fermentation process. This not only enhances the flavor of the sourdough but also contributes to better gluten development. Consider a long, cold fermentation in the refrigerator overnight or for at least 12-18 hours.
- Gentle Handling: Ciabatta dough is delicate due to its high hydration. Handle it gently to preserve the air bubbles formed during fermentation. Don't ever punch the dough down or handle it roughly.
What Flour is Best For This Recipe?
I have used good quality bread flour for making these sourdough ciabatta rolls, but you can use all purpose flour if you prefer. If using all purpose flour, just hold back some of the water to see how the flour copes with the hydration. You can then add more if you need to.
You can read more about using all purpose flour in sourdough bread here.
Do You Need A Baking Stone for Ciabatta?
Sourdough ciabatta rolls are best baked on a searing hot baking stone or pizza stone. I use a square baking stone on the middle rack of my oven. I place the stone in the oven to preheat when I turn the oven on.
The baking stone allows the crust to crisp up better than without it.
If you don't have a baking stone, you can use an inverted cookie sheet lined with parchment paper.
Another option is to use a rectangle cast iron bread pan like this one. You should bake with the lid on for the first half of the bake and then lid off for the last 10 minutes.
To Steam or Not To Steam
I have tested this recipe multiple times with steam and without steam. I have a steam oven but I have also tested the recipe by adding a cast iron pan of water under the baking stone (to replicate what most people would need to do to add steam to their oven).
I find that I get a better result using a hot baking stone with no additional steam added.
The steam tends to cause issues if it hasn't evaporated enough towards the end of the bake. It can make the bottom of the cibatta rolls soggy and can make them stick to the baking stone. I also find that adding steam to the oven is awkward so I will try to avoid it if I can.
Ultimately it's up to you - it can be a good sourdough experiment to see which you prefer.
Baker's Timeline
This is a sample baker's timeline for making sourdough ciabatta rolls. You can adjust it to suit your individual circumstances. You'll also find more information on creating a sourdough baking timeline here.
DAY 1
9.00 pm - Feed sourdough starter (1:3:3 ratio so it's ready in the morning).
DAY 2
7.00 am - Autolyse
8.00 am - Perform 4 sets of stretch & folds over next 2 hours.
10.00 am - Cover and leave on the counter to bulk ferment (let it rise around 50%)
5.00 pm - Place dough into the fridge for long cold ferment.
DAY 3
7.00 am - Shape the dough into sourdough ciabatta rolls and allow to proof on the baking peel.
11.00 am - Preheat oven and bake on hot baking stone.
How To Store + Freeze
These sourdough ciabatta rolls are best eaten the day of baking. I like to bake them within a few hours of needing them.
Leftover sourdough ciabatta rolls can be stored in a plastic bag for a few days. I recommend toasting after the first 24 hours. They are especially good toasted with cultured butter!
They do freeze really well. I snap freeze them on a baking tray lined with parchment paper and then place into a ziploc bag and into the freezer for up to 8 weeks. Thaw at room temp before spraying lightly with water and heating in a moderate oven for 5 to 10 minutes to crisp up.

Sourdough Ciabatta Rolls Recipe
Equipment
- Baking Stone
- Bread Peel
- Silicone Dough Scraper
- Metal Dough Scraper
Ingredients
- 100 g Sourdough Starter
- 360 g Water
- 12 g Salt
- 450 g Bread Flour (or you can use all purpose flour)
Instructions
- Feed Your Sourdough StarterTraditional ciabatta bread is made using a preferment or biga. In this sourdough ciabatta recipe, your sourdough starter is the preferment, so ensure your sourdough starter is active and at room temperature. It should be fed within 6 to 8 hours of making your sourdough ciabatta bread.
- Mix the DoughIn a large mixing bowl, combine 100g of sourdough starter and 360g of water until the sourdough starter is well dissolved. Then add the flour and salt and mix until all the ingredients come together into a shaggy dough.
- Autolyse Cover the bowl with a plastic cover or damp cloth and let the dough rest for about 30 minutes to 1 hour. This autolyse process allows the flour to fully hydrate.
- Stretch and FoldOver the next 2 hours, you will need to gently stretch and fold the dough. Try to do 2 to 4 sets of stretches and folds during this 2 hour period. To fold, wet your hands and lift one side of the dough, stretch it, then fold it over the center. Repeat with all four sides of the dough.
- Bulk FermentationCover the bowl and let the dough sit at room temperature until it rises around 50%. This is a very high hydration dough so it won't take as long as a regular sourdough loaf.
- Once the dough has risen, gently pull the edges of the dough into the centre to create a sticky ball. Cover and place in the fridge for around 8 to 12 hours (you can leave it up to 24 hours if you like, but I find I get best results from 12 hours).
- Divide and ShapeWhen you are ready to shape the sourdough ciabatta dough, take the bowl out of the fridge. Generously dust a clean surface with all purpose flour.Use a silicone dough scraper to flip the sourdough cibatta dough out onto the floured countertop with the sticky side on the top.Gently pull the dough out into a rough rectangle. It definitely doesn't have to be perfect, this is rustic Italian bread. Generously cover the top of the dough surface in flour (this will help with the next step).Use a metal dough scraper to cut the dough into 6 fairly even pieces. Alternatively, you can cut the dough down the middle and create two equally shaped loaves.
- Final ProofTake a baking peel or pizza peel and generously cover it in all purpose flour. If there are any odd shaped rolls, you can gently pull the edges together to neaten them up, or just leave them as they are.Sprinkle the top of the rolls with a generous amount of flour and gently transfer them to the prepared baking peel.Allow the sourdough ciabatta rolls to proof at room temperature until they have visibly puffed up and developed a slightly airy texture. Remember you were working with cold dough, so this might take a bit longer than you'd expect.I don't cover my sourdough cibatta rolls while they proof, but you can if you want to. I just put a fly net dome over them to stop the flies, but that's it.
- Preheat the OvenWhen your sourdough ciabatta rolls are ready to bake, preheat your oven to 475°F (245°C) with a baking stone placed on the middle rack.See notes for information about steam for this bake.
- BakingWhen you're ready, carefully transfer the ciabatta rolls to the hot baking stone in the oven (if you've added enough flour they should easily slide across). Bake for about 20 minutes, or until the rolls are golden brown and have a crisp crust.
- Cool and EnjoyAllow the ciabatta rolls to cool on a wire rack. Once cooled, they're ready to be enjoyed with your favorite spreads or as sandwich rolls.
Notes
Nutrition


