Sourdough Pinwheels with Ham & Cheese [easy + delicious]
This post may contain affiliate links.
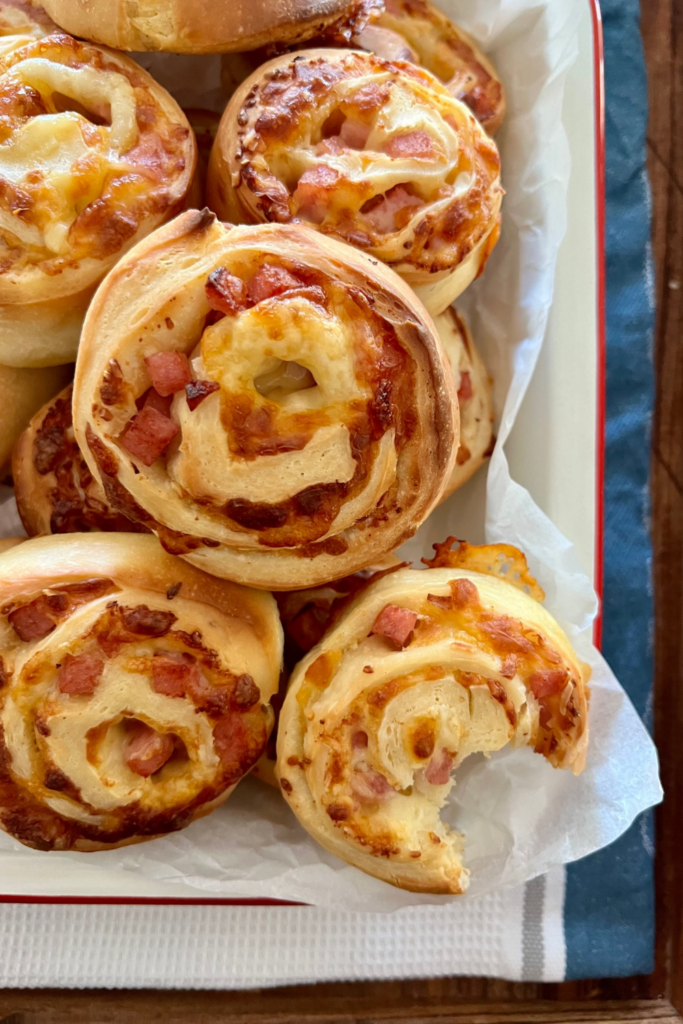
Simple sourdough pinwheels filled with ham and cheese - you and your family will love these buttery bakery snacks.
You can use sourdough starter or sourdough discard, I've included instructions for both options here (you'll see them further down the page).
These sourdough pinwheels can be made in advance, the fillings changed to your tastes (or whatever you have in the fridge) and can be frozen!
What is a Pinwheel?
A pinwheel refers to a savory snack that can be made using dough or puff pastry. It is usually filled with cheese and other fillings like grated vegetables, diced meats, herbs or spreads.
They are called pinwheels because of their round shape and the spiral that is made when you roll them up. You might also hear them referred to as scrolls depending on where you live.
Pinwheels can also be sweet - but are often referred to as "rolls" or "buns" in this instance. For example a cinnamon roll is a type of sweet pinwheel but they are generally more "doughy".
Pinwheels make great on the go snacks and are popular lunch box fillers.

How To Make Sourdough Pinwheels
Making sourdough pinwheels is much like making sourdough cinnamon rolls in that you're making a dough, filling it and rolling it before baking.
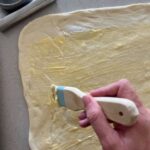
Spreading the dough with butter before adding the ham and cheese is the secret to ensuring you don't end up with dry pinwheels. The butter is like the secret sauce, trust me!
To make the dough:
- Warm the milk to around 37C (99F). Add the warm milk, water and sugar to the bowl of your stand mixer and mix until the sugar has thoroughly dissolved.
- Now add your sourdough starter, salt and flour and use your stand mixer to knead into a rough dough. This shouldn't take too long (around 2 to 3 minutes). Leave the dough to rest in the stand mixer bowl for around 30 minutes to one hour.
- Add the butter and knead into the dough until the dough is smooth and fairly elastic. You may need to increase the speed of your stand mixer to allow the butter to be incorporated (see notes below for tips on adding butter and or kneading by hand).
- Transfer to the dough to a bowl and allow to bulk ferment. You want the dough to rise a little (around 30%) and feel soft to the touch. This needs to happen at room temp - not in the fridge. The time it takes will depend on the strength of your sourdough starter and the temperature of your kitchen.
- Once the dough has finished rising, you will need to fill and shape ham and cheese pinwheels.
Rolling and Filling the Dough
- Turn the dough out on to the counter. It shouldn't be sticky and be easy the handle.
- Gently roll the dough out into a rectangle. 60cm x 30cm is a good size to aim for. It doesn't have to be perfect, but the bigger you an get it, to more perfect swirls you will get.
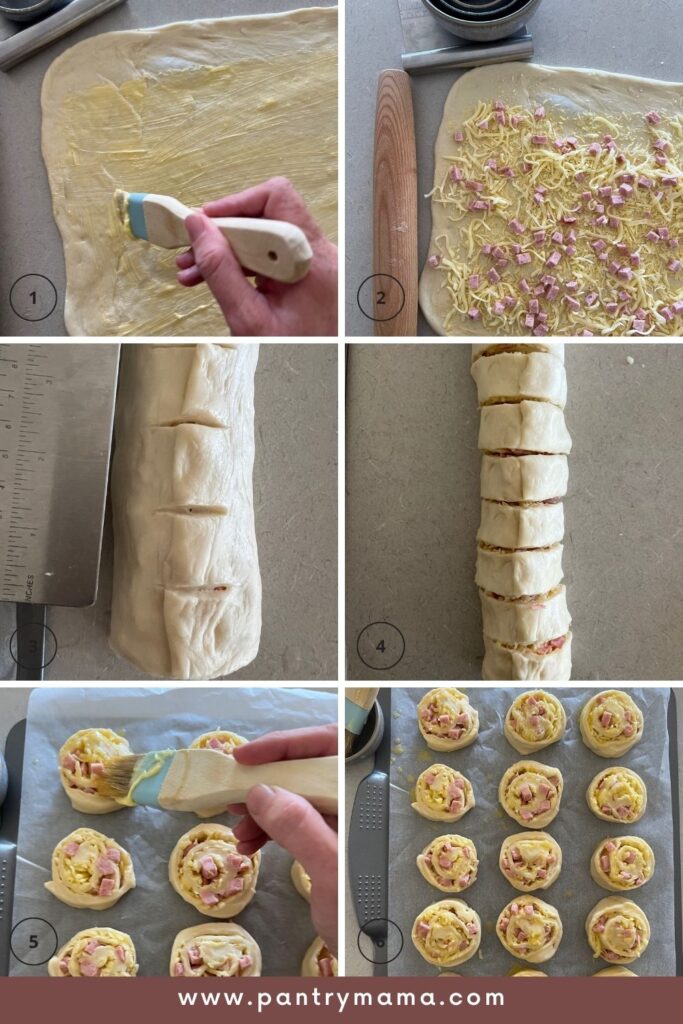
- Brush the butter over the rectangle of dough, leaving a 10cm gap on one of the long edges. You need to leave a gap so that dough will stick to itself when you roll it.
- Now sprinkle over the mozzarella, parmesan and diced ham so that it covers the area of dough spread with the butter.
- Once the filling is spread, roll the dough into a log, starting on the opposite long edge to the gap you've left.
- Roll the dough into a tight log, using the unfilled dough to seal the log. You can spray a little water on the part where the dough joins if you want to - but the dough should stick to itself without it.Lay the log out with the seam underneath.
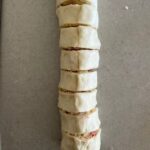
- Cut the log into approximately 12 pieces (you can measure and divide by 12 if you want them to look even - or just go freehand if you're not too fussed). Using dental floss to cut them will help you keep their shape and give the pinwheels a flat surface.
- Place the pinwheels onto a baking sheet lined with parchment paper. You can also make these in a cast iron skillet if you prefer, but they will join together.

Second Rise (Proofing)
- Cover the baking tray with a plastic bag or tea towel and allow the pinwheels to get puffy. The dough is enriched, so it will take a little longer than normal (especially since we are dealing with sourdough).
- Once the dough is puffy, you can bake them straight away - or see baking timeline below to extend the second rise and hold them in the fridge overnight.
Baking Sourdough Pinwheels
- Once the rolls are puffy, it's time to bake them. Preheat your oven to 180C/356F.
- Before the sourdough pinwheels are placed into the oven, you need to brush them with melted butter.
- Bake rolls for 20 minutes at 180C/356F (or until golden brown).
- Once they've finished baking, remove from the baking sheet and place them on a wire rack to cool.
Best Tips for Making Sourdough Pinwheels
Here are my best tips for making sure you get successful sourdough pinwheels every time!
- Try to close up the edge when you roll the pinwheels. If you can close the seal with a little water or even by pinching it, it will ensure that the ends of your pinwheels don't pop open when they're cooking.
- Use dental floss to cut the pinwheels into rounds. You'll get a flatter surface and you won't squash them by using a knife.
- Give the pinwheels plenty of time to puff up on the second rise. If you don't allow them to get light and puffy they will be dense when you cook them. You want them to be fluffy and light inside with a nice golden, cheesy outer.
Bakers Timeline for Sourdough Pinwheels
These sourdough pinwheels can be made really easily around a busy schedule. You can use cold ferment to hold them and bake them the next day.
If you're really pushed for time, I would advise you to look at the notes I've made on using discard and yeast.
But, this is the timeline I use to get these ready to take on a picnic or for morning tea.
| Time | Process |
| 8.00am | Mix and knead dough for sourdough pinwheels. |
| 9.00am | Cover dough and allow to bulk ferment. |
| 5.30pm | Roll out dough, spread filling and roll. Cut into individual rolls and place onto baking tray. |
| 6.00pm | Allow pinwheels to sit for around an hour before covering in plastic wrap and placing into fridge for the night. |
| 6.30am | Take pinwheels out of the fridge and allow them to come to room temperature. |
| 8.00am | Bake sourdough pinwheels for 20 minutes. |
| 8.30am | Allow rolls to cool on a wire rack. |
| 9.00am | Enjoy! |
Sourdough Discard Pinwheels
If you would prefer to use sourdough discard in these pinwheels, you will need to swap the active starter for the same amount of discard. You'll also need to add 7g of commercial yeast.
The yeast is added with the sugar to the milk at the beginning. Add the discard at the same time as you would the sourdough starter.
You'll also need to adjust the rising times to accomodate for yeast - so it will be much quicker to rise (unless your home is really cold).
I've added further notes on this in the recipe notes at the bottom of the recipe card.
Other Filling Ideas
I've used ham and cheese to fill these sourdough pinwheels, but there's no end to the filling options you could choose.
I generally keep the meat and cheese weights the same - so 250g of any cheese and 150g of any deli meats. For other things you might need to experiment.
Here are a few ideas!
- Spread the dough with basil or red pesto (instead of the butter) and then sprinkle on a mix of cheddar and parmesan cheese.
- Use pepperoni or salami instead of ham.
- Spinach and feta is a great combination.
- Diced jalapeños (I wouldn't go above 50g) and cheddar cheese. You could even spread them with this spicy jalapeño honey butter instead of sprinkling on jalapeños.
- Spread with pizza sauce (instead of the butter) before you add ham and cheese (or pepperoni) for delicious sourdough pizza pinwheels (sourdough pizza scrolls).
Freezing + Storage Instructions
These sourdough pinwheels are best eaten within 24 hours of baking. They will be light and fluffy when taken out of the oven, but as there are no preservatives, they won't stay fresh like store bought items.
You can freeze these easily. Let them cool for one hour after removing from the oven and then place rolls into a zip loc bag or plastic container. They will best best if consumed within 8 to 12 weeks of freezing. After this they may change in texture once defrosted.
To defrost, just leave at room temp until soft again. You can also microwave for a short burst to freshen them up if you like.
I put into my kids lunchboxes frozen and they are defrosted and ready to eat by lunchtime.
Frequently Asked Questions
Absolutely you can knead this dough by hand. I choose to use a stand mixer because it makes it quicker and easier (and I'm baking around 3 kids) but you can definitely make this by hand. Follow the instructions as they are, just add the ingredients to a regular bowl and knead by hand. You will need to really work the dough to get it to be smooth and elastic - it should not be sticky!
Yes of course - you could absolutely add sweet fillings to this dough - I've just used savory because that's what my kids prefer.
Yes! Bacon and cheese is a fantastic combo, you could even do bacon, cheese and jalapeño. I use diced bacon and I cook it first, let it cool and then sprinkle the bacon on the cheese.


Sourdough Pinwheels with Ham & Cheese
Equipment
- Stand Mixer
- Rolling Pin
- Cast Iron Pan
Ingredients
Dough
- 80 g Water
- 200 g Milk Warm (37C)
- 50 g Sugar Caster/Fine Sugar (see notes)
- 100 g Sourdough Starter Fed and bubbly (see notes for using discard)
- 500 g Bread Flour
- 10 g Salt
- 50 g Butter Room Temp
For the filling
- 50 g Butter Room Temp
- 200 g Mozarella or Cheddar Cheese - shredded
- 50 g Parmesan Cheese Shredded
- 150 g Ham Diced or Shredded (can also use salami)
For topping
- 50 g Butter melted
Instructions
To make the dough
- Warm the milk to around 37C. Add the warm milk, water and sugar to the bowl of your stand mixer and mix until the sugar has thoroughly dissolved.You can just warm the milk in the microwave before putting into your stand mixer bowl. You just don't want cold milk in your dough as it will take forever to rise!
- Now add your sourdough starter, salt and flour and use your stand mixer to knead into a rough dough. This shouldn't take too long (around 2 to 3 minutes). Leave the dough to rest in the stand mixer bowl for around 30 minutes to one hour.
- Add the butter and knead into the dough until the dough is smooth and fairly elastic. You may need to increase the speed of your stand mixer to allow the butter to be incorporated (see notes below for tips on adding butter and or kneading by hand).
- Transfer to the dough to a bowl and allow to bulk ferment. You want the dough to rise a little (around 30%) and feel soft to the touch. This needs to happen at room temp - not in the fridge. The time it takes will depend on the strength of your sourdough starter and the temperature of your kitchen.
- Once the dough has finished rising, you will need to fill and shape ham and cheese pinwheels.
Rolling and Filling the Dough
- Turn the dough out on to the counter. It shouldn't be sticky and be easy the handle. Do not use flour when rolling out the dough or it will make the pinwheels tough).

- Gently roll the dough out into a rectangle. 60cm x 30cm is a good size to aim for. It doesn't have to be perfect, but the bigger you an get it, to more perfect swirls you will get.

- Brush the butter over the rectangle of dough, leaving a 10cm gap on one of the long edges. You need to leave a gap so that dough will stick to itself when you roll it.

- Now sprinkle over the mozarella, parmesan and diced ham so that it covers the area of dough spread with the butter.

- Once the filling is spread, roll the dough into a log, starting on the opposite long edge to the gap you've left.
- Roll the dough into a tight log, using the unfilled dough to seal the log. You can spray a little water on the part where the dough joins if you want to - but the dough should stick to itself without it.Lay the log out with the seam underneath.
- Cut the log into approximately 12 pieces (you can measure and divide by 12 if you want them to look even - or just go freehand if you're not too fussed). Using dental floss to cut them will help you keep their shape and give the pinwheels a flat surface.

- Place the pinwheels onto a baking sheet lined with parchment paper. You can also make these in a cast iron skillet if you prefer, but they will join together.

Second Rise (Proofing)
- Cover the baking tray with a plastic bag or tea towel and allow the pinwheels to get puffy. The dough is enriched, so it will take a little longer than normal (especially since we are dealing with sourdough).Once the dough is puffy, you can bake them straight away - or see baking timeline above to extend the second rise and hold them in the fridge overnight.
Baking
- Once the rolls are puffy, it's time to bake them. Preheat your oven to 180C/356F.
- Before the sourdough pinwheels are placed into the oven, you need to brush them with melted butter.

- Bake rolls for 20 minutes at 180C/356F.
- Once they're finished baking, remove from the baking sheet and place them on a wire rack to cool.

Notes
Nutrition







I tried this recipe, very tasty. The dough was still sticky when it was time to roll out, I patted and stretched and it worked ok. My only issue was the baking timing, it took 35 minutes at 350 and still not fully brown. And yes, my oven is correct.
I made these today and they were amazing!! I only used gruyere and parmesan as I don't eat meat. I used sourdough discard as I dropped my active sourdough and it crashed in pieces, so discard it was. I wanted to add fresh basil and garlic but I forgot. I will for sure next time. Thank for the recipe and such clear instructions!
These are so so good! I used Kerrygold Irish white cheddar and my husbands homemade bacon inside and it is absolutely heavenly! Can’t wait to try a few different combinations for the filling and freeze a bunch for easy school lunches!
Looking forward to trying this! Would it work with ham slices?
yes it will x
Do you think this would work with fresh milled soft white wheat?
What time are you feeding your starter to be able to bake with it at 8am?
Trying to get into a good routing so that I can bake effectively but mostly I find myself mixing dough before bed and then leaving to bulk ferment overnight, but I suspect that would likely be too long for this recipe? (Currently don't have a normal sized fridge so can't pur them in the fridge overnight once shaping them)
These are flipping amazing. We have a sourdough bakery where I live and he makes sourdough everything including scrolls. These taste just as good!!! I’m so happy I can make my own now and can’t believe I’ve never tried them before. So simple!
Will these work with margarine?
I haven't tried the sourdough pinwheels with margarine, but they should be fine.
How long do they typically need for 2nd proof? I am worried about leaving the meat out for too long
Wondering, how do you think these would turn out with scrambled eggs in them?
Can Boursin be used instead of one of the cheeses or does it replace the butter? Thank-you!
Can you let it bulk ferment longer than the 10-12 hours? Just do it in the fridge?
So the bulk rise and second rise do have a ball park range on how long each will take?
Is the nutrition info provided for the whole batch or just 1 roll?
Just one roll.
So soft and fluffy! This is now my go to scroll recipe for any filling, savory or sweet. Just in case it helps anyone else, I don't wait to mix in the butter, I just chuck it in the warm milk and let it melt a bit and add everything to the dough at once. Much simpler and I find it doesn't affect the dough at all, still soft and fluffy.