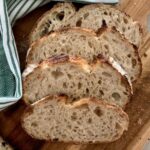
High Altitude Sourdough Bread Recipe
This simple, tasty sourdough bread recipe has been adjusted to accomodate higher altitude elements. It will allow you to bake successful sourdough at higher elevations.
Servings 1 Loaf
Calories 1828kcal
Equipment
- Mixing Bowl
- Digital Scales
- Banneton
- Dutch Oven
Ingredients
- 500 g Bread Flour
- 400 g Water (only add 350 g to start with)
- 25 g Sourdough Starter
- 10 g Salt
Instructions
- Premix & FermentolyseWeigh out your sourdough starter and 350 g of water into a large bowl. Then add your flour and salt and mix whole lot together to form a shaggy dough. Cover your bowl with cling film or a damp tea towel and let it sit for around 30 minutes (up to one hour is ok).Remember to only use 350 g for the first part, you can add more after autolyse has finished if the dough is too dry.
- High Elevation Tip - Increase the Hydration if NecessaryCheck the feel of your dough. If the flour was absorbed all the water and is still dry, add half the extra water and see how it feels. You can add up to 50g extra water if necessary.
- Forming Up The DoughWork your way around the bowl, grabbing the dough from the outside, stretching it up and over itself, into the centre, until a smooth ball is formed. You shouldn't need more than about 20-25 stretches to form the ball. Once the dough has formed into a smooth ball, pop the cling film back on and let it rest for 30 minutes. It's really important to keep the dough covered at high altitude to ensure that you don't lose any moisture.
- Stretch & Fold - Strengthening GlutenOver the next few hours you need to create some structure for your dough by "stretching and folding". Aim to do around 6 sets of stretches and folds. For each set, stretch the dough up and over itself 4 times. Leave around 15 minutes in between each set. Again you do not have to be exact with time, but you need to do at least 6 sets over 2 hours.
- Bulk FermentOnce you've finished your stretch and folds, place the cling film back over your dough and let it rest and ferment (a plastic cover is a better option for this stage).Remember that you need to watch the bulk ferment carefully at high altitude as it will happen faster. You're looking for the dough to double, but this will happen faster than you think.
- Shaping The DoughOnce your dough has finished it's first ferment, it's time to shape it into either a boule or a batard. It's better if you don't use any flour for shaping as this will dry the dough out - and you want to avoid this at high altitudes.Use a silicone dough scraper to gently ease the dough out of the bowl. You want it to land upside down on your counter so that the smooth top of the dough is on the countertop and the sticky underside is facing up. This will make it easier to shape.Place your shaped dough into a banneton or other proofing container. Make sure you place a plastic cover over the banneton to stop the dough from forming a dry skin.
- Cold FermentPlace the shaped dough into the fridge to cold ferment. Try to leave it in the fridge for a minimum 5 hours up to a maximum of around 12 hours. A shorter cold ferment is better in higher altitudes as it has less chance of over proofing.
- Preparing To BakeOnce you're ready to bake your sourdough, you'll need to preheat your oven to 250ºC/480ºF. Place your Dutch Oven into the oven when you turn it on so it gets hot. This oven temperature is higher than I would normally bake sourdough - it has been adjusted for higher altitudes. If you don't want to bake this high, you could reduce to 230ºC (450ºF) and increase the baking time.
- Bake Time!When your oven is at temperature, take your sourdough out of the fridge. Gently place it onto a piece of baking paper. Make sure that you make the baking paper big enough to use the edges as a handle to lower to dough into your Dutch Oven.Gently score your bread with a lame, clean razor blade or knife. Carefully take your dutch oven out of the oven. Place the sourdough into the pot using the baking paper as a handle. Put the lid on and place into the hot oven. BAKE TIME:30 Minutes with the lid on at 250ºC/480ºF plus10-15 Minutes with the lid off at 230ºC/450ºFRemember that longer baking times may be needed at higher altitude, so if your bread does not look or feel done, you can leave it in the oven for up to 15 minutes longer. When you remove your dough from the oven, carefully remove it from the dutch oven as soon as possible and place on a wire rack to cool.
Notes
Please note this recipe is based on my original "Simple Sourdough Recipe" and has been adjusted to acommodate higher altitude elements. You may still have to make further adjustments to suit your unique environment and particular elevation.
Nutrition
Serving: 100g | Calories: 1828kcal | Carbohydrates: 367g | Protein: 61g | Fat: 8g | Saturated Fat: 1g | Polyunsaturated Fat: 4g | Monounsaturated Fat: 1g | Sodium: 3906mg | Potassium: 501mg | Fiber: 12g | Sugar: 2g | Vitamin A: 10IU | Calcium: 89mg | Iron: 5mg
