This post contains affiliate links. Please see our disclosure policy.

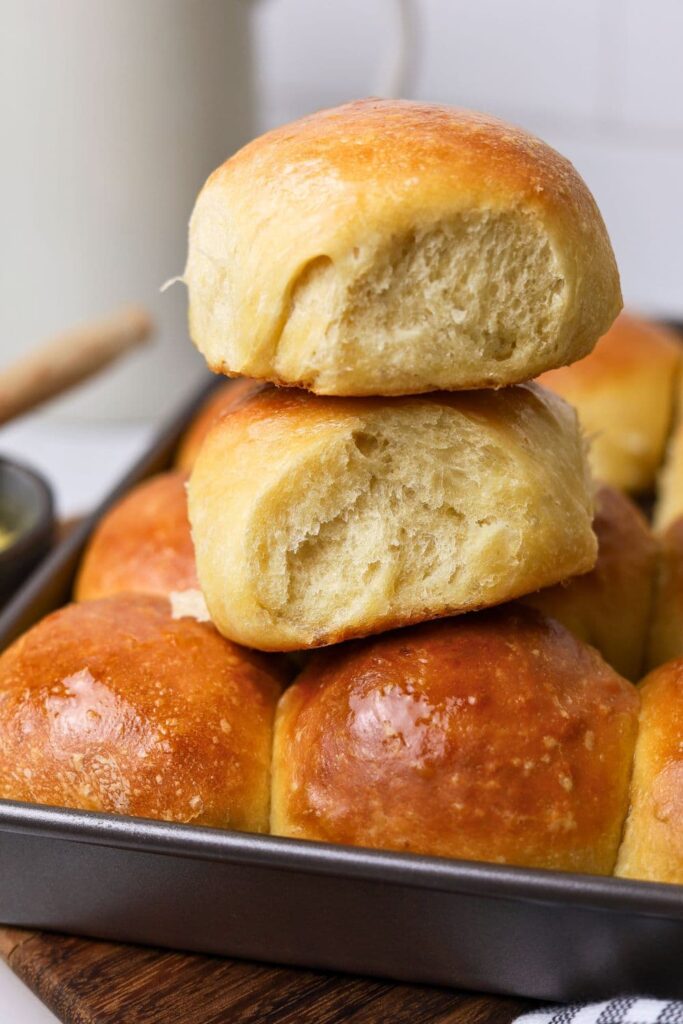
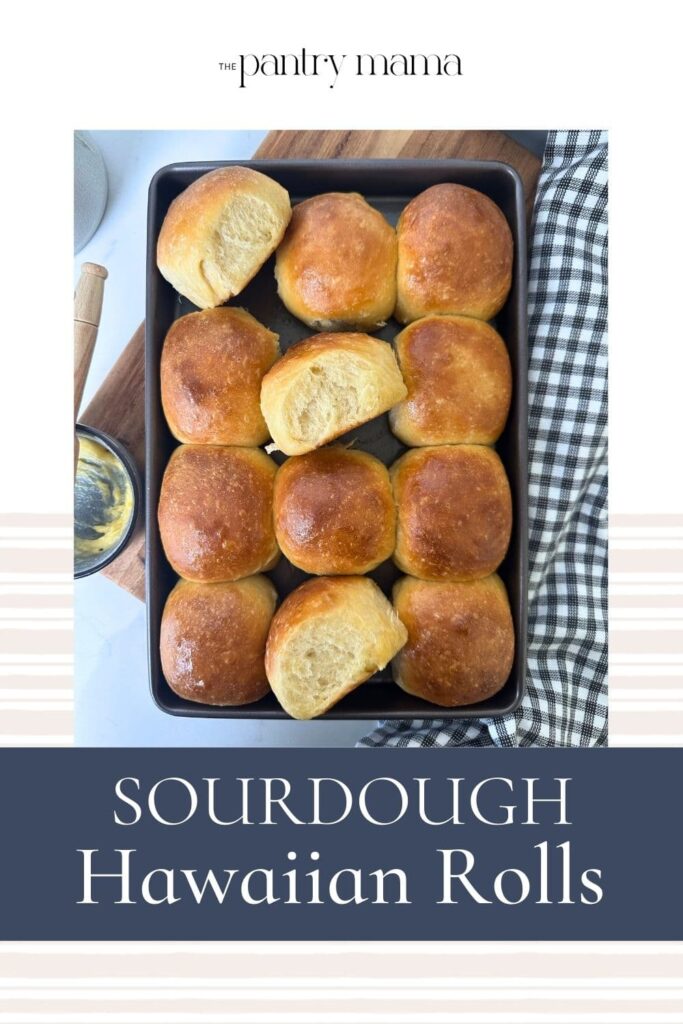
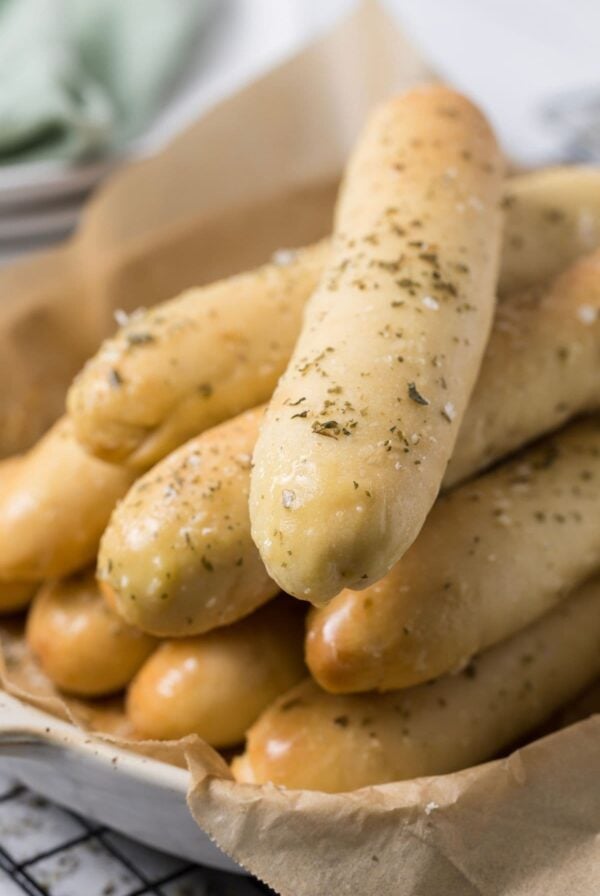
These soft sourdough Hawaiian rolls are enriched with butter, milk and eggs and sweetened with pineapple juice. Golden brown on top with a soft, buttery crumb, there’s something truly special about these sourdough Hawaiian rolls.
Their soft, buttery goodness and delicious pineapple flavor give you something a little different than regular dinner rolls and will have everyone asking for second helpings because of their fantastic flavor!
If you are looking for more sourdough recipes for rolls and buns, then make sure you check out these sourdough hot dog rolls, sourdough brioche rolls and sourdough discard hamburger buns.
Ingredients
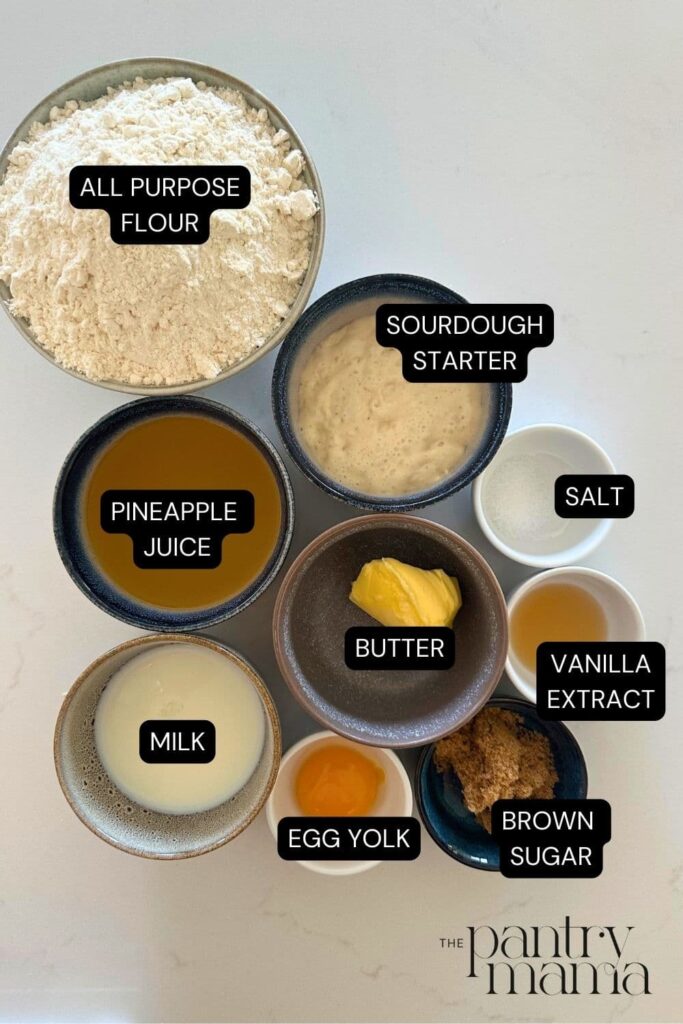
- Milk – I’ve just used whole milk. You could use a non-dairy alternative if you wanted to. The flavor of coconut milk pairs nicely with the pineapple juice in this recipe. Try to warm your milk a little if you can (I like to use milk warmed to 37C).
- Butter – you’ll need to melt the butter here, I’ve used salted, but you can use unsalted if you prefer.
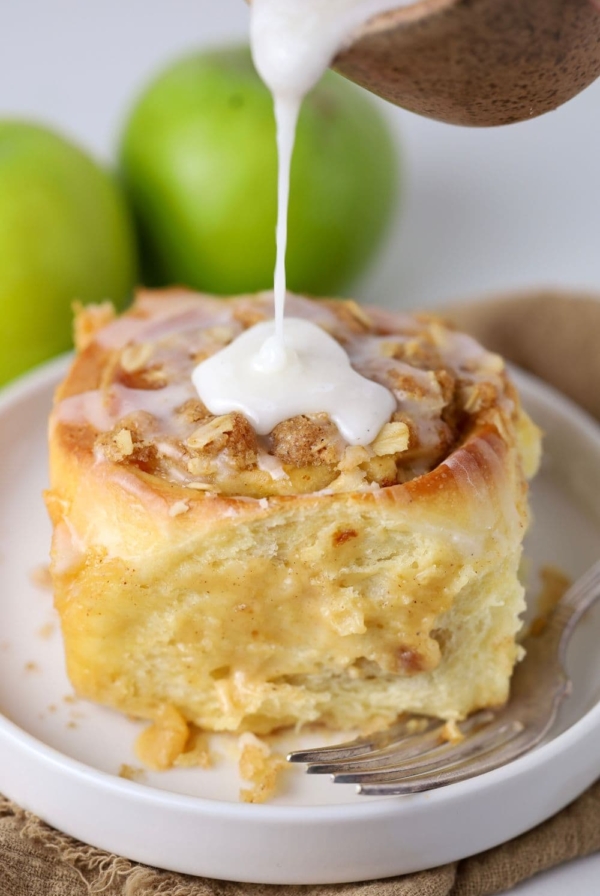
- Pineapple Juice – fresh pineapple juice will give you the best flavor here, but you can use canned pineapple juice if you need to. I’ve tried it with both and prefer it with fresh, but of course there are times when fresh pineapple juice is simply not possible or cost effective. Try to let the juice come to room temperature if you can so that you’re not adding cold juice to the other ingredients as this will hamper your bulk fermentation time quite considerably. If I have canned pineapple juice leftover from making sourdough carrot cake, these rolls are a great way to use it up.
- Brown Sugar – for some added sweetness.
- All Purpose Flour – You can use bread flour for this recipe, but all purpose is better. You’ll get a softer roll as the protein content is generally lower. They will still be soft if you use bread flour, but will have a slight chew to the bite.
- Egg Yolk – the egg yolk adds richness in texture and color to the sweet sourdough Hawaiian rolls.
- Vanilla Extract – this is optional, but it brings added sweetness and depth of flavor to the rolls.
- Sourdough Starter – I’ve developed this recipe with active sourdough starter (and have provided a baker’s timeline further down). If you’d like to use sourdough discard, you’ll find notes for this in the recipe card.
- Salt – like all sourdough bread recipes, a little salt is necessary for flavor and to strengthen the gluten and temper the yeast.
How To Make Sweet Sourdough Hawaiian Bread Rolls
While these sourdough Hawaiian sweet rolls do have quite a few ingredients in comparison to soft sourdough dinner rolls, the process is very easy and most of the time you’ll spend making them will be waiting for them to rise!
I choose to make these in a stand mixer because it makes them quick and easy to throw together. You can knead the enriched dough by hand – you will need to knead it until it’s soft and silky and still slightly tacky. It’s very easy to work with so you shouldn’t have any trouble.
Kate’s Recipe Tip
- When kneading the dough by hand, do not add extra flour, just keep kneading until it comes together. Extra flour will alter the texture of the cooked rolls, making them too dry.
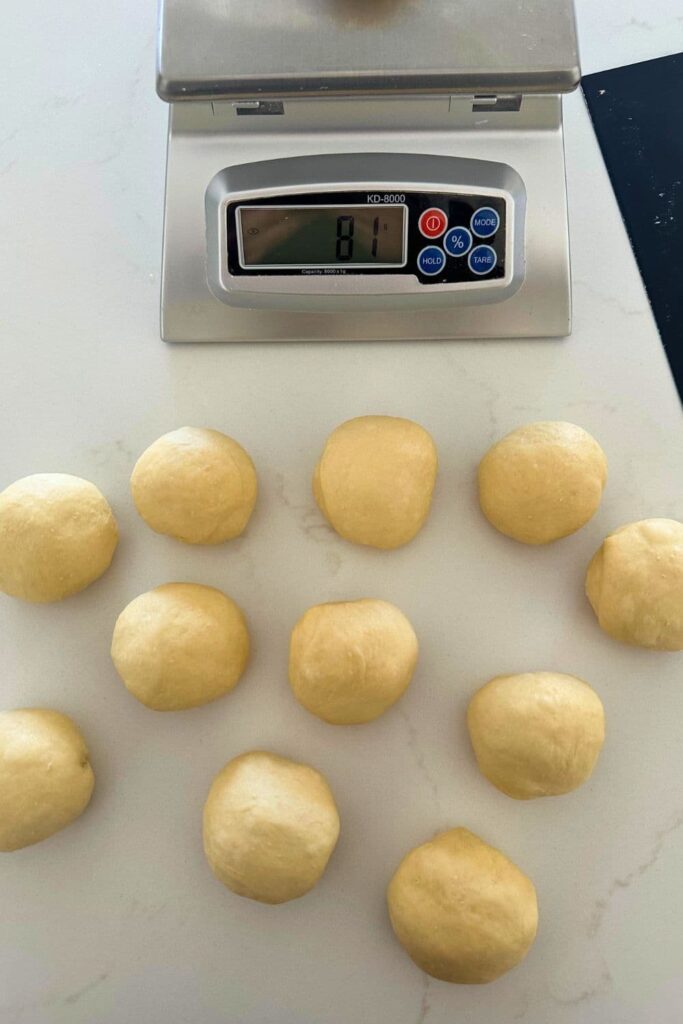
You can choose to make these sourdough Hawaiian rolls whatever size you’d like. I find that this recipe makes around 12 rolls at 80g. (I use a scale to ensure they are all the same size but you don’t have to). The tin I use fits 9 rolls at 110g each.
The easiest way to make them consistent is to weigh your dough at the end of bulk ferment. Divide the weight of your dough by the number of rolls you’d like to make.
Then weigh each dough ball as you shape it – adding or removing dough as necessary so they all weigh the same.
Ideally you want them to be within a few grams of each other for consistency. Making your rolls all the same size will ensure they cook evenly in the oven.
Here’s the basic process for making Sourdough Hawaiian Rolls:
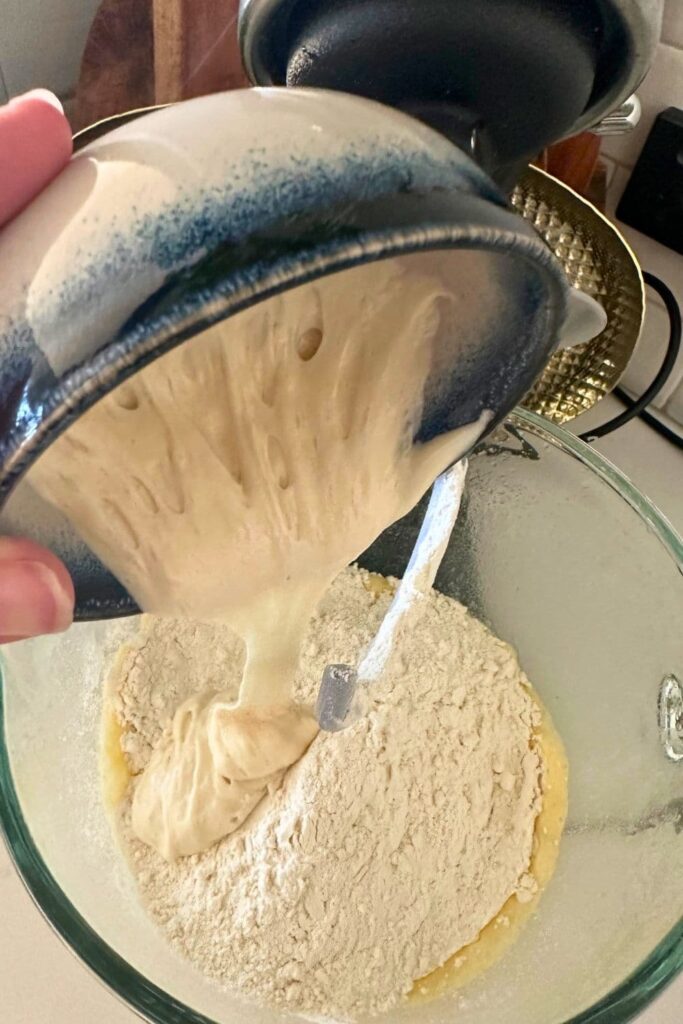
Add the milk, butter, pineapple juice, sugar, salt, egg and vanilla to the bowl of a stand mixer, mixing it through gently (the whisk attachment is best here).

Now add your flour and sourdough starter to the liquid in the bowl. Mix the flour and sourdough starter through the liquid so it just comes together (it’s best to swap over to the dough hook attachment here).
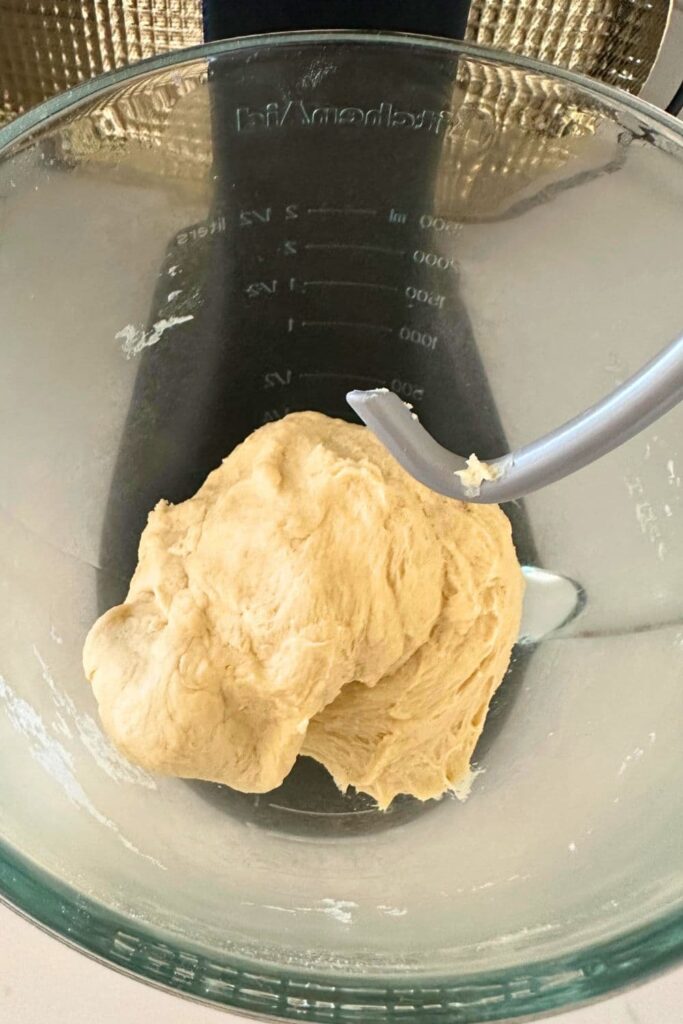
Knead the dough using your stand mixer until it forms a silky, slightly tacky dough. It shouldn’t stick to the sides of the bowl at all.
Once the dough is sufficiently kneaded you need to let it ferment at room temperature (this is the first rise). I like to cover with a plastic food cover and leave it on the counter to rise. You want it to rise around 30%.
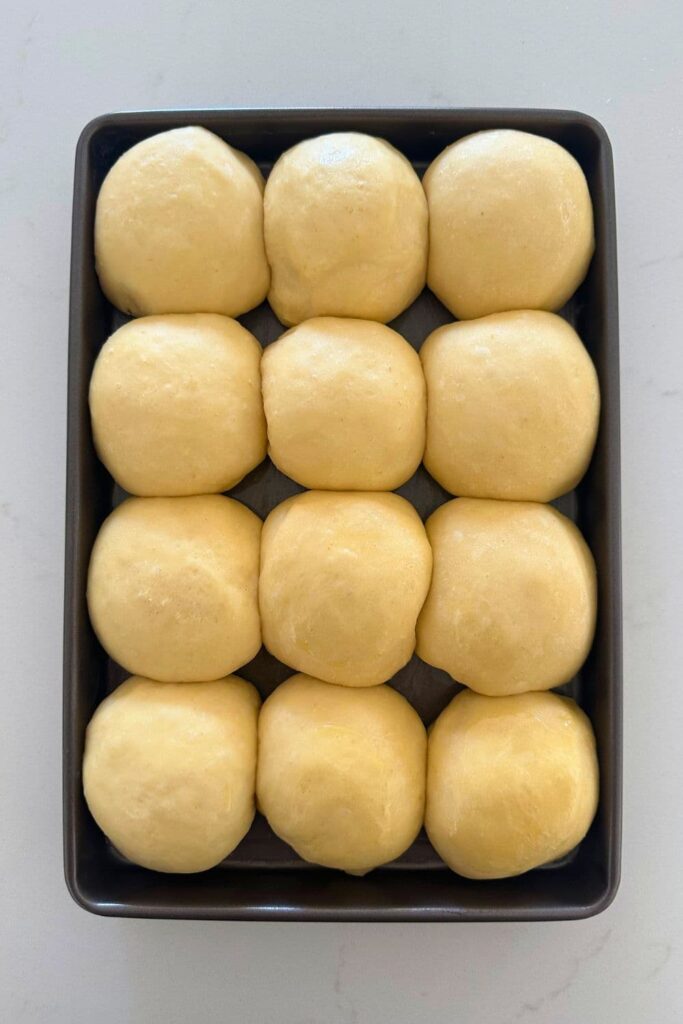
Once your dough has finished bulk fermentation you need to divide the dough and shape into equal pieces.
Arrange the dough balls into a parchment lined tin or an oiled baking dish. They need to be just touching each other in the tin.
Cover the tin with a dish towel and allow the rolls to double in size (this is the second rise). You want the sourdough Hawaiian rolls to be nice and puffy before you bake them, or else you’ll have dense, gummy rolls when you bake them.
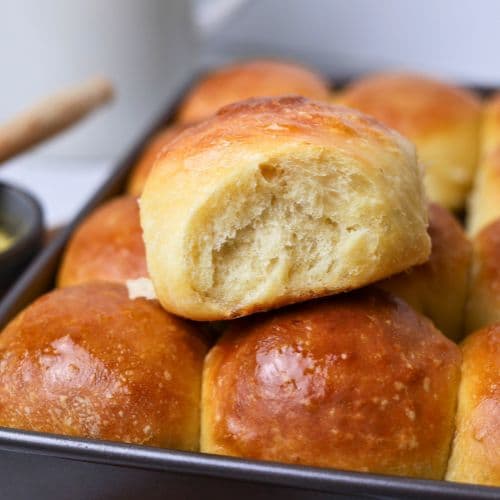
Once the rolls have doubled, brush the tops of the rolls generously with butter and bake them. You could egg wash the rolls before baking if you prefer, but I think butter gives them a better flavor post bake.
Take them out of the oven and brush immediately with melted butter and honey (this is completely optional but gives your rolls a lovely sheen and added sweetness).
Once cooked, place your rolls onto a cooling rack to cool slightly before tearing apart and enjoying them!
Baking Timeline for Sourdough Hawaiian Rolls
This recipe has 100g of sourdough starter – you can reduce the amount of starter if you wish to ferment the rolls overnight.
I would not however recommend increasing the amount of starter as it will make the dough too sticky. It’s perfectly safe to ferment them overnight with milk, egg and butter in the dough. Remember that the rise times given here are only an example and you will need to adjust them to suit the temperature of your home.
You can read more about creating a baking timeline to suit you here.
Here’s a sample timeline to help you manage your bake. Remember though, that this is just a sample and the times listed are just a guide. You’ll need to adjust this based on your sourdough starter and the temperature of your kitchen.
| TIME | PROCESS |
|---|---|
| 8:00 PM | Feed your sourdough starter before you go to bed so it’s ready for you to use when you get up. |
| 7:00 AM | Mix and knead the dough. |
| 8 AM | Bulk ferment the dough at room temperature (remember you’ll need to read your dough here – this timeline is just a guide). |
| 2 PM | Shape the rolls and allow them to proof for a few hours before you bake them – remember you want them to be light and puffy. |
| 5 PM | Preheat your oven. |
| 5:30 PM | Bake the rolls for 30 minutes, smothering them in honey butter when you remove them from the oven. |
| 6 PM | Allow rolls to cool for around 30 minutes. |
| 6:30 PM | Enjoy! |
Baking Pans & Tins
Over the years, I’ve tested this sourdough Hawaiian rolls recipe in many different pans and dishes. These are my recommendations for getting the most out of your dough:
- 9 rolls – you can bake 9 rolls by dividing the dough into 9 pieces at 110g each. I usually bake these in a baking or casserole dish measuring 10″ x 10″ (this is the size of the baking dish I developed the original recipe for these in).
- 12 rolls – you can bake 12 rolls by dividing the dough into 12 pieces at 80g each. I use a baking pan that measures 8″ x 12″. I’ve recently updated the photos in this post and these are the photos you can see using this baking pan.
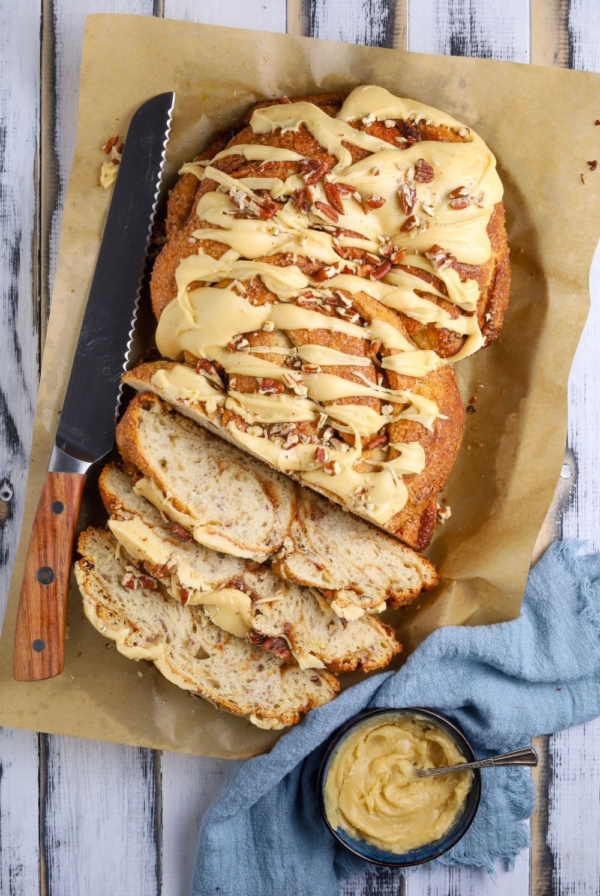
- Sandwich Loaf – the dough for these sourodugh Hawaiian rolls will fit into a sandwich loaf pan measuring 5″ x 10″ x 3″ (1.5 pound USA pan). This makes a lovely sweet flavor Hawaiian bread recipe.

Serving Ideas for Sweet Sourdough Hawaiian Rolls
These sweet sourdough rolls are perfect just on their own – seriously try not to eat them all at once! But just in case you need some inspiration, these are some of the ways that we use them in our home:
- Hawaiian Roll Sliders – Cut them in half and add good quality ham and cheese. Place all the buns back into the tin and brush with butter and french onion seasoning. Grill until bubbling and golden. Grilled cheese just got taken to a whole new level!
- Pulled Pork Hawaiian Rolls – They are delicious filled with pulled pork, bbq sauce and coleslaw (this is my family’s favorite way to enjoy them).
- Sweet Treat – For a sweet treat, serve these rolls with a dish of whipped honey cinnamon butter. You could even brush them with this butter after they’re baked.
- Spicy Treat – For a spicy treat, serve these rolls with a dish of whipped jalapeño honey butter – it’s a match made in heaven!
- Bread Pudding – Cut them up and use in a sourdough bread pudding.
When serving them at the table, I like to place a linen cloth or tea towel into a basket, pop the buns in it and then cover them with the cloth to keep them warm.
You could even place a wheat pack that’s been heated in the microwave in the bottom of the basket before placing the cloth on top. This will keep the buns soft and warm.

Freezing & Reheating
These sourdough Hawaiian rolls can be frozen. I advise freezing once they are cooked and cooled thoroughly. If freezing, do not pull the rolls apart, leave them in one whole piece. Place into a ziploc bag, seal tightly and freeze.
When they are defrosted, wrap them in aluminium foil and place into a warm oven until they’re warmed through. You can brush with melted butter and honey just before you serve if you want to. Once warm, pull them apart.
Frequently Asked Questions
Once you’ve shaped the Sourdough Hawaiian Rolls and placed them into their baking tray, you’ll need to leave them to complete the second rise (also known as proofing). The rolls will be proofed when they are puffy and rounded. If you poke them, the dough will spring back slowly, leaving a slight indent. If it springs back too quickly, they need a bit more time to rise.
Yes you can make sourdough discard Hawaiian rolls by swapping out the sourdough starter for sourdough discard and adding 7g of instant yeast along with it. This will change the timeline though so you will need to change the rising times to suit using discard and active yeast.
I don’t recommend using whole wheat flour in this recipe, as I have developed it using all purpose flour and whole wheat flour will absorb more liquid. If you’re looking for rolls using whole wheat flour then I recommend these sourdough whole wheat dinner rolls.
Sourdough Hawaiian Rolls
Equipment
- Stand Mixer
- Digital Scale
- Baking Tray
Ingredients
- 80 g Milk, (whole)
- 40 g Butter, (melted)
- 200 g Pineapple Juice, (fresh or canned)
- 20 g Brown Sugar
- 530 g All Purpose Flour
- 1 Egg Yolk
- 5 g Vanilla Extract
- 100 g Sourdough Starter, (fed and bubbly)
- 10 g Salt
Topping (optional)
- 20 g Butter
- 20 g Honey
Instructions
- Add the milk, butter, pineapple juice, sugar, salt, egg and vanilla to the bowl of your stand mixer. Mix the ingredients together so that the sugar and salt are dissolved and everything is mixed through. It won't take long, like 30 seconds – you just don't want gritty sugar and salt through your dough.
- Now add your flour and sourdough starter to the liquid in the bowl. Mix the flour and sourdough starter through the liquid so it just comes together.
- Depending on the type of mixer you're using, you may need to add your dough hook on for the next step. You want to knead the dough using your stand mixer until it forms a silky, slightly tacky dough. The dough is enriched with butter, milk and egg so will be glossy. It will generally come away from the sides of the bowl when it's done. It can take anywhere from 3 to 8 minutes depending on the type of stand mixer you're using.
- Bulk Ferment:Once the dough is sufficiently kneaded you need to let it ferment and rise. You can leave it in your stand mixer bowl for this (saves washing up) or you can transfer it to another bowl if you like. Cover the bowl with plastic or a damp tea towel and let it bulk ferment. As always, the time it takes will depend on your starter and the temperature in your home. You want it to come to just under double. (see notes)
- Shaping Your Rolls:Once your dough has risen you need to shape it into the rolls. This recipe will give you 12 rolls around 80g in weight. In the picture I've done 9 rolls at 110g each.To shape the dough, tip it onto your counter (you won't need flour as it won't be a sticky dough). Using a metal dough scraper, cut the dough into 12 pieces. I like to use a scale to ensure that all the pieces are exactly the same. Gently shape each piece of dough into a round ball. Arrange the dough balls into a parchment lined tin or an oiled baking dish. They need to be just touching each other in the tin.
- Second Rise:Cover the tin with a tea towel and allow the rolls to double in size. They will look puffy and squished – this is good! It will generally take around 2 hours for them to double – but of course will take longer if your house is cold.
- Baking The Rolls:Once the rolls have doubled, brush generously with butter.Place the rolls into a cold oven set to 180C (350F) and bake for around 30 minutes. You'll know they're done when they are golden on top. Because these rolls contain milk and sugar, they are prone to burning on top so just keep an eye on them. (see notes)
- Take them out of the oven and brush immediately with melted butter and honey (this is completely optional but gives your rolls a lovely sheen).Once cooked, place your rolls onto a cooling rack to cool slightly before tearing apart and enjoying them!
Notes
Nutrition
Nutrition information is automatically calculated, so should only be used as an approximation.
Like this? Rate and comment below!


So yummy! “Mommy, can you make these again!?” – You know it’s a winner when you get comments like that from the kids. Thank you for doing the leg work for this recipe. I made a few changes but otherwise stuck to your method and the results were amazing (used a whole egg, halved the sugar, no vanilla, high grade flour, more milk b/c I didn’t have enough pineapple juice). I made the dough by hand (a few stretch and folds) before an overnight bulk fermentation to bake off the next day for dinner. Will definitely make again!
Is your 12 hr fermentation time for overnight? I can’t make that math work on a double rise. Thinking 4-6 total.
Tried this recipe… so good! Light n fluffy. Thank you pantry mama
Tried these once and put them in the fridge after forming into rolls. Took them out next morning to warm and rise. They did not get puffy and were flat after baking. Not sure if house/refrigerator were too cold. Is it ok to cold ferment these or other enriched breads? I loved the flavor just wanted to prep the day before and bake to have warm for dinner the next day. Thanks Carol
I was persuaded to make this recipe to the T instead of freestyling bc the first comment really sounded sincere and I wanted that response from my babies. And they loved it! We had hubby’s smoked pork. Recipe worked perfectly even though I only had white bread flour. Also, I used unfed discard and left it for 4 hours to bulk ferment and 3 hours second proof and they rose beautifully in the oven. So I’m really excited to try this with super active starter and a softer flour and add to my rotation. Thank you so much!
Hi! So I am new to sourdough and have a newly established sourdough starter! Buy new I mean at least a couple of months old. Sourdough is very tricky I’m learning lol. I have not yet mastered my artisan loaves yet nor have I mastered these dinner rolls! They are not turning golden brown and they are not doubling in size for the second rise. I am going to make another batch tomorrow and make sure that my first rise happens. I’m thinking maybe I did not let my dough have enough time to go double in size? It’s all trial and error but I’m not giving up! Any tips?
This recipe is crazy good!!!, made it for church and it was a hit!, can’t wait to make them again for work to see their faces lol!, thank you!
I made them the day before and covered them and refrigerated them. took them out two hours before baking and they raised beautifully. I loved the fact that had fresh baked buns right before I needed them.
These were delicious! Slightly sweet, with a small sourdough tang. My husband who is not a fan of sourdough couldn’t get enough of these. Have you ever placed these in the fridge after the bill ferment, once they have been shaped, and baking at a later time? I was thinking of making the dough during the day and shaping then in the evening, placing them in fridge to double and baking the following afternoon. I know this is possible with an artisan sourdough loaf but this has many other ingredients. Thanks!
Would I be able to keep the rolls in the refrigerator to bake later? Thinking second rise would work?
yes you can do that. Shape and then refrigerate. But allow them to come to room temperature before baking 🙂 TPM x
These are amazing so delish. I was wondering to make ahead how long would I be able to store in the fridge? Understanding that it needs to come to room temp and double in size prior to baking.
These are amazing! Do you think you could refrigerate after you knead them (for bulk fermentation) then pull it out shape and 2nd rise. It’s about 75 degrees F in my house
What size pan do you use for this? I am going to make this weekend for a party and planning to triple the recipe!!
These will fit in a 9″ x 13″ baking pan with no worries. I’ve also baked them in a 10″ x 10″ square pan.
So excited to try these. If I want to make them the day before Thanksgiving – would I shape them and let them rise and then put in the refrigerator or do I weight/shape, and then put them in the fridge. Pulling them out and letting them double first before cooking?
I’d shape them and then put in the fridge, taking them out and let them get nice and puffy before you bake them 🙂
These are our favorite! I have made them lots of times!!
Do you think I could freeze these? I’m thinking about doing the overnight ferment and then shaping and freezing in a muffin tin? So they don’t stick together… then pulling out early enough that they come to room temp before baking. Have you ever tried this?
I haven’t made these yet but I’m wondering if there is a way to use some commercial yeast so the rise will be quicker and they can be baked the se day.
Hi Pantry Mama, I enjoy reading all of your tips and ideas. Is it possible to have the recipes indicated with the TM information for kneading and mixing please. That is why I love your site is for the fact that you use some of your recipes using your Thermomix.
example: TM (30 sec./sp 4 or 3 min/knead)
Thanks again!!!
Can I use orange juice instead of pineapple juice for making these rolls? Thank you!💜
You state you can use less stater for an over night ferment. How much less and do you increase anything else because of this?
Yesterday I made your Soft Sourdough Dinner Roll for bbq chicken sandwiches. Everyone loved them! They are so soft! (I did use all milk because I needed to use it up before it went sour). I’m not sure how the chemistry works with pineapple juice, but do you think that recipe would work if I substituted pineapple juice for the water in that recipe? I was super happy with my results just wanting to see how it would taste with pineapple juice (this recipe looks awesome but if I can achieve similar taste with no eggs, that would be awesome).
If you’re looking to use pineapple juice, I’d recomend this recipe for sourdough Hawaiian Rolls 🙂 So glad you loved the dinner rolls recipe 🙂 xo
Can recipe be made with discard and active dry yeast to make it quicker?
Yes you can use sourdough discard and active dry yeast if you prefer, you can find notes for how to do this in the recipe card.
Have you tried freezing the rolls before? And if so, was it easy enough to thaw and warm up afterwards?
Yes! It works great. To freeze, don’t pull the rolls apart, leave them in one whole piece. Place into a ziploc bag, seal tightly and freeze. When they are defrosted, wrap them in aluminum foil and place into a warm oven until they’re warmed through.
Loved these!! Is there a way to keep them soft though once they are cooled or a way to get them soft again when eating them the next day?
When you put the rolls on the cooling rack are they supposed to be in the pan?
I take them out of the pan when I place them on the cooling rack 🙂
Can this be made into a loaf?
Yes you can definitely make these sourdough Hawaiian rolls into a sandwich loaf, I’ve added notes for doing this in the post, but I use a 1.5 pound USA loaf pan for this.
These were so easy and by far the best tasting rolls I have ever made. I do have a question, can this recipe be used to make sandwich bread?
Thank you,
Sylvia
So glad you loved the recipe Syliva. Yes you can definitely make these into a sandwich loaf, I’ve added notes for this in the post, included the size of pan that I would use.
Could I use discard and yeast instead of active starter? And if so, how much? Thanks!
You can use sourdough discard instead of active starter. So you’d use 100g of sourdough discard along with 7g of yeast. There are notes for this in the post as well as the recipe card 🙂
Could I make these ahead of time not bake them and freeze them for thanksgiving?
I would bake them before freezing. You risk over or under proofing if you freeze before baking. But you can definitely freeze them once they are baked. Just warm them up in the oven when you’re ready to eat. They’ll be nice and fresh.
So excited to make these for Thanksgiving! Does the baking time change if baking in an aluminum pan?
You may need a bit more time, but I would start at the time in the recipe and check them. Add a few more minutes at a time as needed.
This recipe is delicious and I’m making it for my holiday party this year. Just wondering how long would you suggest baking if I’m making 24 smaller rolls instead of 12 regular sized ones.
The baking time should be the same. 🙂
Amazing recipe! Easy recipe and delicious rolls. I had to guess what the bakers schedule would be for me. I used the bakers schedule from the skill rolls recipe and it worked well. Definitely recommend making a double batch because you will be shocked how quickly you and your family will devour these!
I’m so glad you loved the recipe! I’ve just added a baker’s schedule to the post as well, so hopefully that helps too 🙂
These look amazing! Can these be baked in a muffin tin or would they burn? Thanks!
I haven’t tried baking them in a muffin tin but they should be ok, just keep an eye on them as they may color more where they are touching the pan 🙂
Do not use fresh squeeze, pineapple juice! Repeat do not use fresh squeeze, pineapple juice! Make sure to use pasteurized, pineapple, juice or the whole recipe is totally ruined… Apparently the fresh pineapple Juice has the bromine enzyme intact, and it totally ruins the gluten structure. Trust me
Thank you so much, Sarah!
Made exactly as posted. After rising, formed into shape put into batard shaped basket. Left in refrigerator. Removed after about 12 hours. Put into loaf pan. Cut slits for expansion. Baked straight from refrigerator for about 50 minutes.
The most gorgeous, high, sandwich loaf. WILL be using this recipe again.
I love this recipe and have made it numerous time! I am wanting to try making a whole boule vs rolls. Have you ever tried?
You can definitely bake this as a loaf – I would use a 1.5 pound USA Loaf Pan to create this 🙂
If I want to let these overnight ferment, I know I need to lower my starter amount but is it best to do this on the first rise or the second rise?
Let them bulk ferment overnight on the first rise 🙂