
If you love all things chocolate and sourdough, you’re going to love how easy and tasty this chocolate chip sourdough bread is! It will make your taste buds sing. I love the combination of the sweet chocolate chips with the tanginess of the sourdough bread … and the smell of this delicious bread when you lift the lid on the Dutch oven is just incredible! It’s less intense than this sourdough chocolate bread.

This post contains affiliate links. Please see our disclosure policy.
Ingredients
- Sourdough Starter – You’ll need a happy, active sourdough starter that’s been fed and at peak.
- Water
- Bread Flour – You can use all purpose flour, however you’ll need to make a few changes. You can read this guide to making sourdough bread with all purpose flour. If you’re using whole wheat flour I wouldn’t substitute more than half of the bread flour for whole wheat. Consider adding some vital wheat gluten to ensure you still get the best oven spring. I don’t recommend adding rye flour to this recipe.
- Salt
- Chocolate Chips – Use your favorite chocolate chips. I’ve used semi-sweet chocolate chips for this loaf. You could even get creative and use a blend of say half chocolate and half caramel chips! If you don’t have chocolate chips, you could grate a chocolate bar or chop it really finely. You don’t want big chunks for this recipe. If you’re using white chocolate chips, you might like to check out this recipe for lemon and white chocolate sourdough bread!
How To Make Chocolate Chip Sourdough Bread
Fermentolyse – Premixing The Dough
Weigh out your sourdough starter and water into a large ceramic or glass bowl. Mix the water and starter together briefly. Then add your flour and salt and mix whole lot together to form a shaggy dough. The dough will be fairly shaggy and only just brought together. Technically, fermentolyse does not involve salt, however I always add salt … let’s call it a fermentolyse with salt!
Cover your bowl with cling film or a damp tea towel and let it sit for around 1 hour. It’s ok if it’s a little bit longer, it’s not going to matter too much.
Forming Up The Dough
After the dough has been through autolyse you need to bring it together into a ball. Work your way around the bowl, grabbing the dough from the outside, stretching it up and over itself, into the centre, until a smooth ball is formed. You shouldn’t need more than about 20-30 stretches to form the ball.
You’ll notice that the dough is fully hydrated after soaking all the water up. It will be fairly sticky but as you bring it into a ball, it will become smoother and shinier.
Once the dough has formed into a smooth ball, pop the cling film back on and let it rest for 30 minutes.
Stretch & Fold – Creating Structure
Over the next few hours you need to create some structure for your dough by “stretching and folding”. Aim to do around 4 sets of stretches and folds. For each set, stretch the dough up and over itself 4 times. Leave around 15 minutes in between each set. Again you do not have to be exact with time, but you need to do 4 sets over 2 hours.
Lamination of Chocolate Chips
Once your dough is nice and elastic, spray your counter with water and pop the dough out of the bowl. Gently stretch the dough out so that it forms a rough sq uare – it doesn’t have to be exact. If you’ve never laminated dough before, check out these detailed instructions.

Sprinkle the chocolate chips evenly over the dough and then roll it up into a log and place back into the bowl for bulk ferment. Try not to let your dough get too warm during the fermentation process once you’ve added the chocolate chips as they will start to melt and make the dough really difficult to shape.
If you don’t want to laminate the chocolate chips, see notes above for how to add them during the stretching and folding stage.

Bulk Fermentation
Once you’ve finished your stretch and folds, place the plastic wrap or damp towel back over your dough and let it rest and bulk ferment at room temperature (a plastic cover is a better option for this stage).
Shaping and Cold Fermentation
Once your dough has finished its bulk ferment, it’s time to shape it into either a boule or a batard. You will need a banneton to put your dough into. If you do not have a banneton, then a bowl or basket lined with a floured tea towel is perfectly fine. Make sure your bowl isn’t too big though, you want your dough to retain some shape.
Liberally dust your banneton with rice flour to stop it sticking. Place the shaped dough into your banneton smooth side down, so your seam is on the top – this way the top of your dough will get the pretty lines from the banneton. Now the dough is in its “shaping container” cover it loosely with a plastic bag or damp tea towel and place into the fridge.
Kate’s Pro Tip
Shaping Tip
When shaping, you may find that some of the chocolate chips pop through the outer skin of your dough. This is ok and the dough will repair itself in the banneton – just make sure you flour it liberally. I find that this happens less when I laminate the chocolate chips as oppose to stretching and folding them.
Preparing To Bake
Once you’re ready to bake your sourdough, you’ll need to preheat your oven to 230ºC/450ºF. Leave your dough in the fridge until the very last minute – placing a cold dough into a hot oven will give you a great “spring”.

Bake Time!
When your oven is at temperature, tip your dough out onto a piece of parchment paper, scoring it with a lame. Place your dough into your hot Dutch oven, baking for 30 minutes with the lid on and 10 to 15 minutes with the lid off.
I don’t recommend adding extra chocolate chips to the top of the dough before baking as they generally burn – even if you’re using a Dutch Oven to bake your sourdough in.
Remove the loaf from the oven once done and let it cool on a wire rack.

Should You Laminate or Stretch and Fold?
In this chocolate chip sourdough bread recipe, I both stretch and fold the dough and laminate it. You can choose to do both, or just add the chocolate chips during stretch and folds. I have added both options in the recipe card so you can choose what you are comfortable with. If you’re new to the process of sourdough lamination, you can use this guide on how to laminate dough.

Flavor Variations
- To take this bread to the next level, sprinkle a little flaky sea salt on the top of the dough before you put it in the oven. I don’t recommend putting the salt in the banneton as it can draw moisture from your dough during cold fermentation.
- If you would like to add some dried fruit to this sourdough loaf, you can reduce the chocolate chips to 100 g and then add 100 g of dried fruit. Raisin, blueberries or cherries are lovely in this bread dough.

If you’re looking for some other chocolate chip sourdough recipes, why not try these amazingly chewy sourdough chocolate chip cookies, sourdough chocolate chunk muffins or even add some chocolate chips to this easy sourdough banana bread.

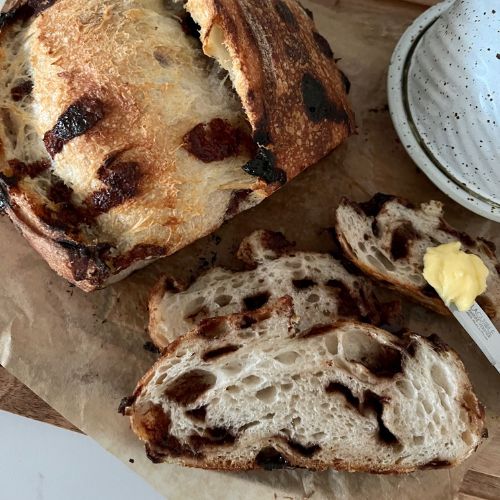
Chocolate Chip Sourdough Bread
Equipment
- Mixing Bowl
- Digital Scales
- Banneton
- Dutch Oven optional
Ingredients
- 50 g Sourdough Starter
- 350 g Water
- 500 g Bread Flour
- 10 g Salt, (increase or decrease according to your taste)
- 200 g Chocolate Chips, (use your favorite ones!)
Instructions
- FermentolyseWeigh out your sourdough starter and water into a large ceramic or glass bowl. Mix the water and starter together briefly. Then add your flour and salt and mix whole lot together to form a shaggy dough. The dough will be fairly shaggy and only just brought together.
- Cover your bowl with cling film or a damp tea towel and let it sit for around 1 hour. It's ok if it's a little bit longer, it's not going to matter too much.
- Forming Up The DoughAfter the dough has been through fermentolyse you need to bring it together into a ball. Work your way around the bowl, grabbing the dough from the outside, stretching it up and over itself, into the centre, until a smooth ball is formed. You shouldn't need more than about 20-30 stretches to form the ball. You'll notice that the dough is fully hydrated after soaking all the water up. It will be fairly sticky but as you bring it into a ball, it will become smoother and shinier.
- Once the dough has formed into a smooth ball, pop the cling film back on and let it rest for 30 minutes.
- Stretch & Fold – Creating StructureOver the next few hours you need to create some structure for your dough by "stretching and folding". Aim to do around 4 sets of stretches and folds. For each set, stretch the dough up and over itself 4 times. Leave around 15 minutes in between each set. Again you do not have to be exact with time, but you need to do 4 sets over 2 hours.If you don't want to laminate the chocolate chips in the step below, see notes for how to add them during stretch and folds.
- Lamination of Chocolate ChipsOnce your dough is nice and elastic, spray your counter with water and pop the dough out of the bowl. Gently stretch the dough out so that it forms a rough square – it doesn't have to be exact. Sprinkle the chocolate chips evenly over the dough and then roll it up into a log and place back into the bowl for bulk ferment.If you don't want to laminate the chocolate chips, see notes for how to add them during the stretching and folding stage.
- Bulk FermentOnce you've finished your stretch and folds, place the cling film or damp tea towel back over your dough and let it rest and ferment (a plastic cover is a better option for this stage).
- Shaping The DoughOnce your dough has finished its bulk ferment, it's time to shape it into either a boule or a batard (see notes for more info).You will need a banneton to put your dough into. If you do not have a banneton, then a bowl or basket lined with a floured tea towel is perfectly fine. Make sure your bowl isn't too big though, you want your dough to retain some shape.
- Placing Dough Into The BannetonLiberally dust your banneton with rice flour to stop it sticking.Place the shaped dough into your banneton smooth side down, so your seam is on the top – this way the top of your dough will get the pretty lines from the banneton. If you are worried about the dough sticking, you can also add a bit of rice flour around the sides of the dough too, just carefully lift the dough gently with your fingers.
- Cold FermentNow the dough is in its "shaping container" cover it loosely with a plastic bag or damp tea towel and place into the fridge. Try to leave it in the fridge for a minimum 5 hours.
- Preparing To BakeOnce you're ready to bake your sourdough, you'll need to preheat your oven to 230ºC/450ºF. Place your Dutch Oven into the oven when you turn it on so it gets HOT. Try to preheat for around 1 hour to ensure your oven is super hot – but you know your oven so just adjust this time if you need to.Leave your dough in the fridge until the very last minute – placing a cold dough into a hot oven will give you a great "spring".
- Bake Time!When your oven is at temperature, take your sourdough out of the fridge. Gently place it onto a piece of baking paper. Make sure that you make the baking paper big enough to use the edges as a handle to lower to dough into your Dutch Oven.Gently score your bread with a lame, clean razor blade or knife. I find a single slash is best for this recipe as the chocolate chips can be tricky to cut through. You can find my full guide on how to score sourdough bread here.Carefully take your dutch oven out of the oven. Place the sourdough into the pot using the baking paper as a handle. Put the lid on and place into the hot oven. If you want to you can spritz your dough with extra water before you put the lid on.BAKE TIME:30 Minutes with the lid on at 230ºC/450ºF plus10-15 Minutes with the lid off at 210ºC/410ºF
- Finishing The BakeWhen you remove your dough from the oven, carefully remove it from the dutch oven as soon as possible and place on a wire rack to cool.
Nutrition
Nutrition information is automatically calculated, so should only be used as an approximation.
Like this? Rate and comment below!









Oh My Lord!
I meant to make this bread as a gift for a dear friend.
Circumstances made it undeliverable.
So it is now with me… or what’s left of it!!
So LOVE !
I added orange zest to the chocolate chips when doing lamenting step.
Yum yum yummy!!!
Loved it! A nice and simple variation to a standard loaf. Agree the laminating works better to get the chips incorporated.
I was thinking I’d make this later this week. Can you tell me, if I fed my starter and it rose then I put it in the fridge but it didn’t fall. Can I use it? Also. The nutrition seems off…says nearly 2000 calories for 100g ?
I don’t understand how there are no comments for this recipe! This is my second time making this loaf and it’s perfection. I go to bed dreaming about this loaf!!
I didn’t see notes on shaping before putting into the bowl.
love this recipe!!! i have used it twice now. second time i used more starter and it seemed to rise more, but my starter is still only a month ish old so it may not be mature enough to fully rise with 50g. this recipe is fool proof if you follow it exactly! huge fan & makes incredible incredible bread!!
Can I use my mixer for this recipe including adding in the chocolate chips therefore no stretch and folds?
Yes you can definitely do this 🙂
I am new to sourdough bread baking and have been looking for a sweet loaf. I made a cinnamon raisin one that i really enjoyed. I have a friend who
wanted a chocolate one. I decided to try this recipe….let me tell you,that it is fabulous!! It’s soft and chewy on the inside and a little crispy outside. I ate 2 full slices the minute is was cooled down. I really could have eaten more,it’s that good!!! Thank you so much! 🥰
So simple and so delicious! I incorporated the the chips during the stretch and folds due to not enough counter space. I used a USA Pan with another type of loaf pan on top to create a loaf pan dutch oven. I used your suggestion of a little flakey salt on top. It’s like a party in my mouth! This bread is going on my gift giving list. Thank you
The bread turned out fine but way too many chocolate chips. I’d do half.
Absolutely delicious, thank you soo much, it turned out fabulous and I even laminated for the first time! I will be making this again and again ❤️❤️
Should the cubed butter be hard straight from the fridge or soft butter let out on the bench Thankyou
This recipe is fabulous! I kneaded with my mixer, proofed, added some chocolate chips with kneading by hand, then proofed again. Best loaf of sourdough I’ve made yet.
Hello! I’m looking forward to making this loaf tomorrow and wondered if I can just divide the dough into three mini loaves after chocolate chip lamination? Or should I divide the dough first and then add chocolate chips to each separately? How much chips? Appreciate your help!!
You can do it either way. I think I would just add the chocolate chips as per normal, let it bulk ferment and then divide at shaping 🙂 That would be the easiest 🙂 And then you don’t have to measure the chocolate chips for each individual loaf 🙂
just tried this recipe, it’s my best loaf so far!! i laminated the dough after bulk fermentation and put the chocolate chips in, then let the dough rest for 30 minutes before shaping and it worked out really well! thank you so much ❤️