This post contains affiliate links. Please see our disclosure policy.

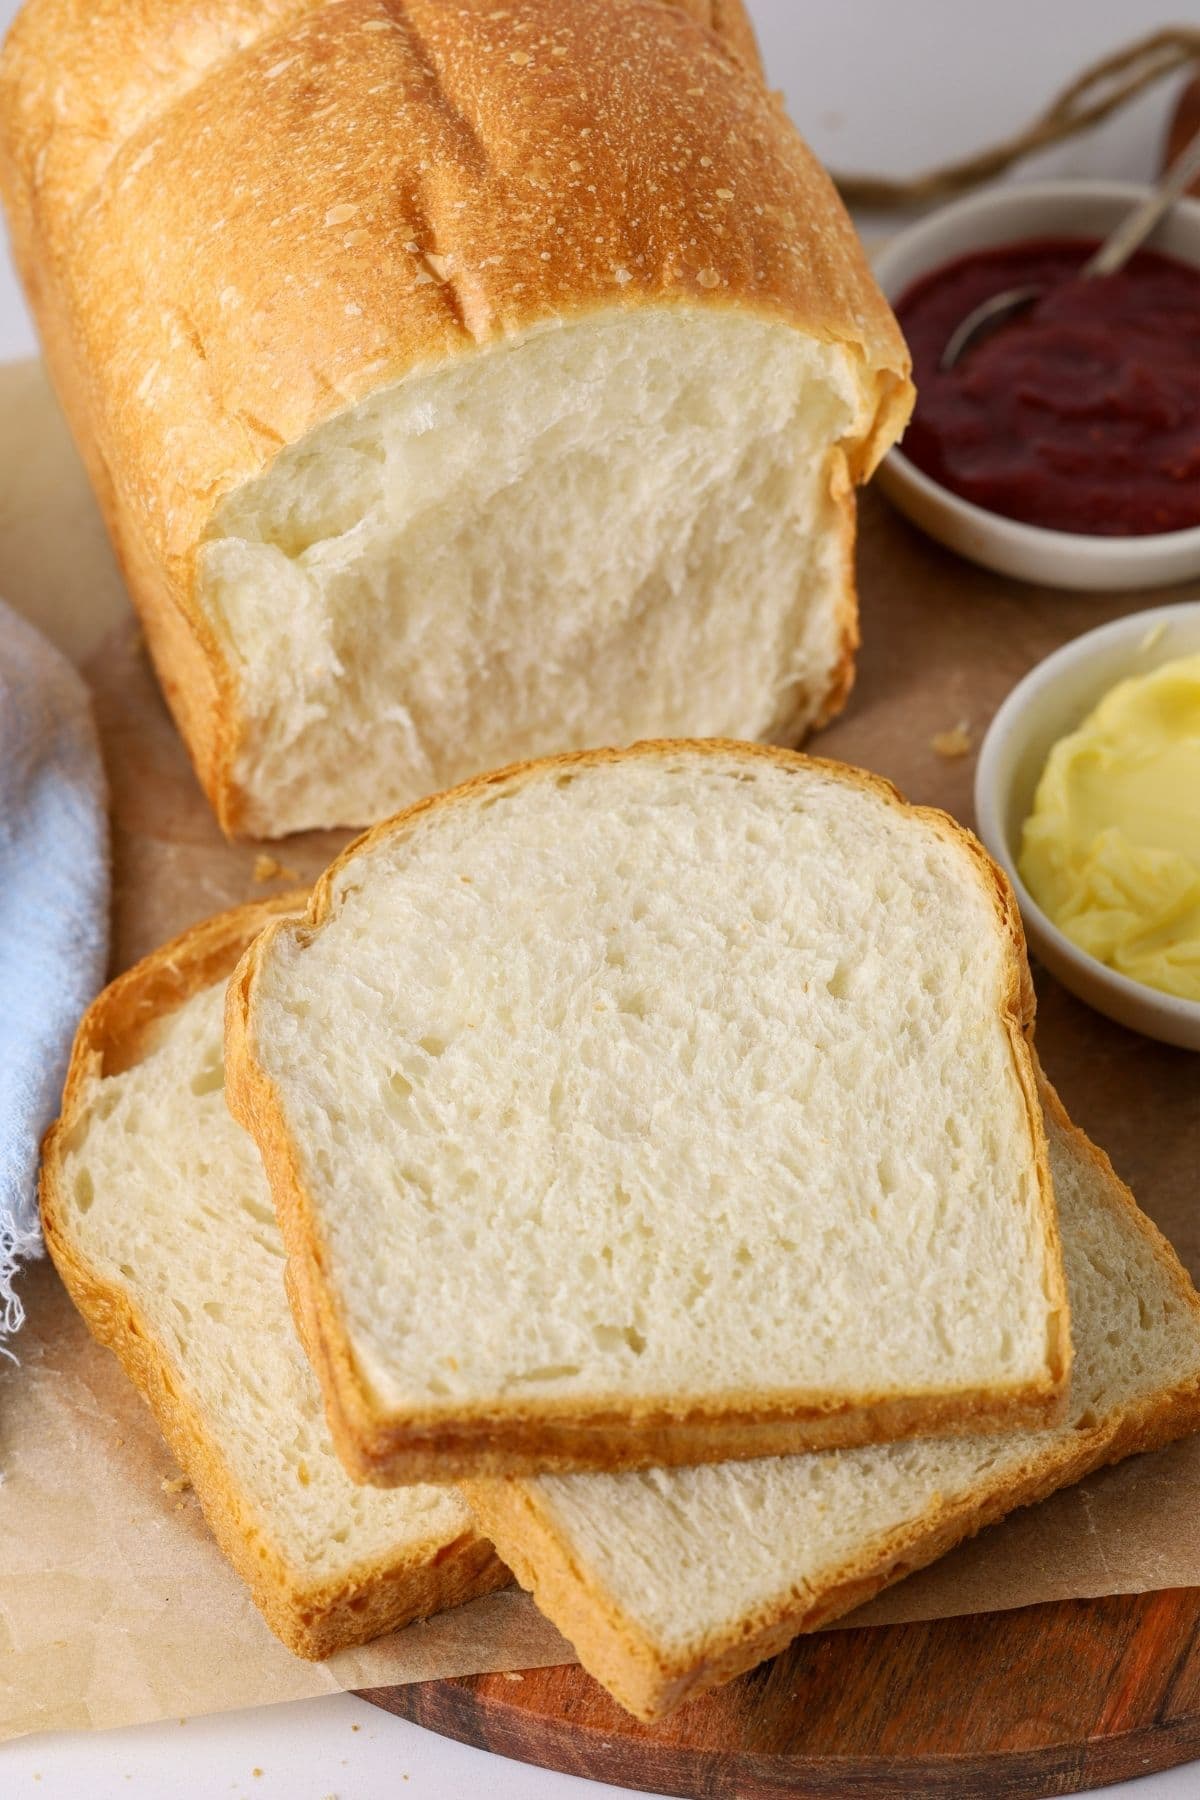
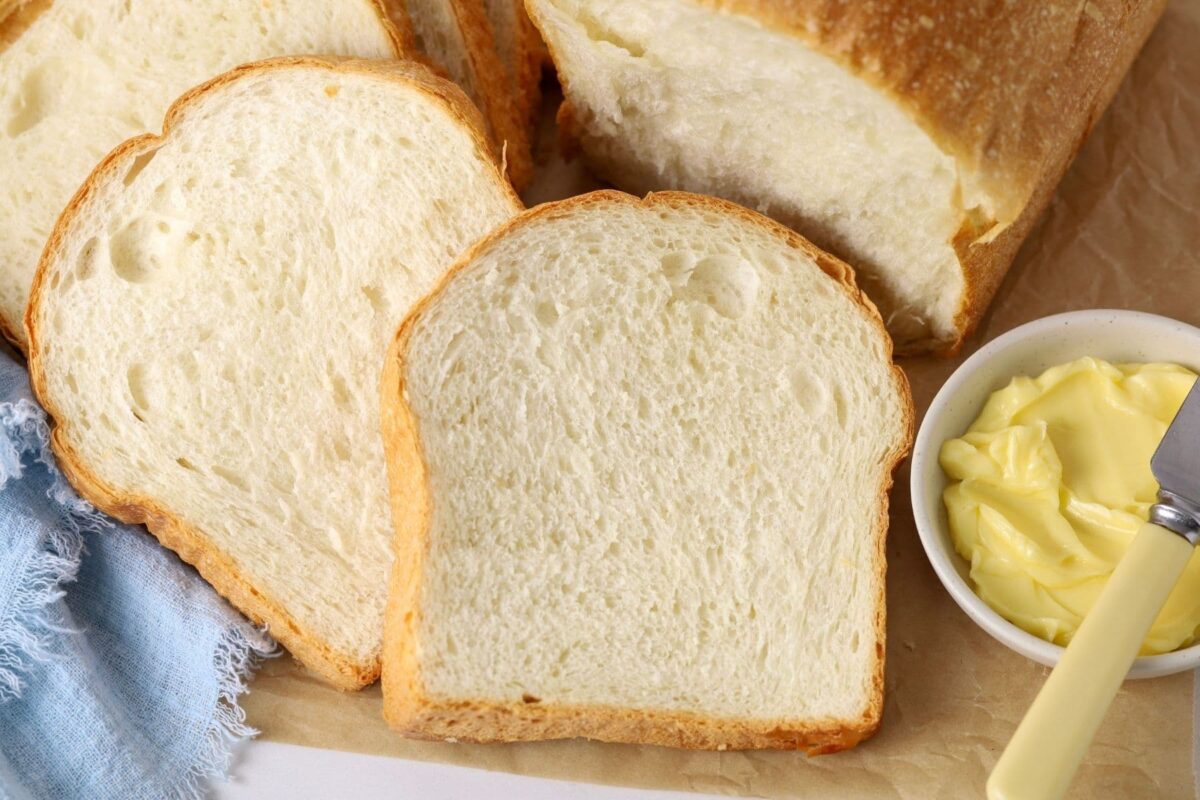
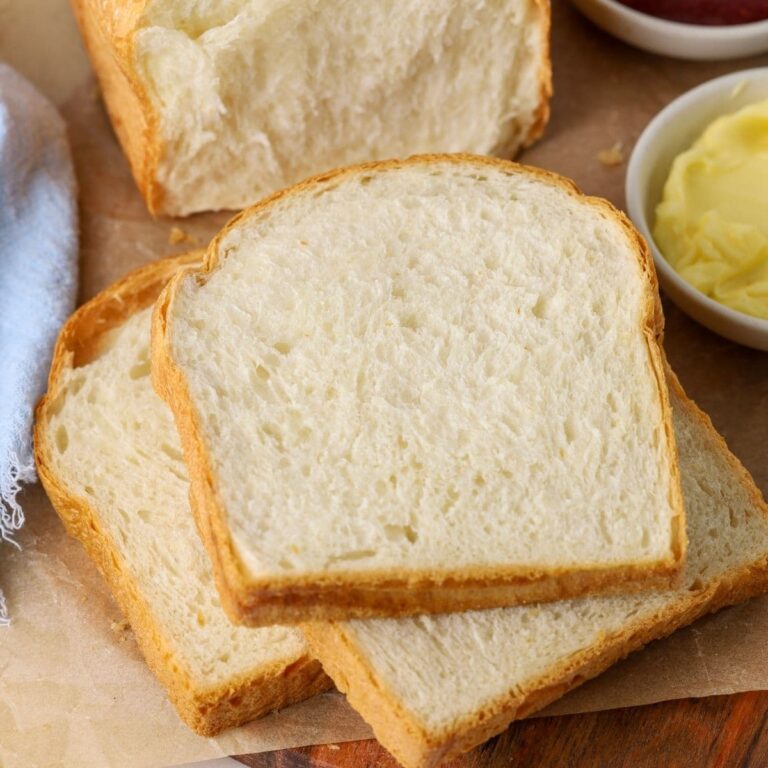
This quick and easy sourdough discard sandwich bread is a great sourdough recipe to have in your repertoire for when you need to use up some discard or you need a loaf of sourdough bread in a hurry. This bread takes around 2 to 3 hours from start to finish, depending on how warm your house is. It utilises 100g of sourdough discard and is perfect with homemade butter! You’ll get a super soft, light and airy crumb with a soft crust that’s easy to eat. It’s egg free and can be made without butter if you prefer.
Why you’ll love this family favorite recipe!

Tested thousands of times – this is one of the first recipes I posted on my site back in 2019 and it has been made by thousands of people in my sourdough community. It has been shared over 130,000 times and has hundreds of 5 star reviews! It’s a well tested recipe that guarantees great results.
It’s so easy! – Pop the ingredients in your stand mixer and let the dough hook attachment do the work for you! If you have a warm place to make the dough rise more quickly, you’ll have this loaf done in around 3 hours or less. There’s not need for fridge time!
Easy to slice, freezes perfectly – Perfect for making a double batch, eat one, freeze one.
Table of Contents
Ingredients
- Sourdough Discard – I developed this recipe using unfed sourdough starter, however, as with all sourdough discard recipes, you can use active starter if you prefer.
- Water – if you want a super fast rise, warm water is best here. It always gives the yeast a boost and gets this loaf on the table much faster!
- Bread Flour (or All Purpose Flour)
- Salt
- Sugar – this adds to the soft texture of the crumb of this loaf. You can substitute the same weight of honey if you prefer.
- Butter – salted butter softened at room temperature. If you don’t want to use butter, you can use swap this out for vegan butter or olive oil.
- Instant Yeast – using a little commercial yeast gives your bread rise since we are using sourdough discard, rather than active sourdough starter. I use instant yeast because unlike active dry yeast, it doesn’t need to be bloomed in water first and can be added straight to the dough.

How To Make Sourdough Discard Sandwich Bread
This loaf comes together really easily, particulary if you use a stand mixer to knead the dough. Combine the sourdough discard, water and flour into the bowl of your stand mixer and mix until it forms a shaggy dough (around 30 seconds will do it). Leave the dough to rest for 30 minutes. No matter what machine I’m using, I usually just use a spatula to get the dough to this stage, and then add the dough hook attachment for the next stage.
Next you’ll need to add the salt, sugar, butter and yeast to the bowl and knead the dough for around 3 to 6 minutes. The time it takes to knead the dough will depend on what you’re using (you can see my recommendations on stand mixers further down the post).
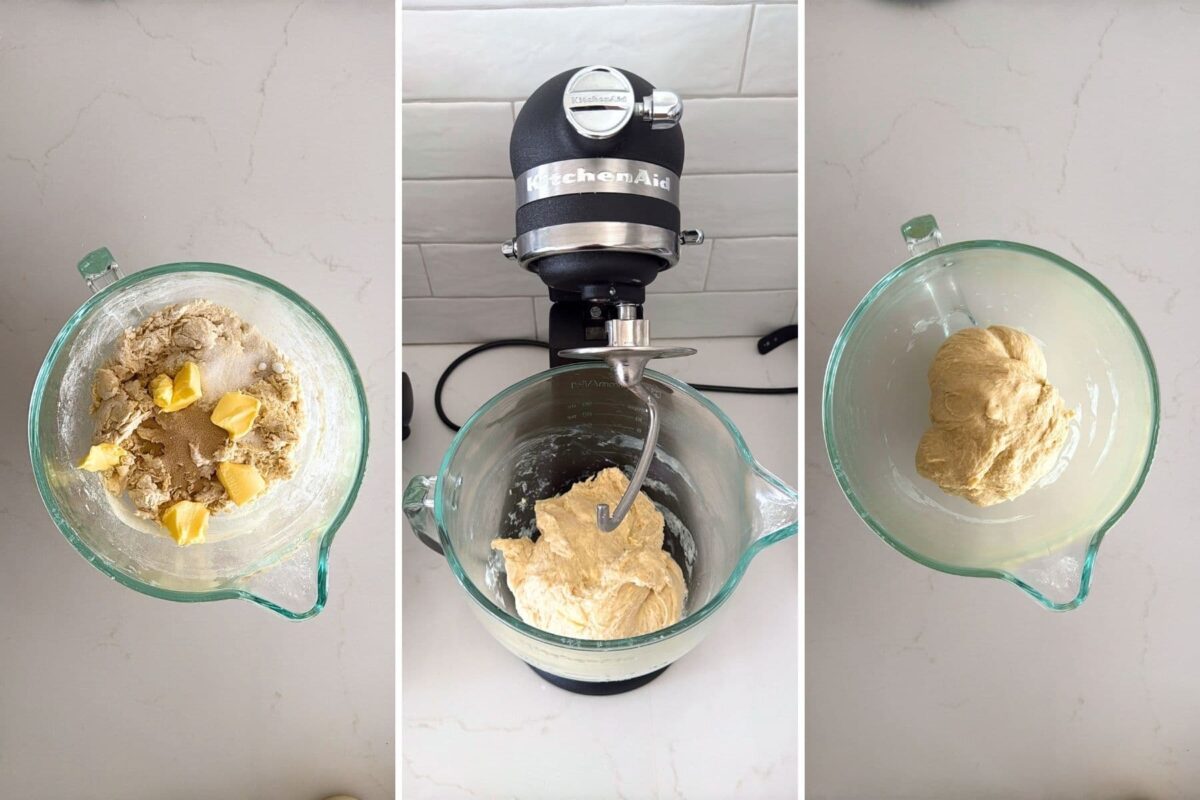
You want the dough to be elastic, silky and slapping the sides of the bowl. Just keep the mixer going at a low speed until you achieve this. If you’re using a Kitchenaid, I recommend giving your machine a break from kneading every few minutes.
Now you need to let your dough rise. You are using instant yeast as the leavening agent in this recipe, rather than sourdough/wild yeast, so it will rise very quickly, particularly if your home is warm. Leave it for around an hour (it will take longer if your house is cooler). You want it to double.
Shaping The Dough
Shaping sandwich bread is so so easy. Of course, like anything, there are a million ways to complicate it, however I like to stick to this simple method – it’s so easy my kids can do it!
Remember that this dough will feel different to traditional sourdough sandwich bread because it has been leavened with instant yeast. You won’t need extra flour for shaping, the dough won’t need it.
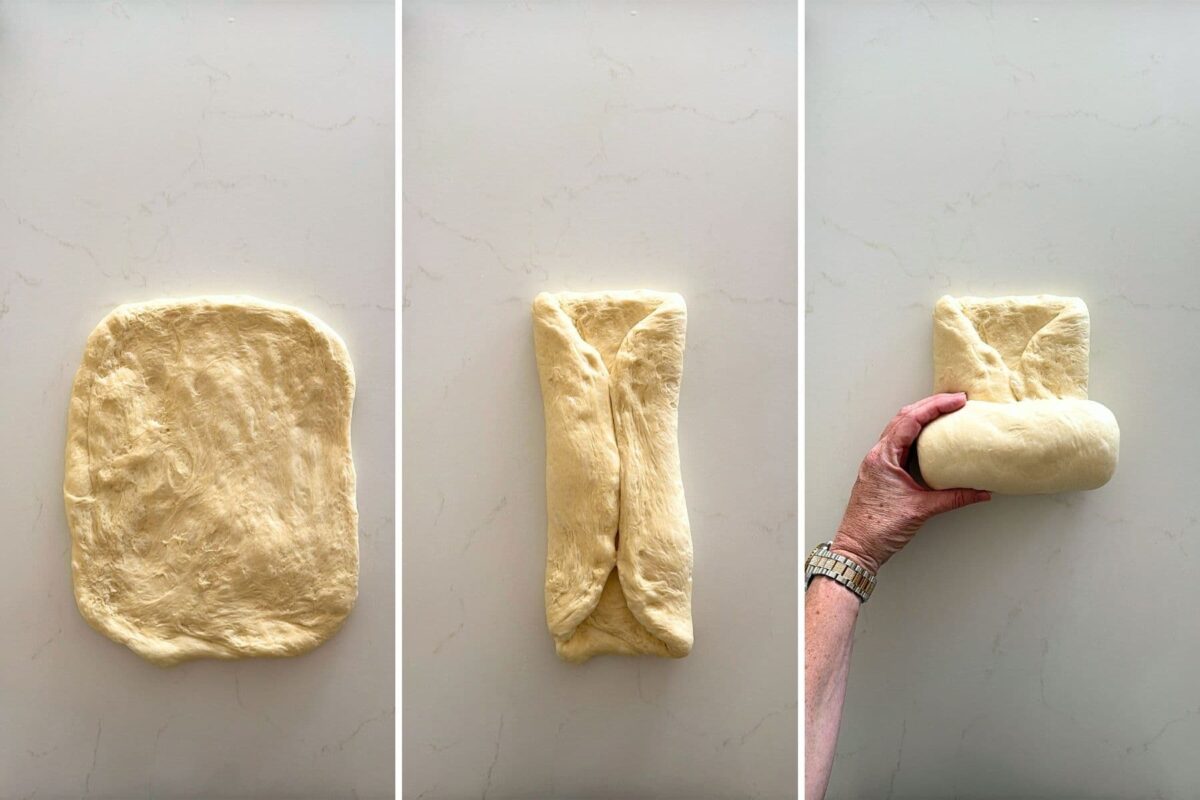
You need to pop your fermented dough out onto the kitchen counter so that the smooth side is underneath and the sticky side is on the top. Gently ease the dough out into a rough rectangle, with the short edge closest to you.
Then roll the dough up into a log and tuck the ends under. Try and create as much tension as you can on the top of the loaf. This will help it to develop a lovely shape when it’s baked.
Kate’s Pro Tip
Easier Shaping Technique
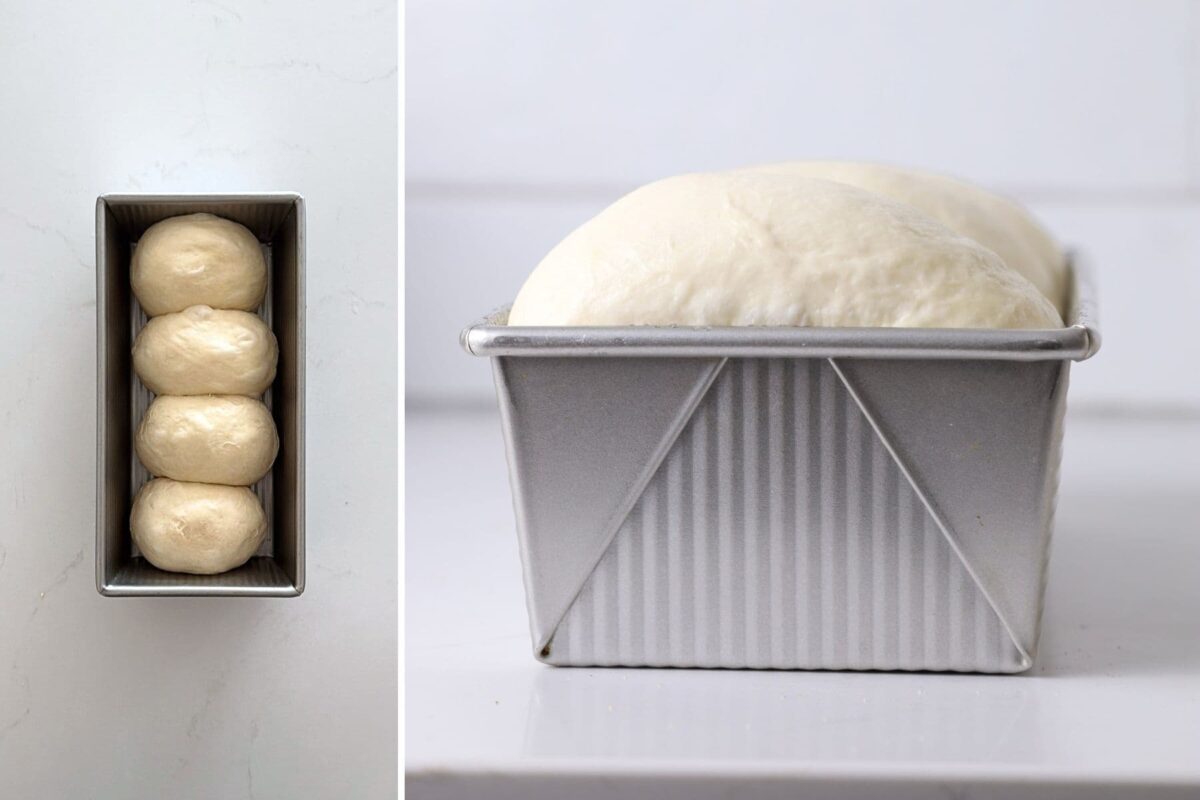
If you want an even easier shaping technique, divide the dough into 3 or 4 equally weighted pieces and roll them into balls. Place the balls into your chosen loaf pan, making sure they’re touching.
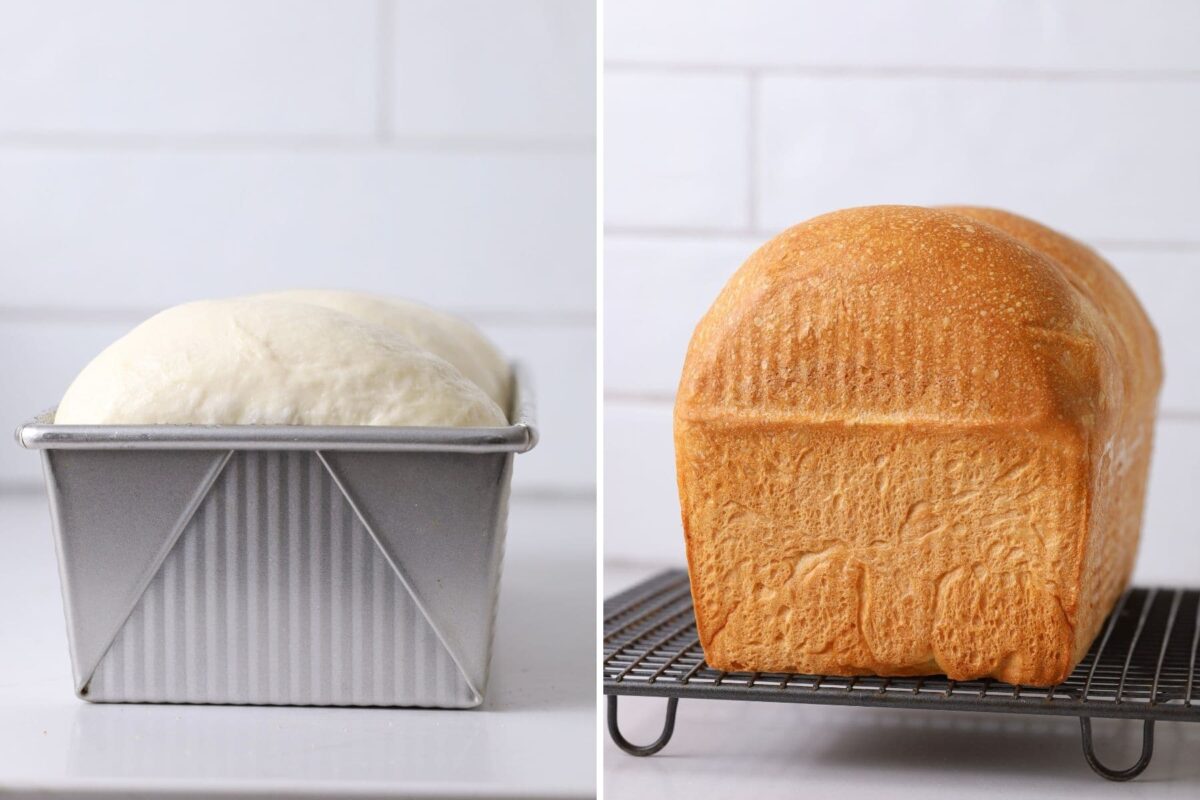
Once the dough is shaped, gently place it into a well greased bread pan with the seam underneath. Leave the dough to rise until it’s just above the rim of the tin (I usually cover the dough with plastic wrap lightly coated in olive oil or an elastic dough cover for this step). This second rise will take around an hour, depending on the temperature of your home. You really want to make sure the dough has time to proof, even though you want this to be ready in just a few hours. If it’s not soft and puffy, you’ll end up with a dense loaf.
Let’s Bake It
Once the dough has risen, you’ll need to bake your loaf.
Preheat your oven to 180ºC/350ºF and allow it to warm for around 10 to 15 minutes. Spray the top of your dough with some water mist and place into the oven. Bake for around 40 to 45 minutes, or until the top of the loaf is golden brown and the loaf feels hollow when you tap the base.
Remove from the loaf pan once done and place on a cooling rack to cool before slicing. You can brush the baked loaf with melted butter if you want to. This keeps the crust really soft, however this is totally optional.
If you’d like a more artisan style sourdough discard bread, you could try this crusty sourdough discard loaf made in a Dutch Oven, or these sourdough discard hamburger rolls might be more your style. I’ve also created a sourdough discard sandwich bread recipe in a bread machine and a whole wheat sourdough discard sandwich bread recipe.
Equipment for Making Sourdough Discard Sandwich Bread
Stand Mixer – I highly recommend mixing this dough in a stand mixer as its much easier and faster knead mechanically than by hand. I have tested this loaf in a Kitchenaid, Thermomix TM31, TM5 and TM6, Ankarsrum Assistent and the Ooni Halo Pro Spiral Mixer. The Kitchenaid and Thermomixes can handle one batch of dough at a time without becoming overwhelmed. The Ankarsrum Assistent can comfortably handle 3 to 4 batches, however I don’t love the way it kneads this dough (I use the dough roller). I make a triple batch of this dough in the Ooni Halo Pro Spiral Mixer very often (at least once a week). I LOVE the way the dough comes out of this machine and it kneads it very quickly and effectively. The crumb turns out super soft and supple when I knead it with the Ooni Halo Pro Spiral Mixer. I get a much nicer crumb than when I knead it with the Kitchenaid or even by hand.
Sandwich Loaf Pans – I have made this recipe literally hundreds of times and tested more loaf pans than I’d like to admit! After years of testing, I almost always make this loaf in a USA Pan 1.5 pound loaf pan. The pan measures 5 x 10 x 3-inches and makes a lovely family sized loaf. If you prefer a more uniform loaf, placing a second 1.5 pound pan on top while its baking will give you this.
I also like to use the USA Pan Pullman Pan measuring 9 x 4 x 4-inches (it comes with a lid, however I never use it). This gives a very high, lofty loaf. If you prefer a loaf that is a little less lofty, split the dough in two at shaping and put half in each pan (you could even use the lid if you want to when splitting the dough in two). Let the dough rise until it’s level with the rim of the pan and then bake.
Ziplock Bags – this sourdough discard sandwich loaf is best stored in a ziplock bag after it’s cooled to room temperature. This will keep the crumb and crust soft and supple.
Mercer Bread Knife – I always use this Mercer Bread Knife to slice my sourdough discard sandwich bread evenly. You can also use a bread slicing guide if you want to, however I find as long as the loaf is cool, it’s pretty easy to create even slices.
Flavor Variations and Inclusions
There are lots of ways to jazz up this easy sourdough discard sandwich bread. Here are a few suggestions:
- Honey & Oat Sandwich Loaf – Add 20g of honey and 50g of oats to the mixture when you add the butter, sugar and salt. If you’d like to add oats to the top you should do so when you put the dough into the tin – spray the loaf lightly with water so the oats stick to the top.
- Multigrain Sandwich Loaf – Add 50 to 100g of your favorite seeds to the mixture when you add the butter, sugar and salt. Seeds like sesame, sunflower, pumpkin and flax work really well.
- Wholemeal Sandwich Loaf – Replace half the Bread Flour with whole wheat flour for a more hearty country style sandwich loaf. You could top with sesame seeds when you place it into the tin.
- You could also turn this loaf into sourdough discard rolls.
How to Store + Freeze
Room Temperature – this loaf stays soft at room temperature for around 24 to 48 hours if stored in a plastic ziplock bag. This keeps the moisture in the crumb and ensures it stays soft and supple. For the best storage results, don’t slice the loaf until you need to. This helps further retain the moisture in the crumb.
Freezing – This loaf freezes so well! I almost always make a triple batch, one to eat today and 2 for the freezer. For best results freeze the whole loaf, uncut. Place uncut, cooled sourdough discard sandwich loaves into large ziplock bags and place into the freezer for up to 3 months.
Sourdough Discard Sandwich Loaf Recipe
Equipment
- Stand Mixer (easiest kneading option)
- Digital Scales
- Loaf Pan (I use USA Pan 1.5 pound loaf pan measuring 5 x 10 x 3-inches)
Ingredients
- 100 g Sourdough Discard , (unfed sourdough starter)
- 250 g Water
- 500 g Bread Flour, (or All Purpose Flour)
- 10 g Salt
- 20 g Sugar
- 60 g Butter, (salted, room temperature)
- 7 g Instant Yeast
Instructions
- Combine the sourdough discard, water and flour into the bowl of your stand mixer or Thermomix and mix until it forms a shaggy dough (around 30 seconds will do it). Leave the dough to rest for 30 minutes.
- Now add the salt, sugar, butter and yeast to the bowl and knead the dough for around 3 to 6 minutes. You want the dough to be elastic, silky and slapping the sides of the bowl. Just keep the mixer going until you achieve this. If you are using a stand mixer you'll need to use your dough hook attachment for this step.
- Now you need to let your dough rise. You are using instant yeast as the leavening agent in this recipe, rather than sourdough/wild yeast, so it will rise very quickly, particularly if your home is warm. Leave it for around an hour (it will take longer if your house is cooler). You want it to double.
- While you're waiting for the dough to double, lightly butter a sandwich loaf or pullman pan so it's ready to go when the dough is shaped.
- Once the dough has doubled, tip it out onto the counter top with the smooth side underneath and the sticky side on the top. Gently ease the dough out into a rectangle. It should be quite easy to do this as the dough is very elastic.
- Now you want to shape your dough into a sandwich loaf. This is fairly easy. Make sure that the short side of the rectangle is in front of you. Fold each side of the dough into the middle, then roll the dough into a tight log with the seam underneath. Tighten the top of the dough by putting your hands at the base and pulling the dough towards you, without lifting if off the countertop.
- Once the dough is shaped, gently place it into the buttered loaf tin. Leave the dough to rise until it's just above the rim of the tin. This will take around an hour, depending on the temperature of your home.
- Once the dough has risen, you'll need to bake your loaf. Turn your oven on and set the temperature to around 180C/350F. Let it warm for around 10 minutes. Spray the top of your dough with some water mist and place into the oven. Make sure that there's plenty of room for it to grow in the oven as it will generally keep rising.
- Bake your bread at 180C/350F for around 40 to 45 minutes or until the loaf is golden brown.
- Remove from the loaf tin and allow to cool on a wire rack.
Notes
Nutrition
Nutrition information is automatically calculated, so should only be used as an approximation.
Like this? Rate and comment below!


How would I change this to use active dry and not rapid dry yeast? Thank you!
I love this recipe and my loaves are beautiful and delicious. I do find they are a bit dense. Any advice would be appreciated
The trick is to make sure the bread is very risen and puffy before you bake it 🙂 If it’s dense then it hasn’t risen enough before you bake it 🙂
Love this recipe! Thank you! I was wondering if it’s possible to shape it and then refrigerate overnight and bake in the AM? I’ve never tried that with a yeasted bread before.
You definitely can, but I would take it out of the fridge and give it some time to come to room temp before you bake it or you might risk a dense loaf 🙂
Would love to get the dough ready and bake in the morning! Would I do all the steps all the way to the loaf tin and then pop it in the fridge in the loaf tin….right away or after it rises some? And will it rise some more after it reaches room temperature in the morning?
Thanks! cant wait to try it.
I did this when I made it and had no issues at all! I had them sitting on the counter for just a short amount of time before baking. No problems!
Is there a way to sub out the butter for olive oil? To move it closer to vegan…
I was wondering if I could let this rise in the fridge for a night. You know when the kids decide to undo your plans. 🤣Then bake in the morning.
I was very glad to find this recipe as I’m always glad to find more uses for sourdough discard. I used 1/2 bread flour and 1/2 white whole wheat for a bit more substantial loaf. The ingredients were a bit unusual for the bread I’m used to making; more sugar and yeast plus the butter. Made the dough a bit unwieldy to come together in the beginning but after the proper amount of kneading it was fine. I will say this is a bread that you need to watch for proofing rather than go by time in recipe. The recipe said it will proof quickly the first time but also said to leave it for an hour which for me was way too long and resulted in overproofing. Since proofing helps develop flavor the next time I make this I will cut back a bit on yeast and sugar. The other big thing was that the loaf was really tall. If I hadn’t used a gluten-free bread pan it probably would have gone right over the edges. Fortunately because the recipe is in grams, I will be able to cut it down by a third next time and the size will be fine.
Could this recipe be made in a bread machine? I do not have a stand mixer.
you certainly can do it in a bread machine – the instructions for this are here.
I would like try this out. You mentioned to preheat oven for 10mins but I normally preheat for 15mins. So is it for this recipe I only have to preheat for 10? Also, you mentioned to knead dough till smooth and silky, do you mean reach window pane syage? Thanks for your help!
Are there any add ins I can put in this bread? Could I make a cinnamon sugar loaf with this recipe? Would I spread some butter on and then a sugar cinnamon mixture before rolling it up?
I’d like to add some wholemeal flour for fibre, what quantities would you suggest. Thanks.
Just came across this recipe and I’d like to know if I could add some Whole Wheat Flour to the recipe? If so how much All Purpose Flour and how much Whole Wheat Flour would be a good combination?
Thanks, I can’t wait to try it.
Very good sandwich loaf. I mixed all by hand. It gets a bit messy for the first few minutes after adding the butter,s,sug,and yeast but eventually comes together well with flour dusting. Kneaded approximately 7-10 minutes. I was curious. What is the largest amount of discard you would hazard to use? Thanks again.
When I make the honey oat, do I sub some of the flour for oats and replace the sugar with the honey? Love the original recipe but would love to try the honey oat. Thanks.
JUST MADE THIS> IT WAS INSANE. THANK YOU!
I have four small kids and love this recipe. But making pancakes is a bit of a task with a newborn. So I’ve taken this recipe and made it into sheet pan pancakes. Double the recipe and bake on sheet pan for 15 minutes at 425 F. My first batch was a little thick so I might suggest adding a bit more milk. Thanks for the recipe! My kids are grateful! 😁
Beautiful bread with a great crumb!
It’s just a little sweet.
Any way I can decrease the sugar amount?
Just made my first loaf and as always with your recipes, it turned out amazing! The only thing is I always have to add more flour with most of your recipes than called for, or it stays way too sticky. Same goes with the discard sourdough pizza dough. Perhaps my starter is more wet or something, but everytime I end up adding about 1/3-3/4 additional flour to your recipe. Just a heads up to anyone looking. Otherwise the flavor and directions are simply fabulous.
I was hoping to leave out the sugar too! Would it change the structure of the bread?
I’ve been making your ong fermented recipe for a while. It is easy and usually comes out like it should with regard to the prep. This recipe however was very wet. It was shaggy before adding the butter etc. I always use a scale. I kneaded by hand and could never get it into a ball. Any suggestions. It is a breezy day here and my house is about 72 degrees.
Can I substitute almond flour in this recipe to cut down on the carbs? TIA
This made an amazing loaf..Soft and delicious with a perfect crust. I loved making this dough. I did it by hand and the dough was a pleasure to work with. Used coconut oil instead of butter. Will make again amd again.
Thank you!
Turned out delicious and beautiful. Taste, crumb. I’ve bookmarked it. Thank you for posting!
This looks delicious, just wondering if you have a video (I am pretty much a visual learner) thank you very much for sharing your recipe.
For the sour dough sandwich bread it calls for discard. Can I use my sourdough starter (Unfed) directly from the refrigerator? I’m still learning sourdough. Thank you for this recipe. Can’t wait to try it!
Oh. My. Goodness!! I just made this today – your Discard pull apart rolls were so perfect yesterday – and my husband wanted bread with the same texture. I followed your excellent instructions exactly and BOOM! Wonderful wonderful bread – all the tang of my sourdough but squishy just like good bread should be! Just wish I had a fresh summer tomato and some mayonnaise! Thank you SO much! 🙂 I DO have a question – you recommended a slicer. Is that the one you have and use? 🙂
I have been making this bread for about a year now. The only thing I didn’t follow was the yeast. Instead I just used active sourdough starter. I let it double for a few hours on the counter for each rise. Turns out perfect every time.
This bread is absolutely delicious!! I’ve made this recipe a couple times already. I’d actually like to make Cinnamon raisin bread with this recipe. What would be the measurements to add to make that work? I’m still learning how to make additions and not sure how to go forward with that.
Made this recipe today for my very first sandwhich loaf and it turned out so beautiful! I made a couple of adjustments but mostly because I don’t think the loaf pans I have are for normal size bread loafs. I split them in half, made 2 loaves and only baked for 20 minutes. They turned out absolutely perfect. And you can really taste the sourdough which I LOVE. This will probably be the only recipe I ever use for sandwhich bread. My kids love it too and they are all 7 and under. 🥰
Wonderful recipe! One issue – Why is my loaf bursting after baking?
Wonderful, soft, fluffy bread. I’m so pleased with this recipe!
Can I sub the instant yeast for 100g of active sourdough and just take off 50g water and 50g flour
I love this loaf. Today I’m thinking of dusting with herbs before I roll it up to put in the pan. Can’t see where it’s been mentioned. Have you done this? If I try it will let you know.
That sounds lovely! Let me know how it goes xo
This turned out amazing. Double the recipe and ended up with two small loaves and a small round. The kids and husband said it was the best.
Will definitely be making this weekly.
Just wanted to say thanks for this recipe. We’re now making and freezing four loaves a week. Kids and parents love it. PB&J, egg and toast, avocado toast, deli sandwiches. Mmmmm
In general, when using saved discard from the refrigerator, should you let it come to room temp before beginning? Brand new to SD here. 🙂
You don’t have to let it come to room temp, just use it straight from the fridge, especially if you’re adding yeast x