This post contains affiliate links. Please see our disclosure policy.

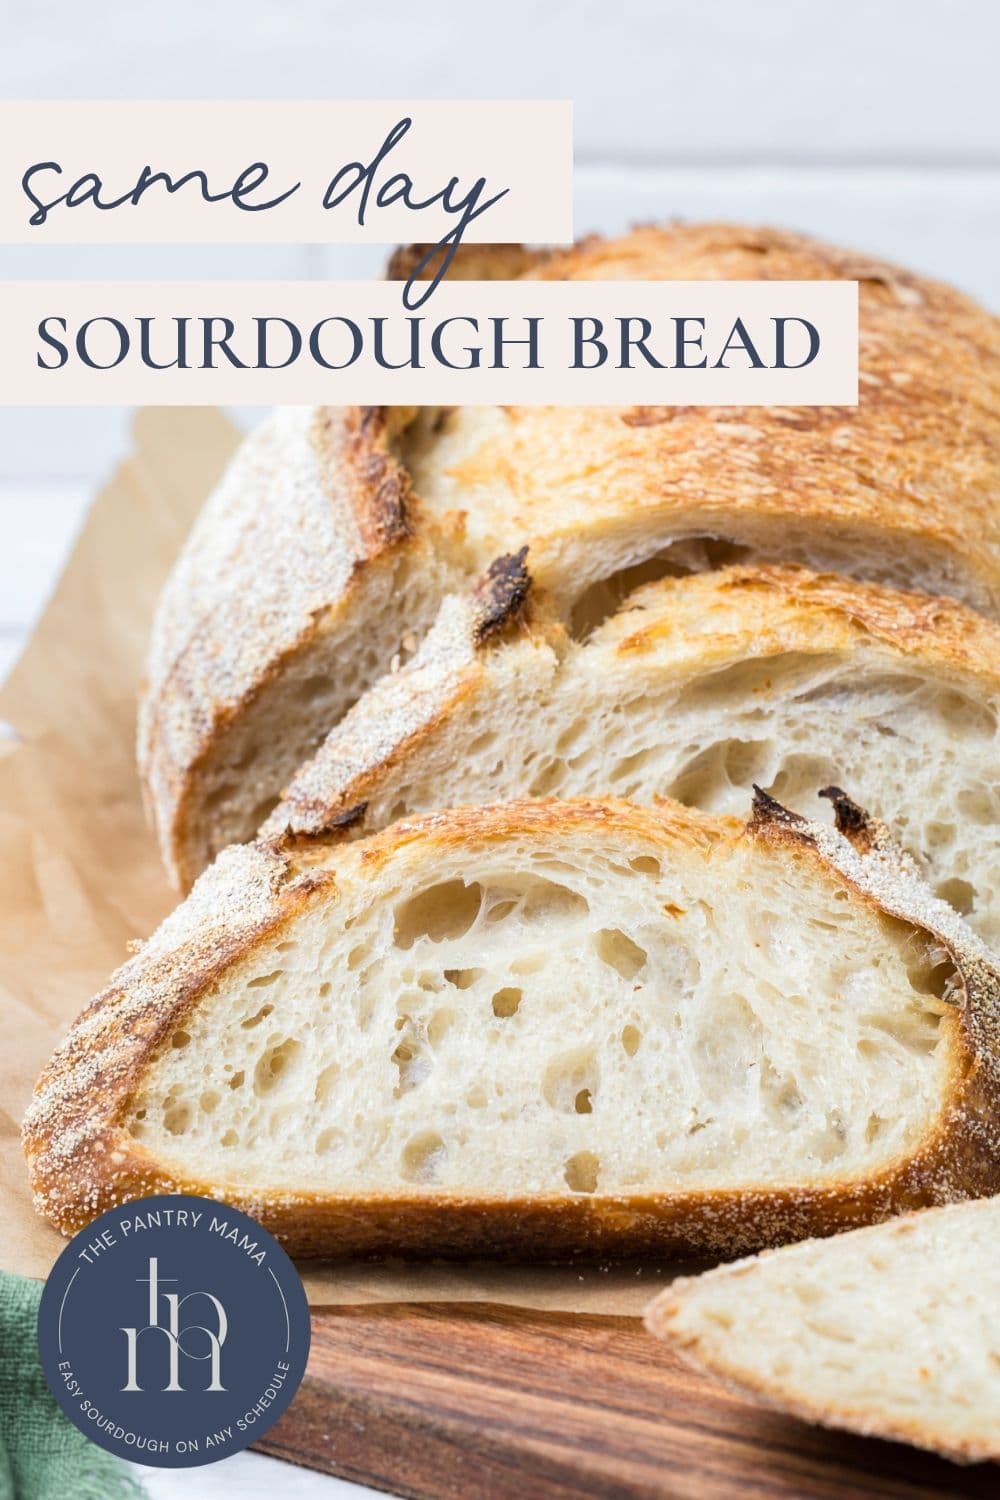
Many people ask me if they can bake a loaf of sourdough in one day, without compromising on great oven spring and sourdough flavor? The short answer is yes, you can make a same day sourdough bread recipe. It just takes a little forward planning before you start the whole process. With some forward planning and a mature sourdough starter you can definitely mix, ferment, proof and bake a sourdough loaf of bread all in one day. We are all about easy sourdough on any schedule after all!
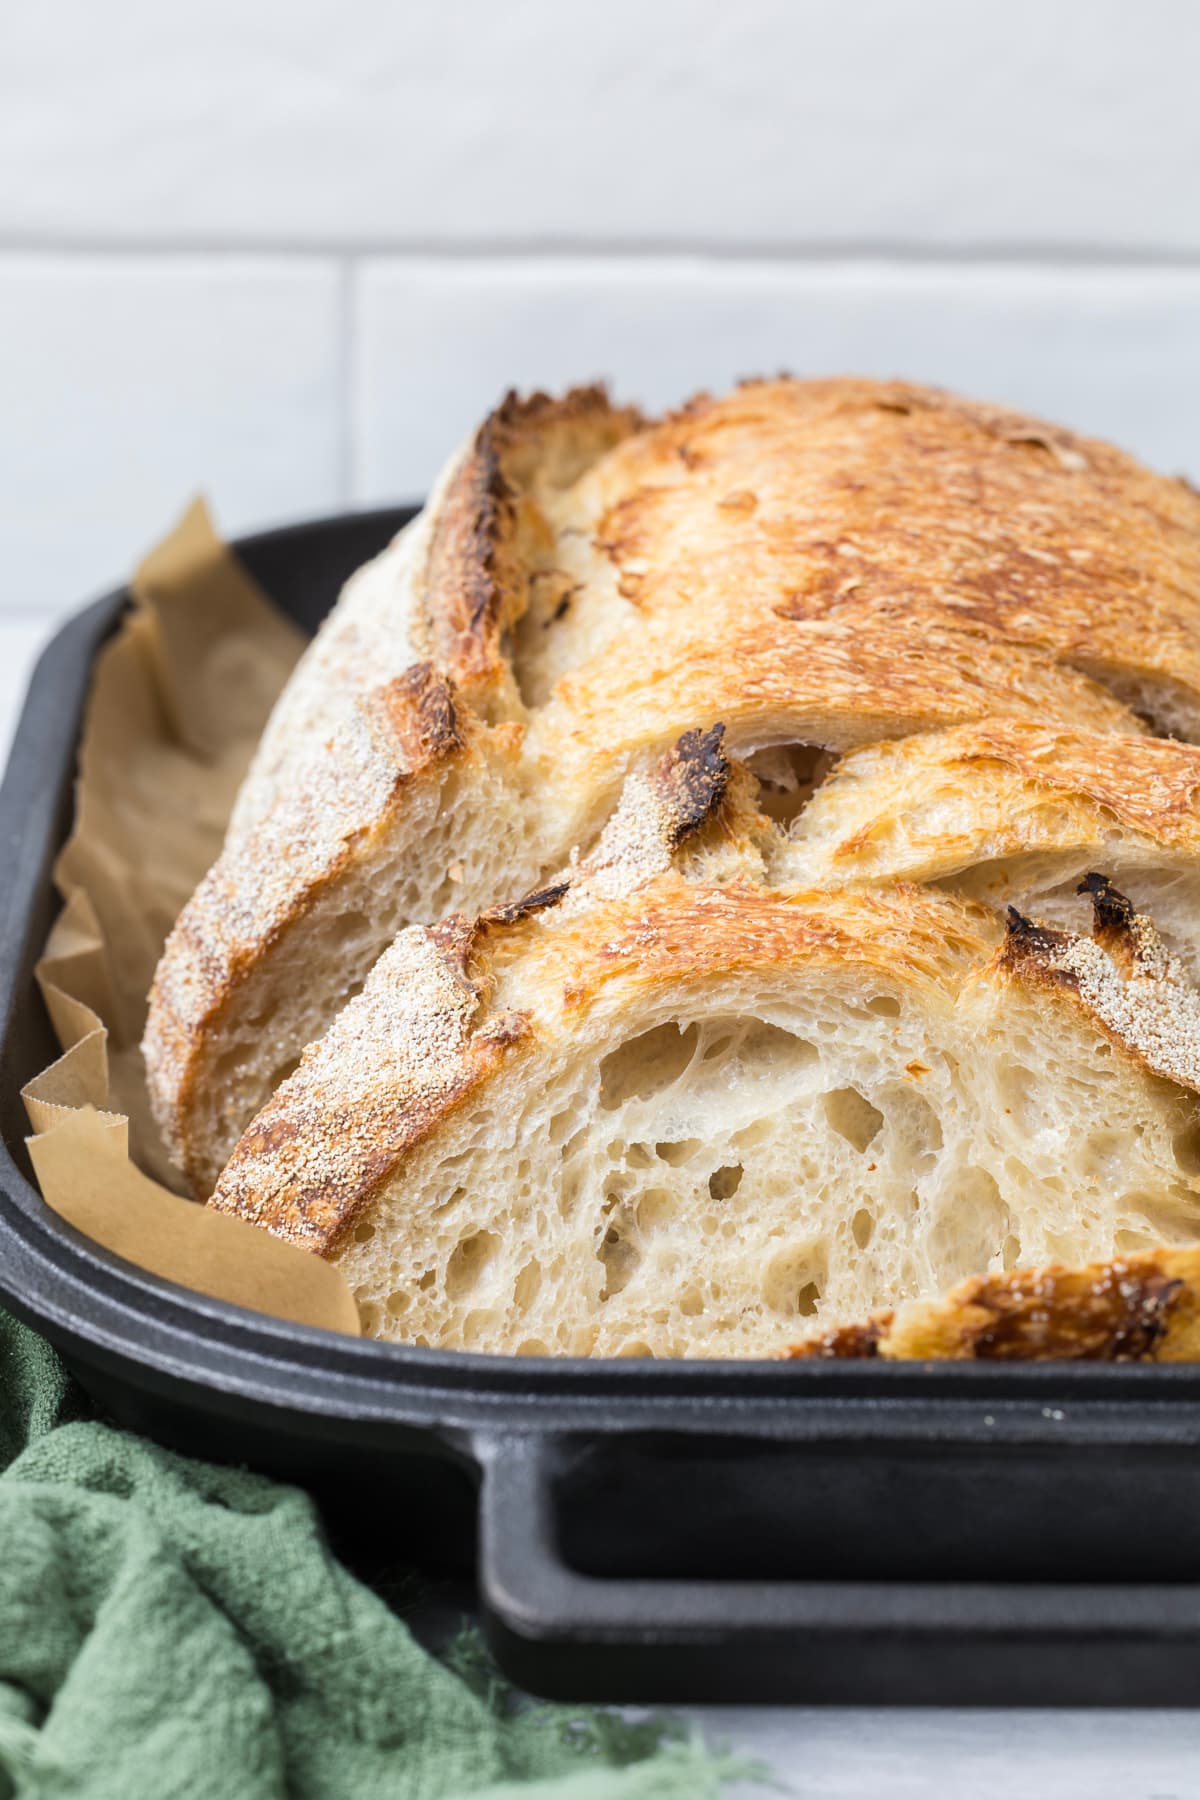
Table of Contents
- Why You’ll Love This Recipe!
- Ingredients
- Why This Same Day Sourdough Works!
- How To Make Sourdough Bread in One Day
- Keep Your Dough Warm
- Short Cold Fermentation
- Bulk Fermentation Tip
- Baker’s Timeline for Making Sourdough Bread in One Day
- How To Store and Freeze
- Frequently Asked Questions
- Same Day Sourdough Bread Recipe
Why You’ll Love This Recipe!
Real Sourdough, Made in One Day – This loaf is still naturally leavened with sourdough starter, no commercial yeast here! The key is using a fed, bubbly and active starter so your dough has everything it needs to rise beautifully in a shorter timeframe.
Perfect for Confident Beginners – This is a great recipe if you’re ready to make sourdough fit into your day, not your entire week. You’ll need a mature starter, but the process itself is simple, approachable and easy to follow.
Made for Busy Schedules – Same day sourdough is for those times when you want fresh bread without waiting days to bake it. It gives you a flexible, faster sourdough option while still keeping all the flavor and satisfaction of a naturally leavened loaf.
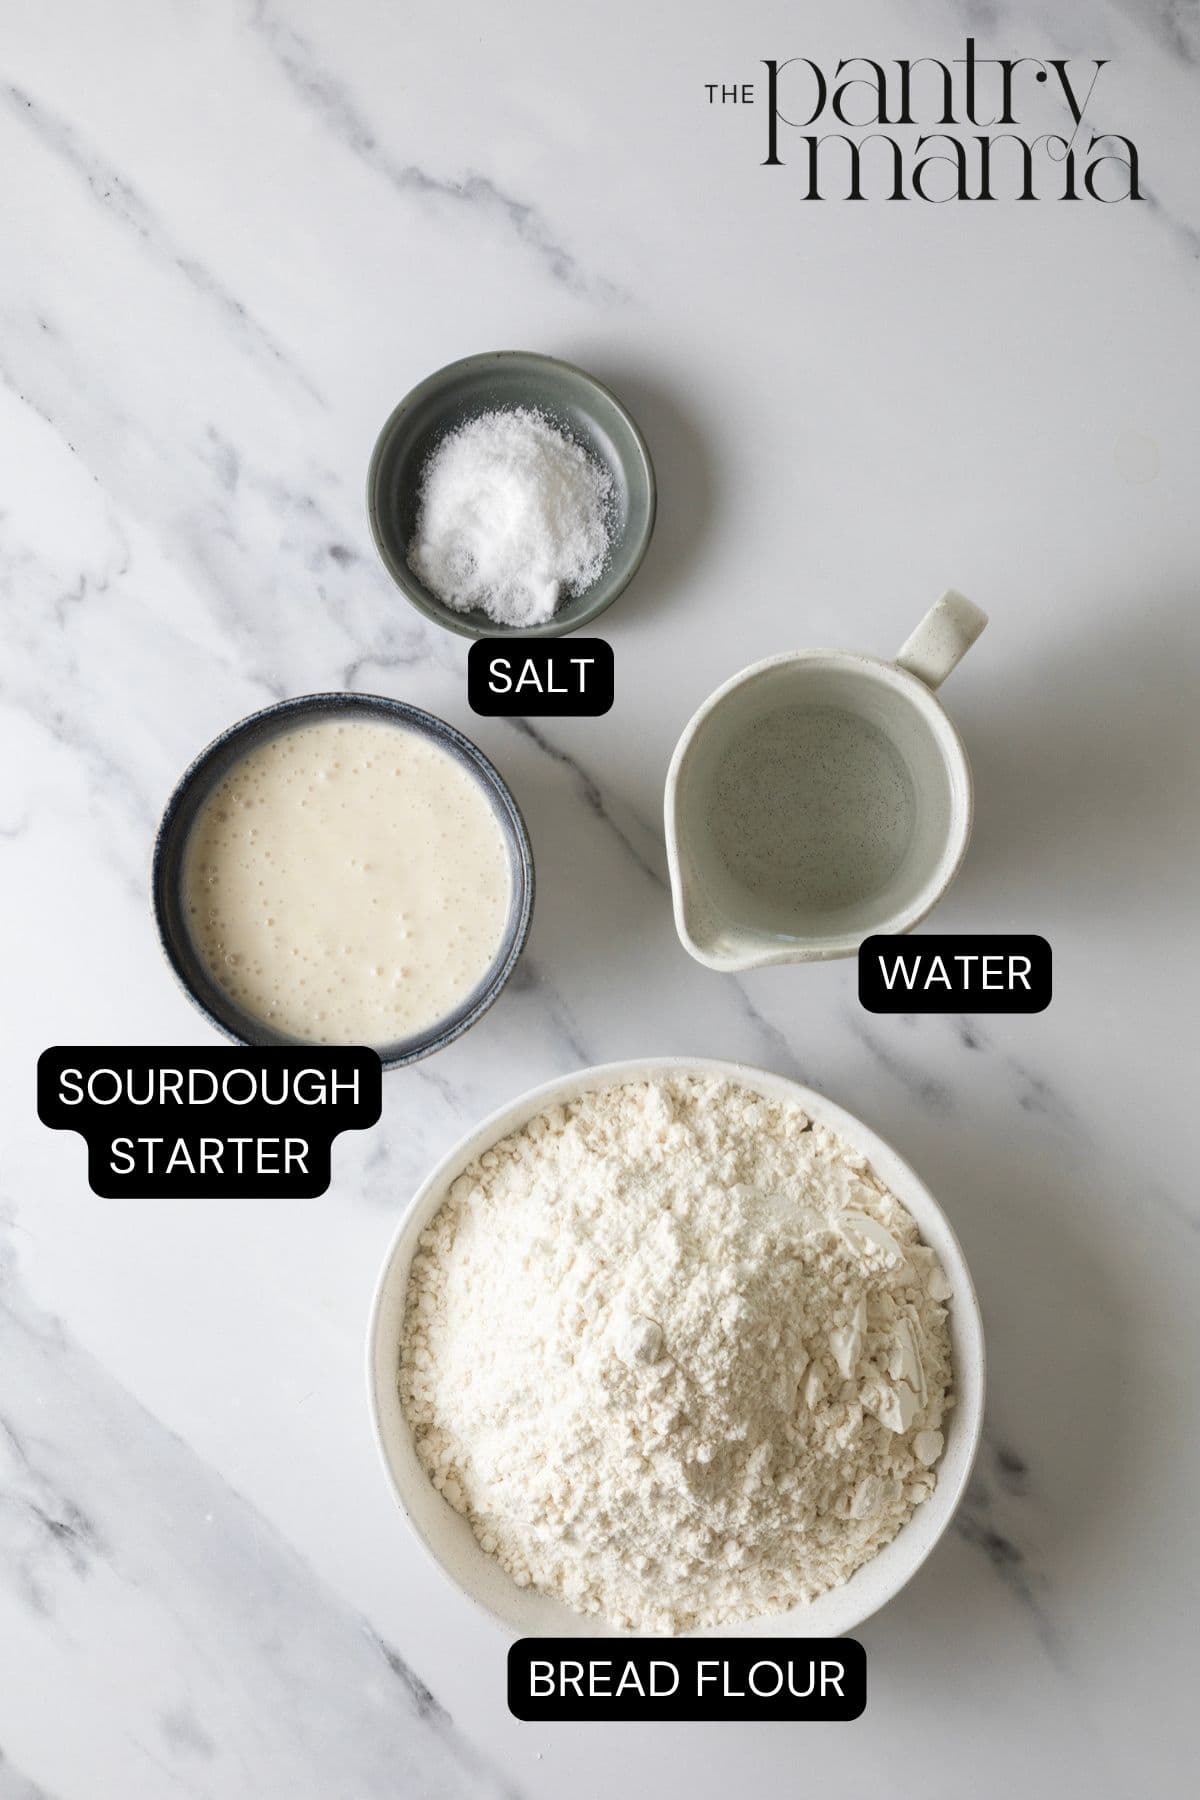
Ingredients
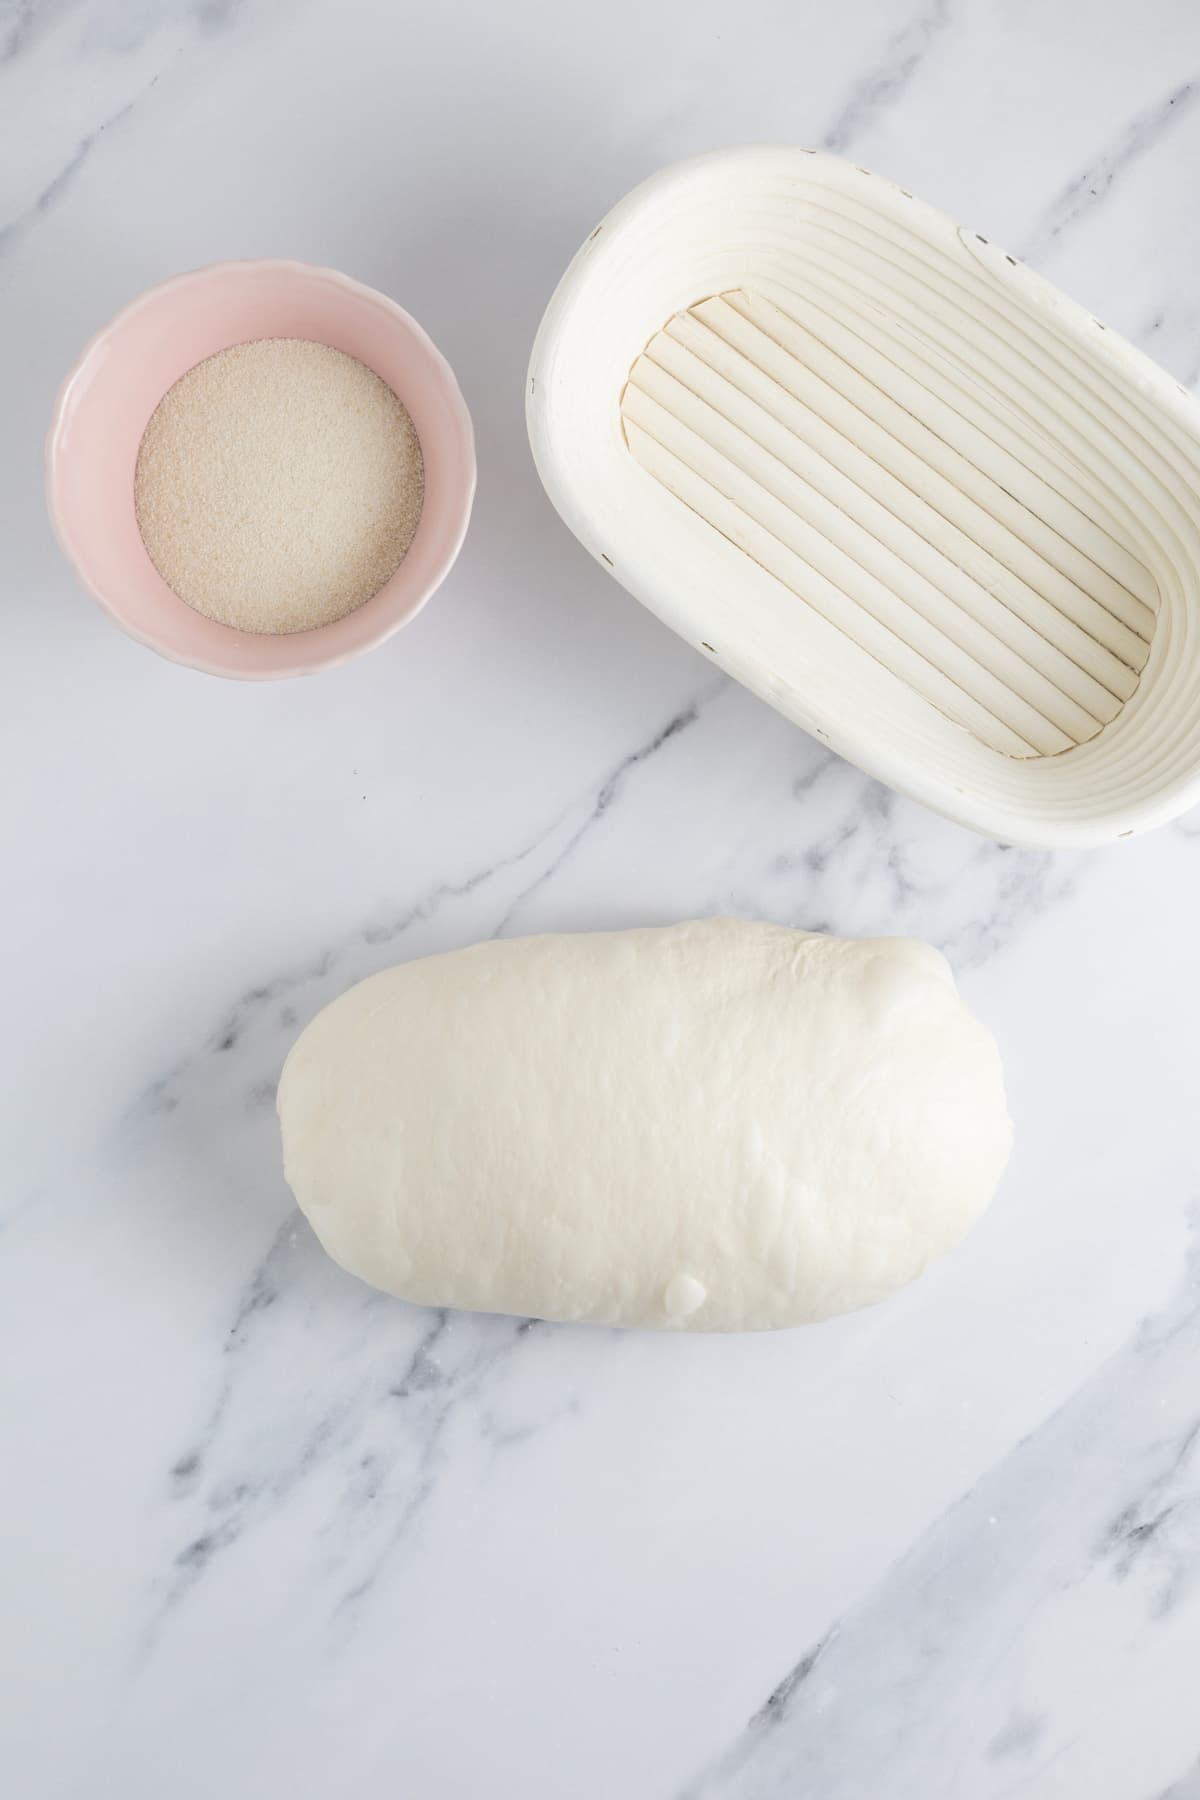
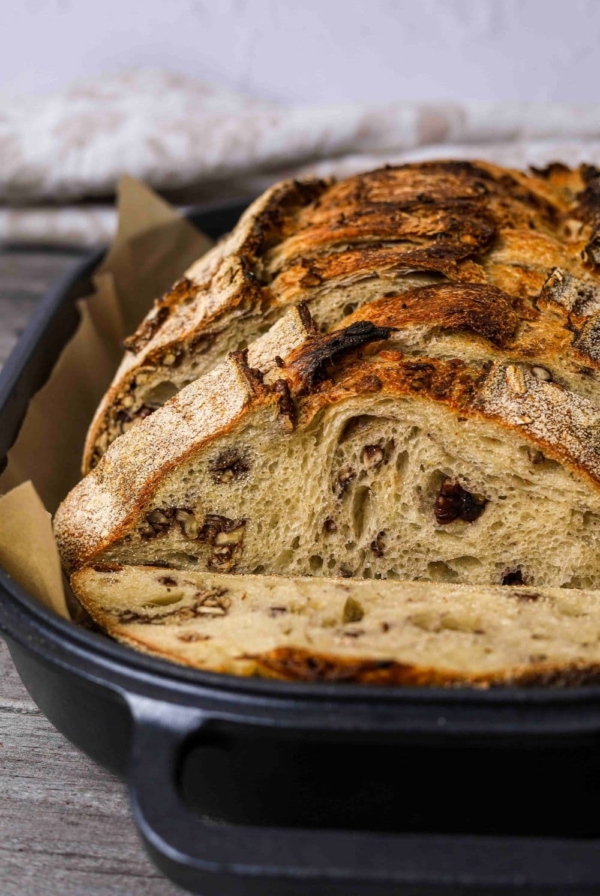
- Sourdough Starter – I’ve used 150 grams of sourdough starter to speed up bulk fermentation and ensure this loaf can be properly fermented in just one day.
- Water – I prefer using filtered water, but use whatever you would normally drink.
- Bread Flour – This recipe works best with white bread flour rather than all purpose flour or whole wheat flour.
- Salt
Why This Same Day Sourdough Works!

Amount of Sourdough Starter – This recipe uses a higher amount of starter than my simple sourdough bread recipe. Rather than 50g of starter, we are using 150g of starter to speed up bulk fermentation time. An increased amount of sourdough starter will decrease fermentation time and decrease the sour flavor of your loaf. You can even push this amount up to 200g if you want to. You’ll need to use this long fermented sourdough recipe if you like a strong, tangy flavored sourdough bread.
Temperature – rather than opting for room temperature, we are wanting to use a warmer temperature to boost fermentation in this recipe. Increased amount of starter and increased temperature will give you the best shot at same day sourdough baking.
Skip The Cold Ferment – in order to squeeze your bake into one day, this recipe skips cold fermentation in favor of a final proof on the counter. You can use the freezer to make scoring easier if you want to. You might enjoy this article on the differences between cold ferment and bulk ferment.
How To Make Sourdough Bread in One Day
Making sourdough bread in a same day bake process is fairly easy. It is basically the same process as you would undertake to make sourdough bread over a few days, except that you are adjusting the amount of starter and the temperature to better suit your needs, as well as altering the final proof.
Feed Your Sourdough Starter
Ideally, feed your sourdough starter in the late afternoon or evening (before bed is perfect). I like to feed my starter as follows for this recipe: 50g starter: 200g flour: 200g water (so 1:4:4).
This sourdough starter ratio gives me plenty of active starter for the recipe plus ensures that my starter is at it’s peak when I get up because it’s been given a really big feed. There’s no need to do the float test on your starter – you’ll be able to see that it’s risen the next morning and that’s all you need for a mature starter!
Fermentolyse
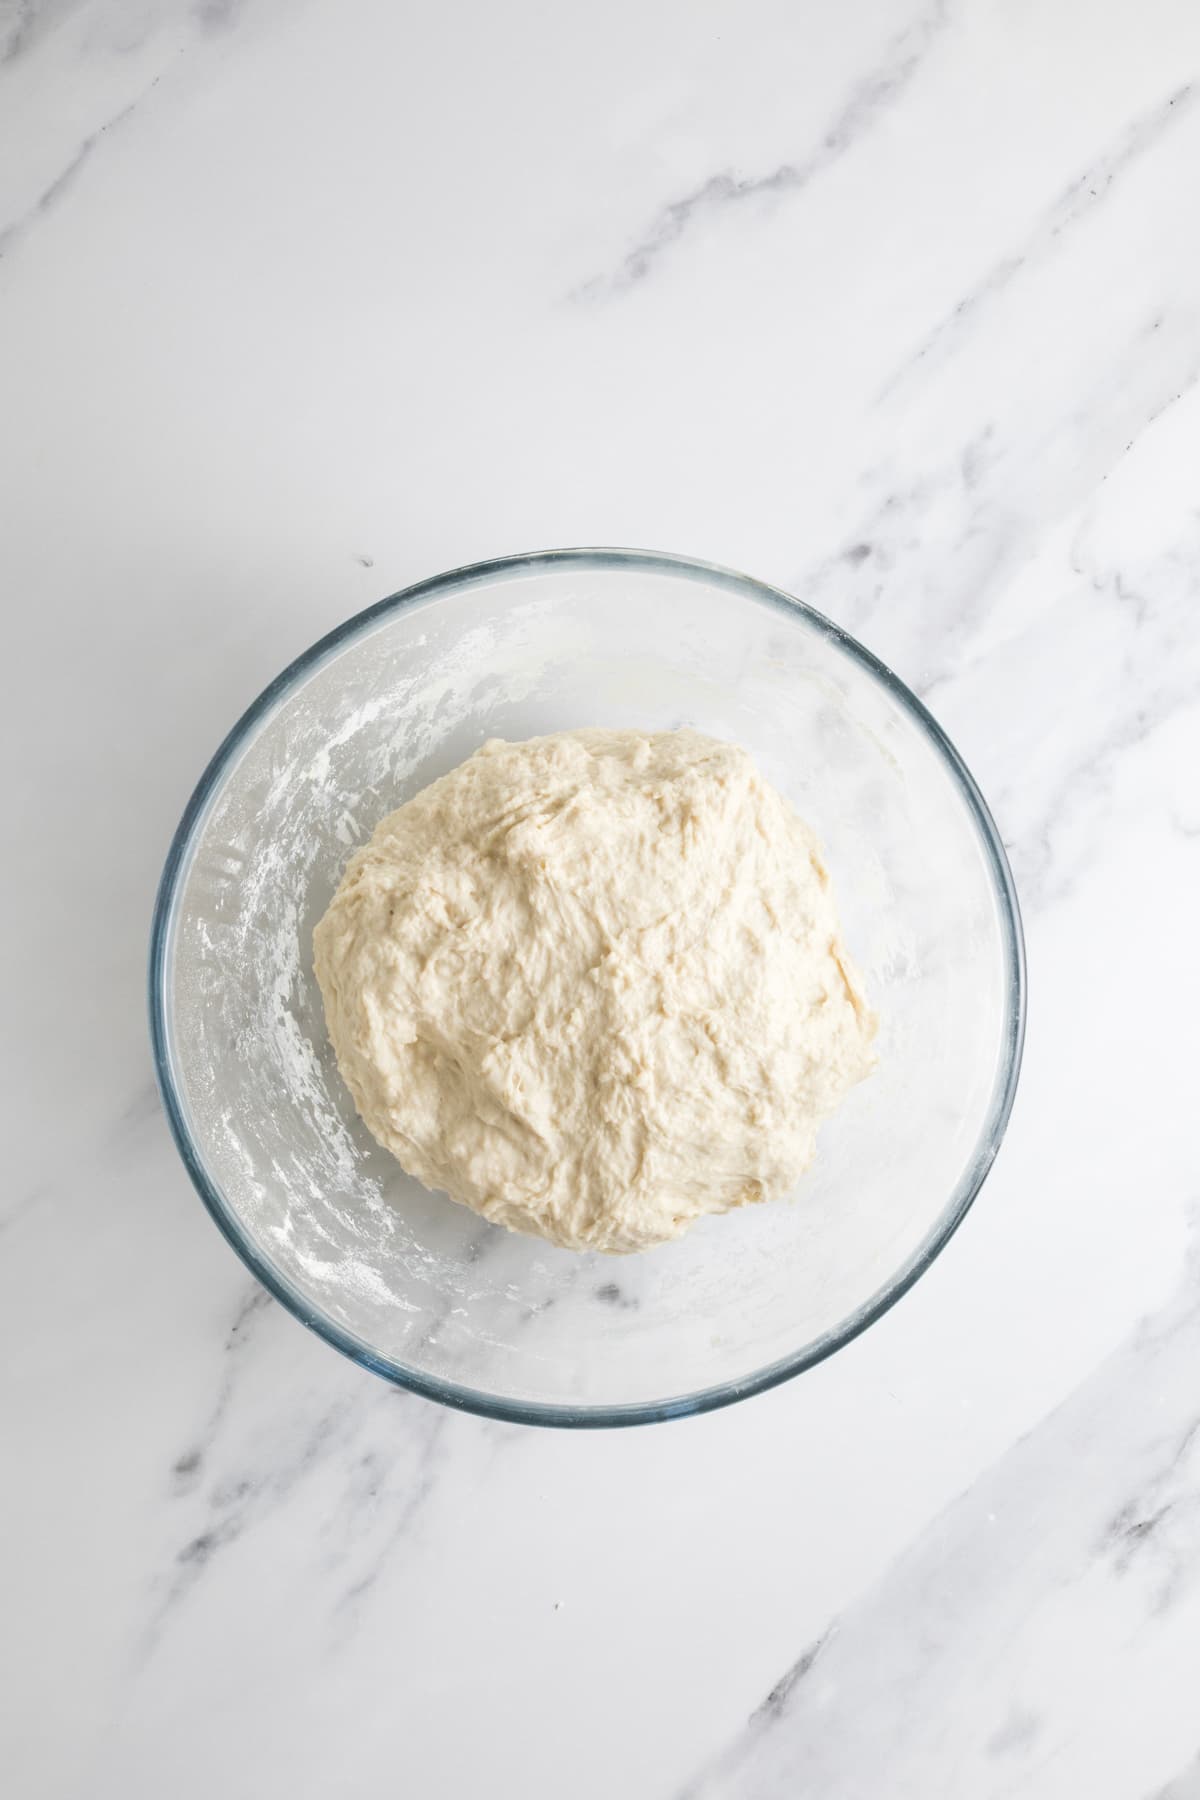
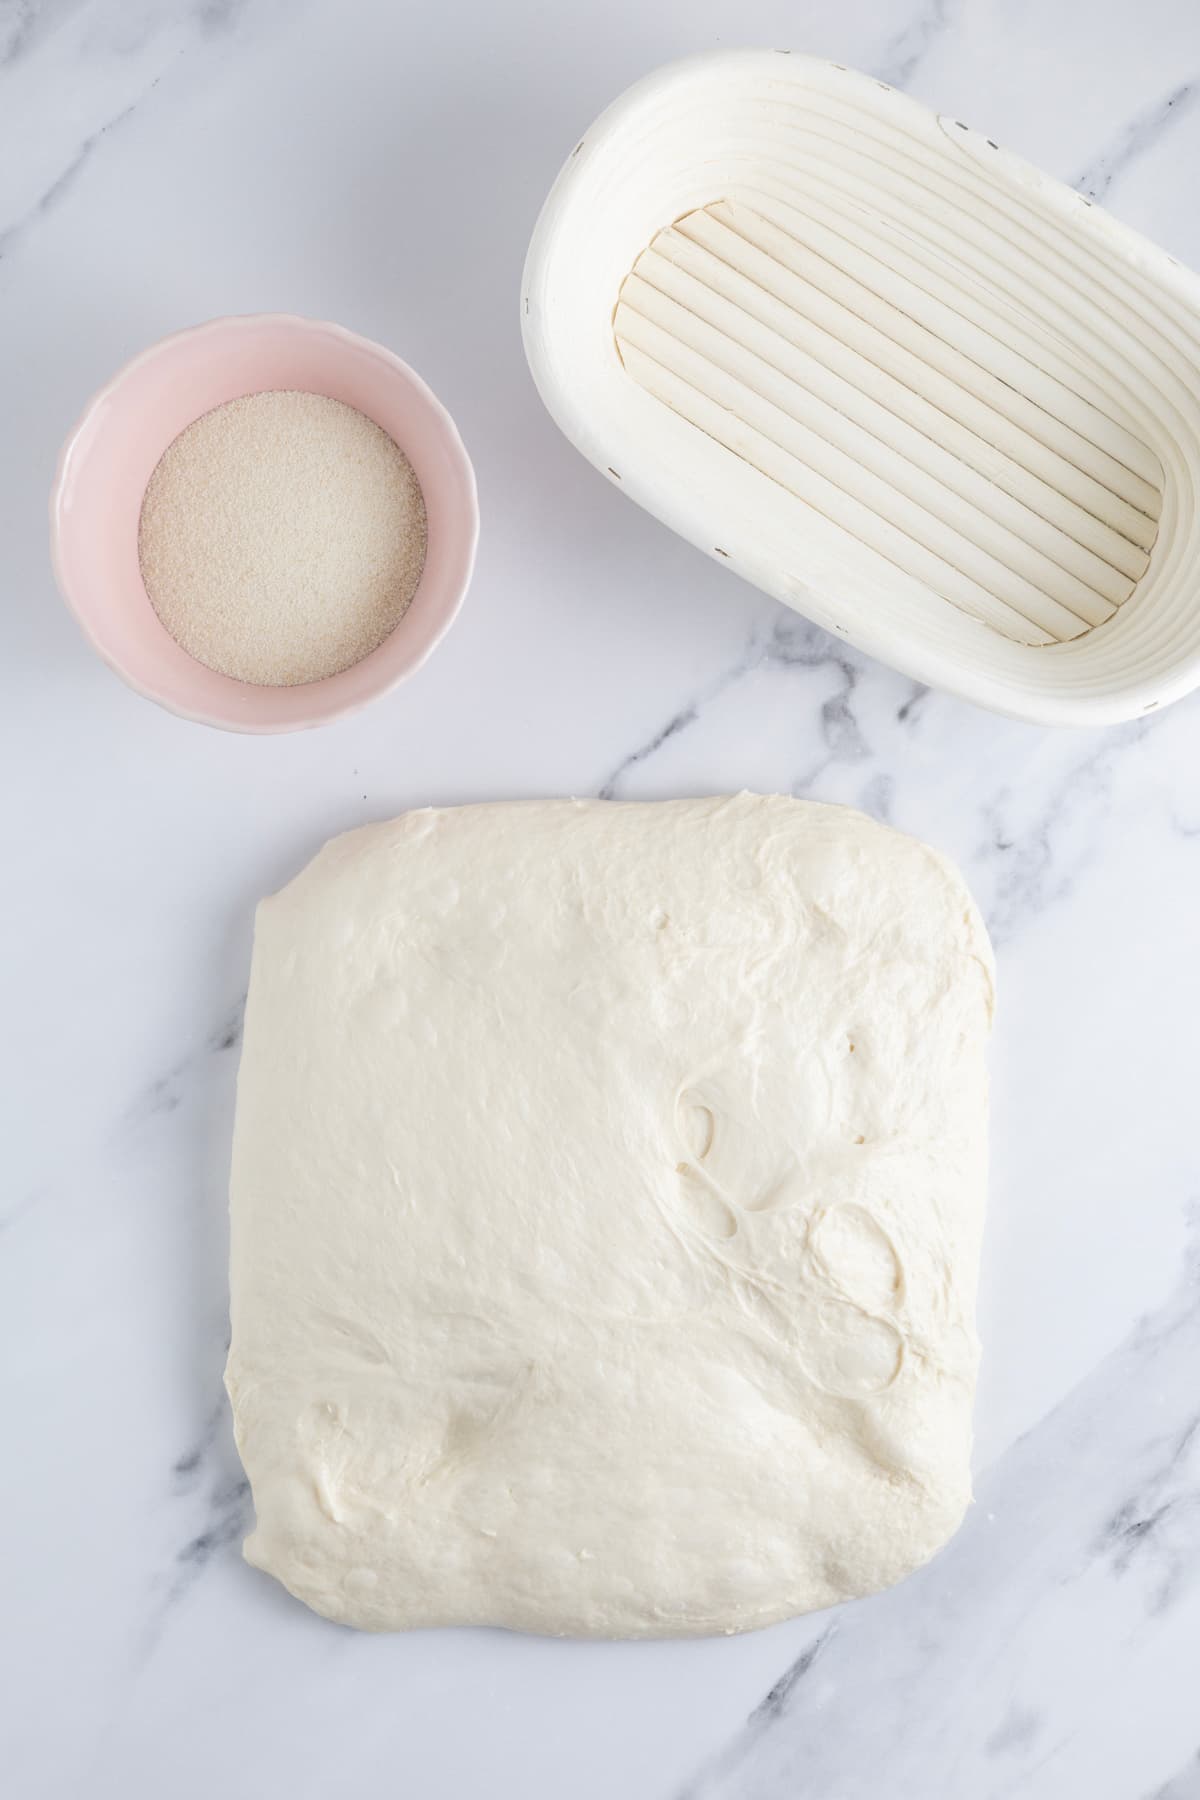
It’s best to start your day early so that you give yourself enough time for fermentation to occur. Weigh out your sourdough starter and water into a large mixing bowl and mix together briefly. Now add your flour and salt and mix whole lot together to form a dry dough. Cover your bowl and let it sit for around 30 minutes to an hour.
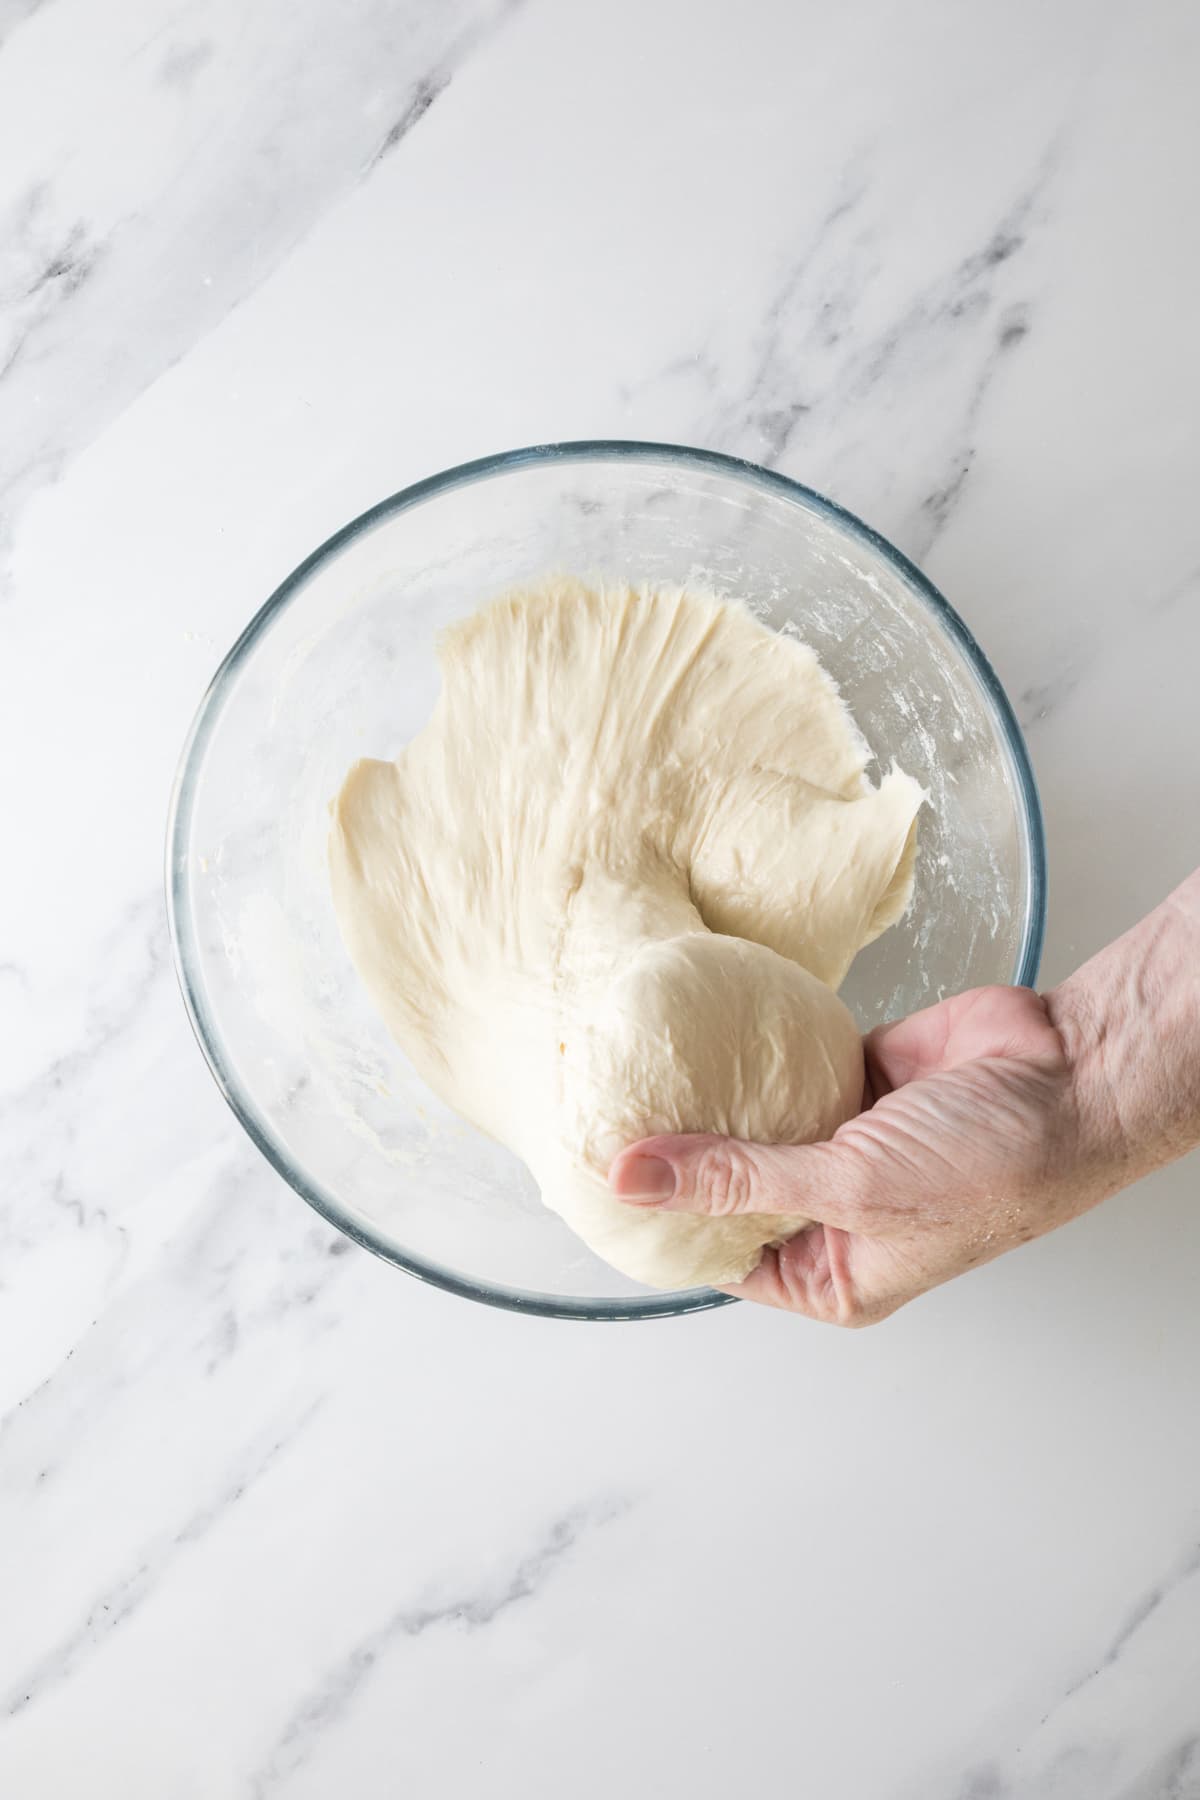
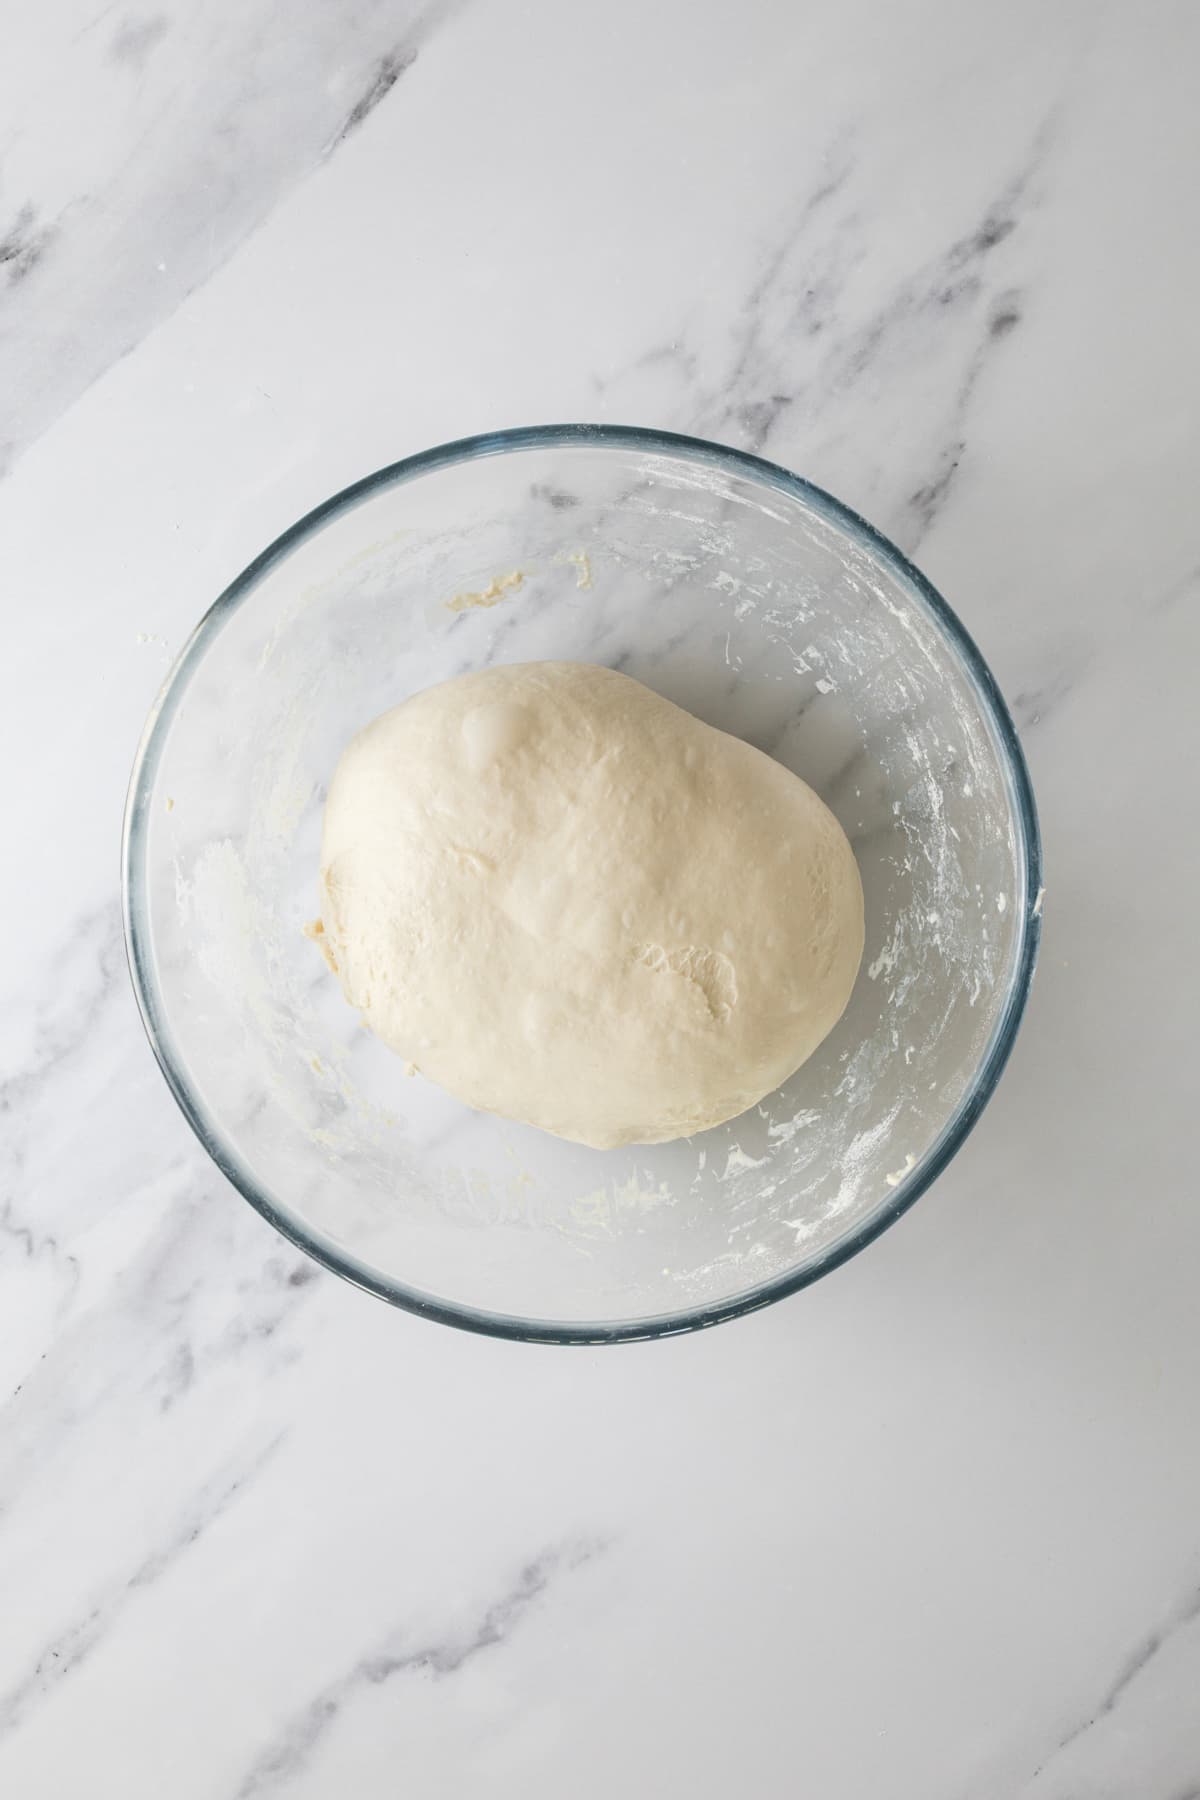
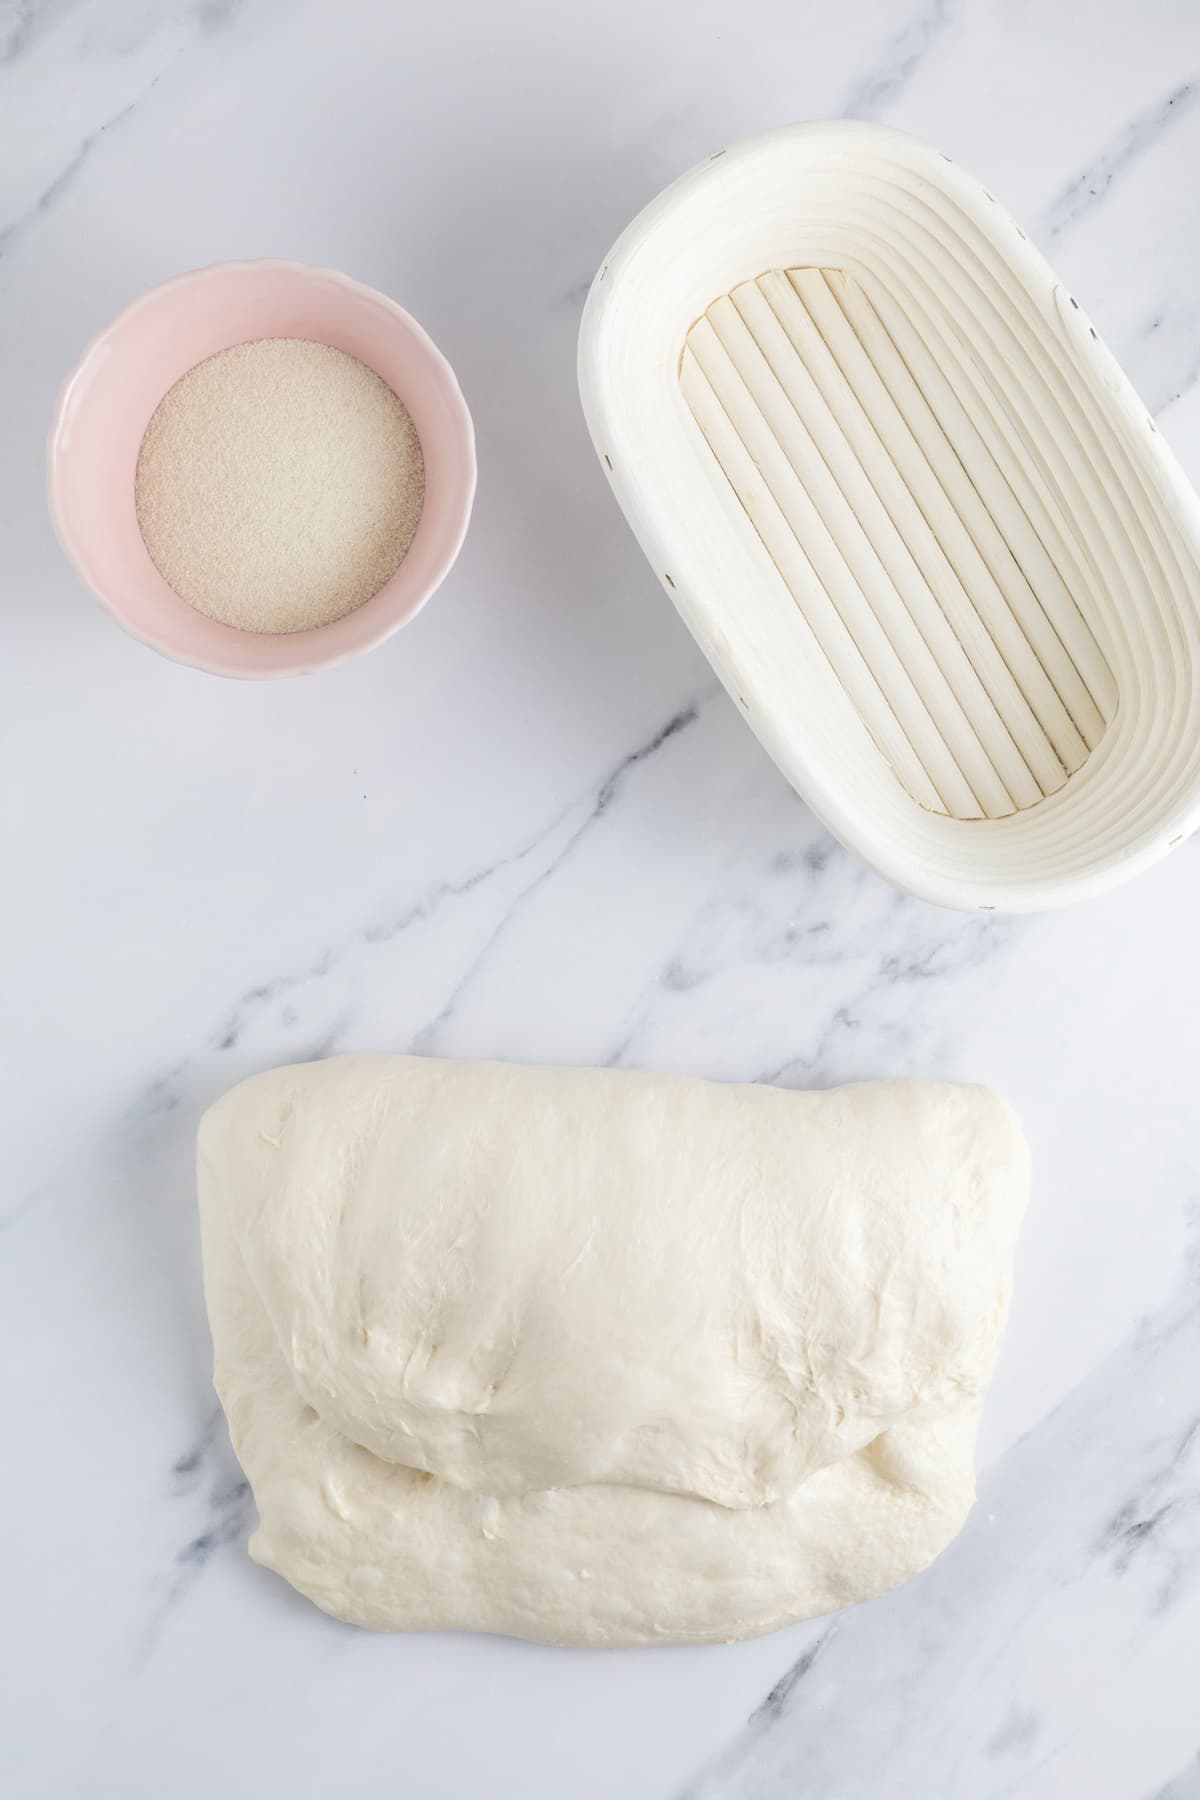
Now you’ll need to strengthen the dough by bringing the dough together into a ball. Pull the edges of the dough into the centre until it’s smoother and feels a little stronger than before. Let the dough rest again.

Stretch and Fold
Over the next few hours you need to create some structure for your dough by “stretching and folding”. Aim to do around 4-6 sets of stretch and folds. Remember to keep the dough warm while you’re stretching and folding as this will help speed up the process and allow you to have a loaf baked later the same day.

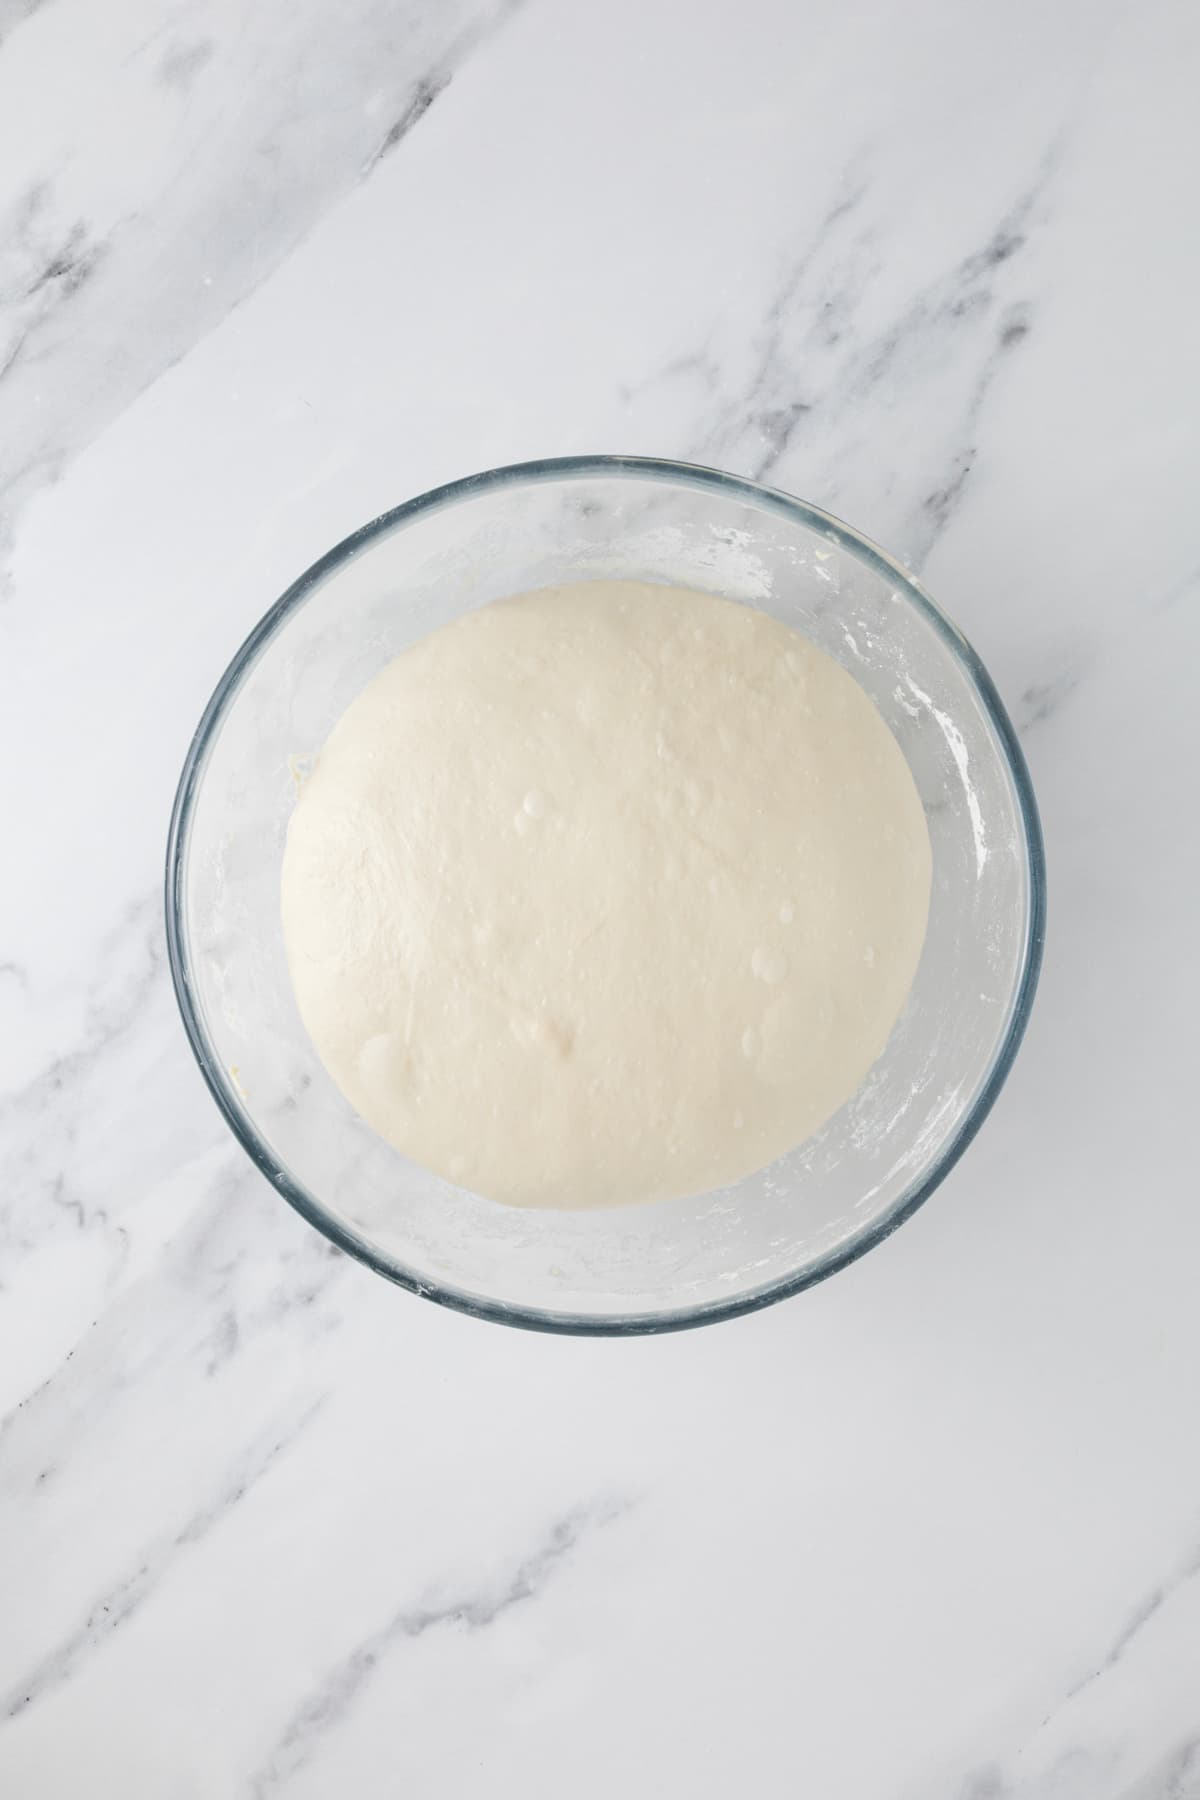
Bulk Fermentation
Once you’ve finished your stretch and folds, cover the dough and let it ferment until doubled. You can’t bulk ferment sourdough quickly without increasing your temperature. Cold weather is not your friend when attempting a same day bake, because your room temperature will be too low to boost fermentation and get those natural yeasts working in a timely manner (unless you use 200 grams of starter or more)! So you’ll generally need to manipulate the temperature to speed up bulk fermentation.
Kate’s SCHEDULE SAVER
Keep Your Dough Warm
Use your oven or microwave as a proofing box (you can read about how I do this inside The Pantry Mama kitchen).
Mix the dough using warm water to motivate your wild yeast and give fermentation a head start.
Use a proofing box where you can set the temperature. I like to set my Brod and Taylor Proofing Box to 28ºC (82.4ºF) when making this loaf.
Shaping the Dough
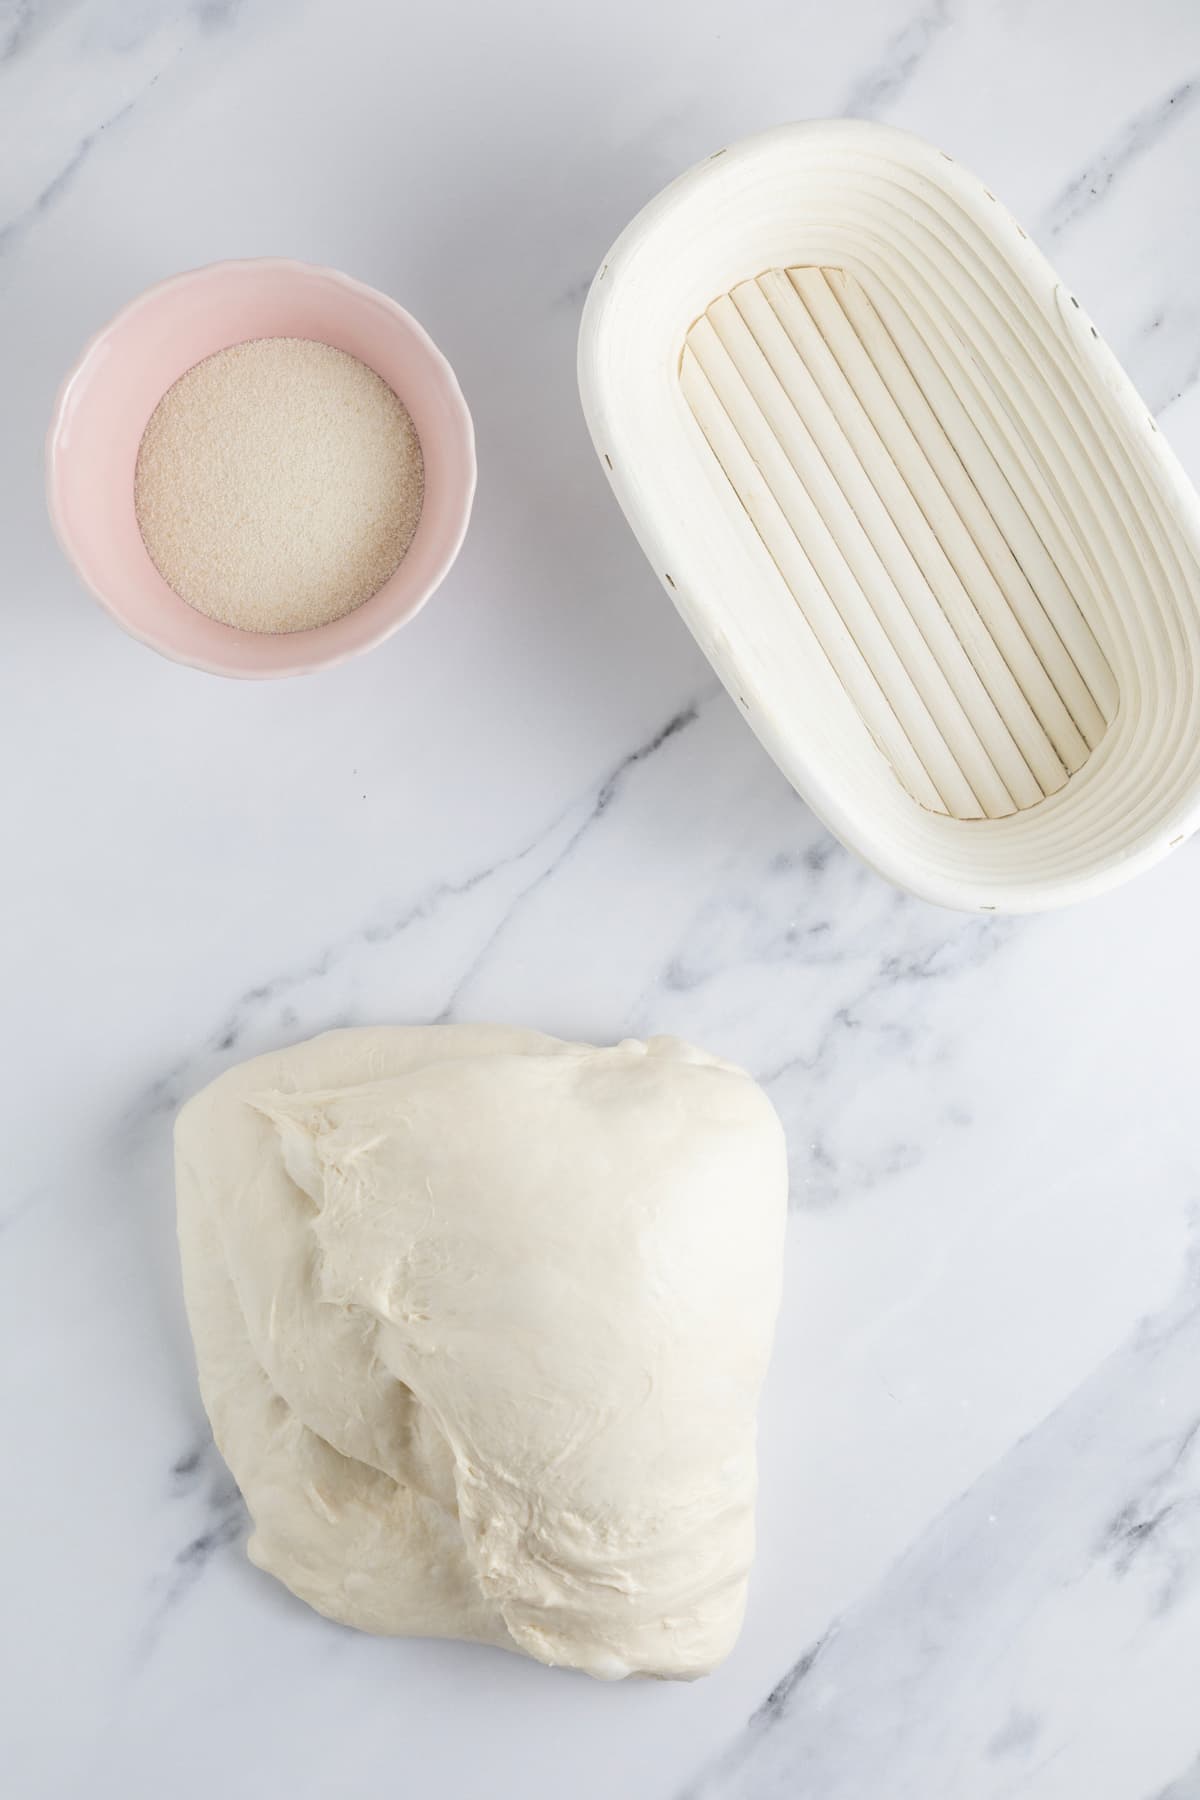
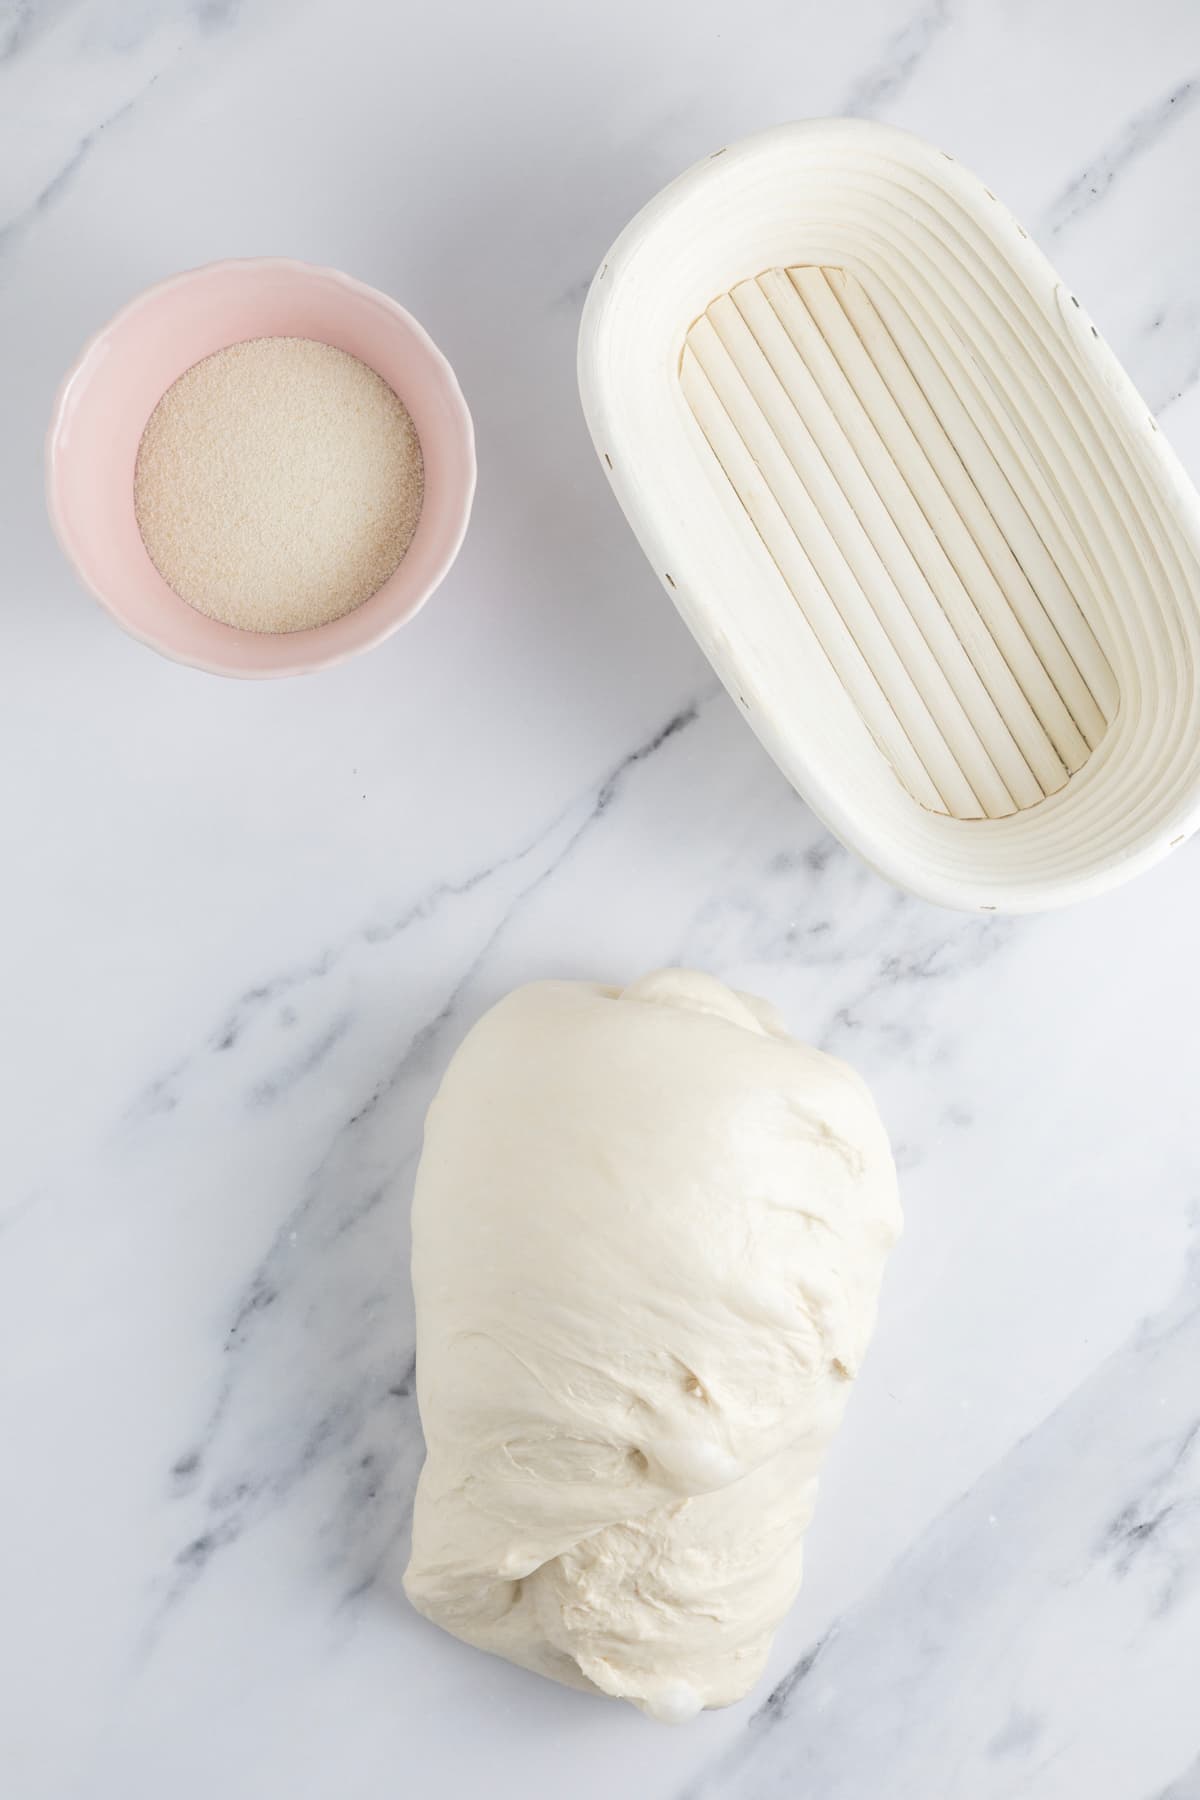
Once your dough has finished bulk fermentation, it’s time to shape it into either a boule or a batard. I don’t generally use flour to shape, but if I do, it’s always semolina flour, rather than rice flour.

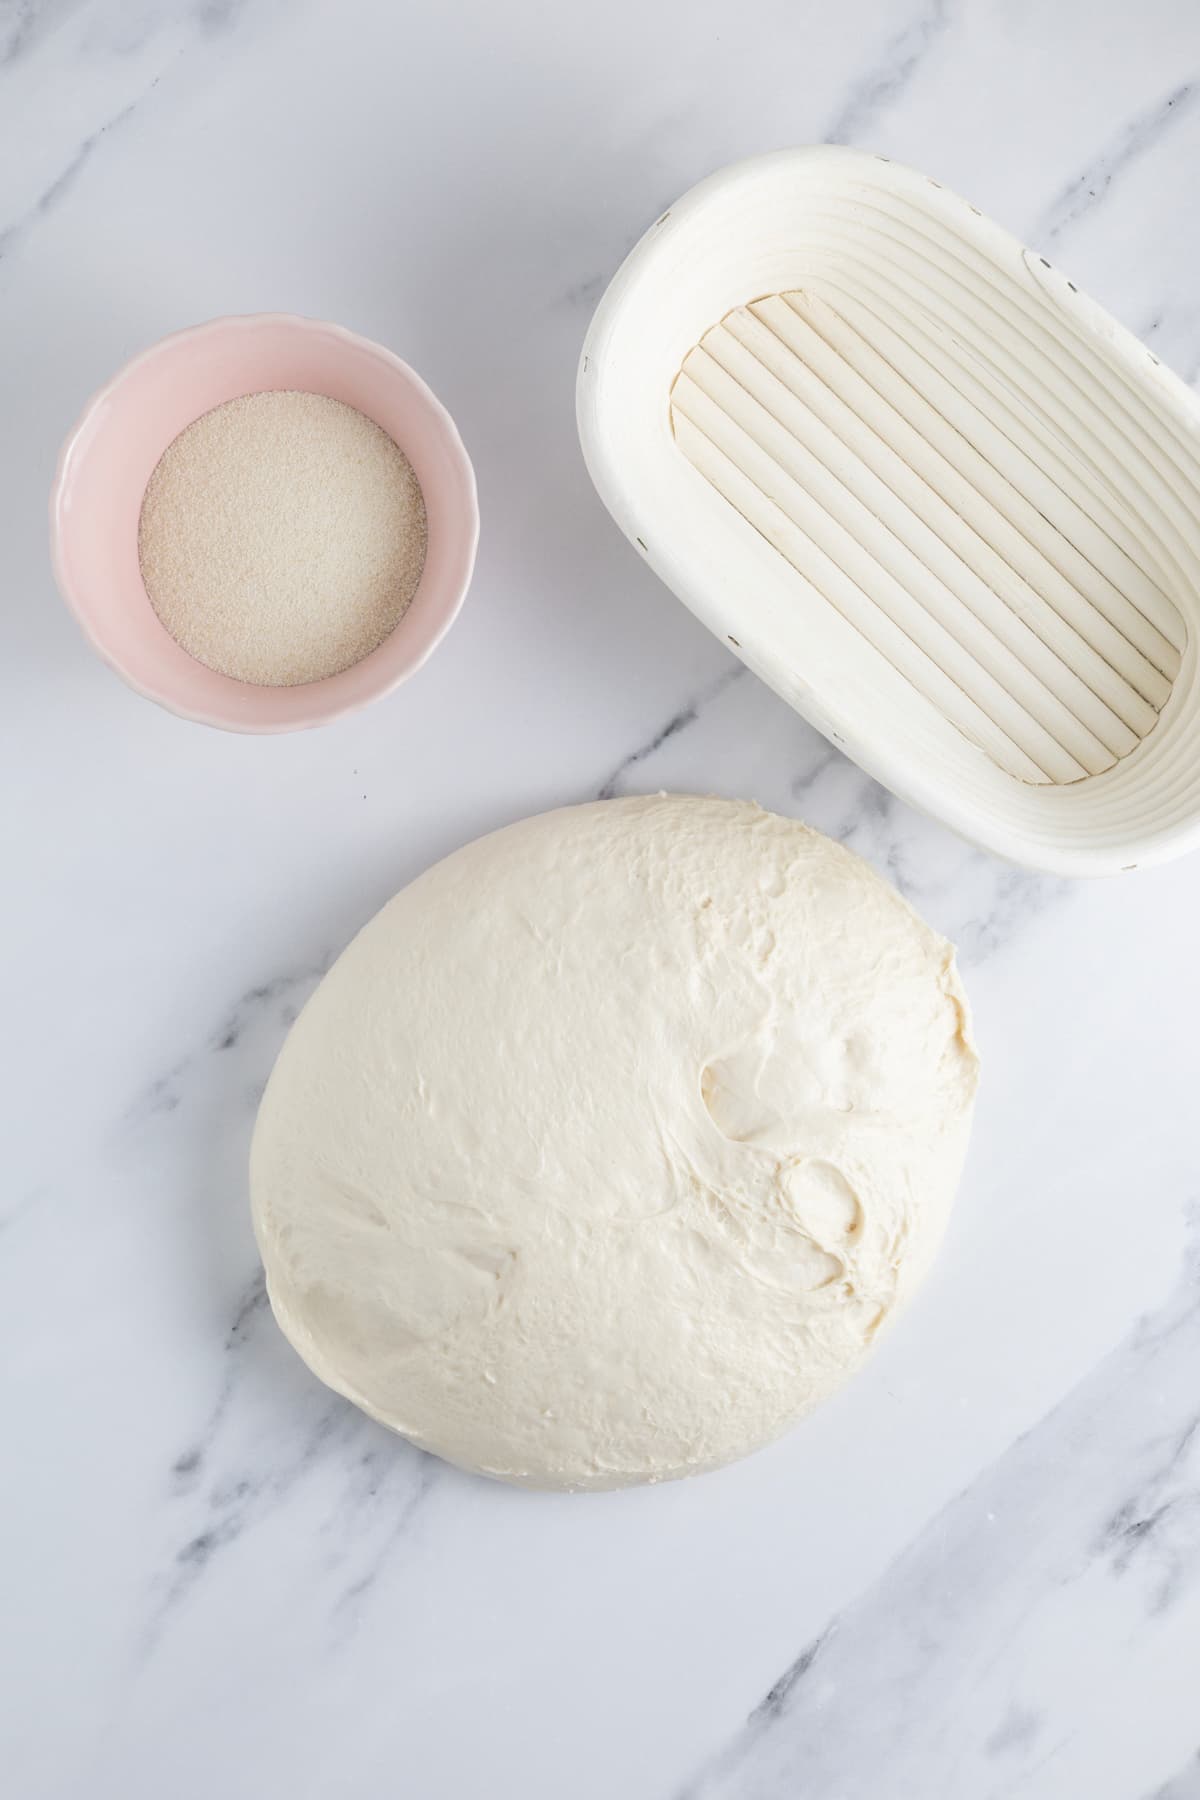
Use a silicone dough scraper to gently ease the dough out of the bowl. You want it to land upside down on your counter so that the smooth top of the dough is on the countertop and the sticky underside is facing up. This will make it easier to shape. Once the dough is shaped into a tight dough ball, place it into your banneton basket smooth side down, so your seam is on the top.
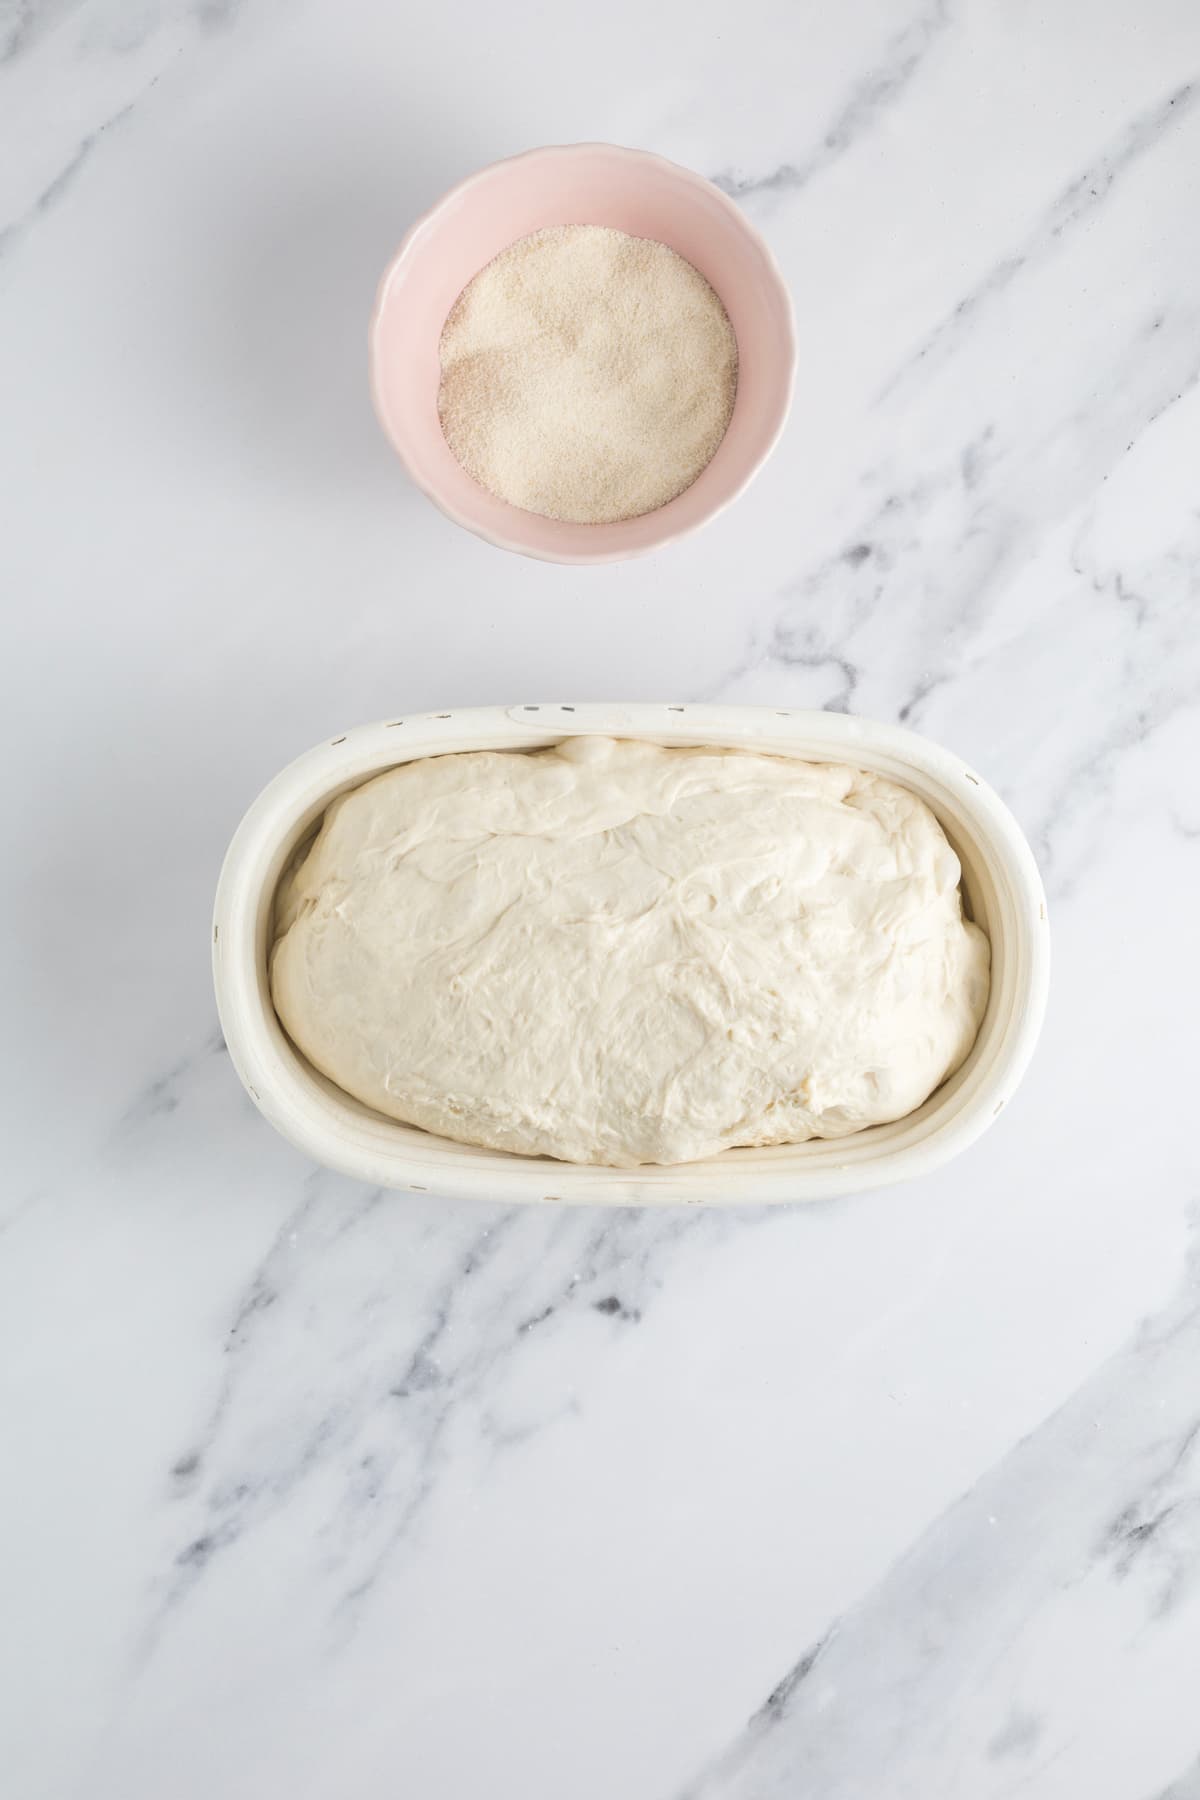
Proofing
Now the dough is in its proofing basket cover it loosely with a plastic bag or damp flour sack towel and let it sit on the counter to proof. You’ll need to let it sit for around an hour or two. Just be careful not to let it get too puffy or you’ll lose your oven spring! If it does start to rise too much in the banneton, place it in the freezer while you preheat the oven.
Kate’s SCHEDULE SAVER
Short Cold Fermentation
If you do have a few hours until you need to bake your sourdough then place it in the fridge for a short cold ferment. This will make it easier to score. You may end up with a more rustic looking sourdough if it has not had any fridge time, but looks aren’t important for this quick artisan sourdough bread!
Preparing to Bake
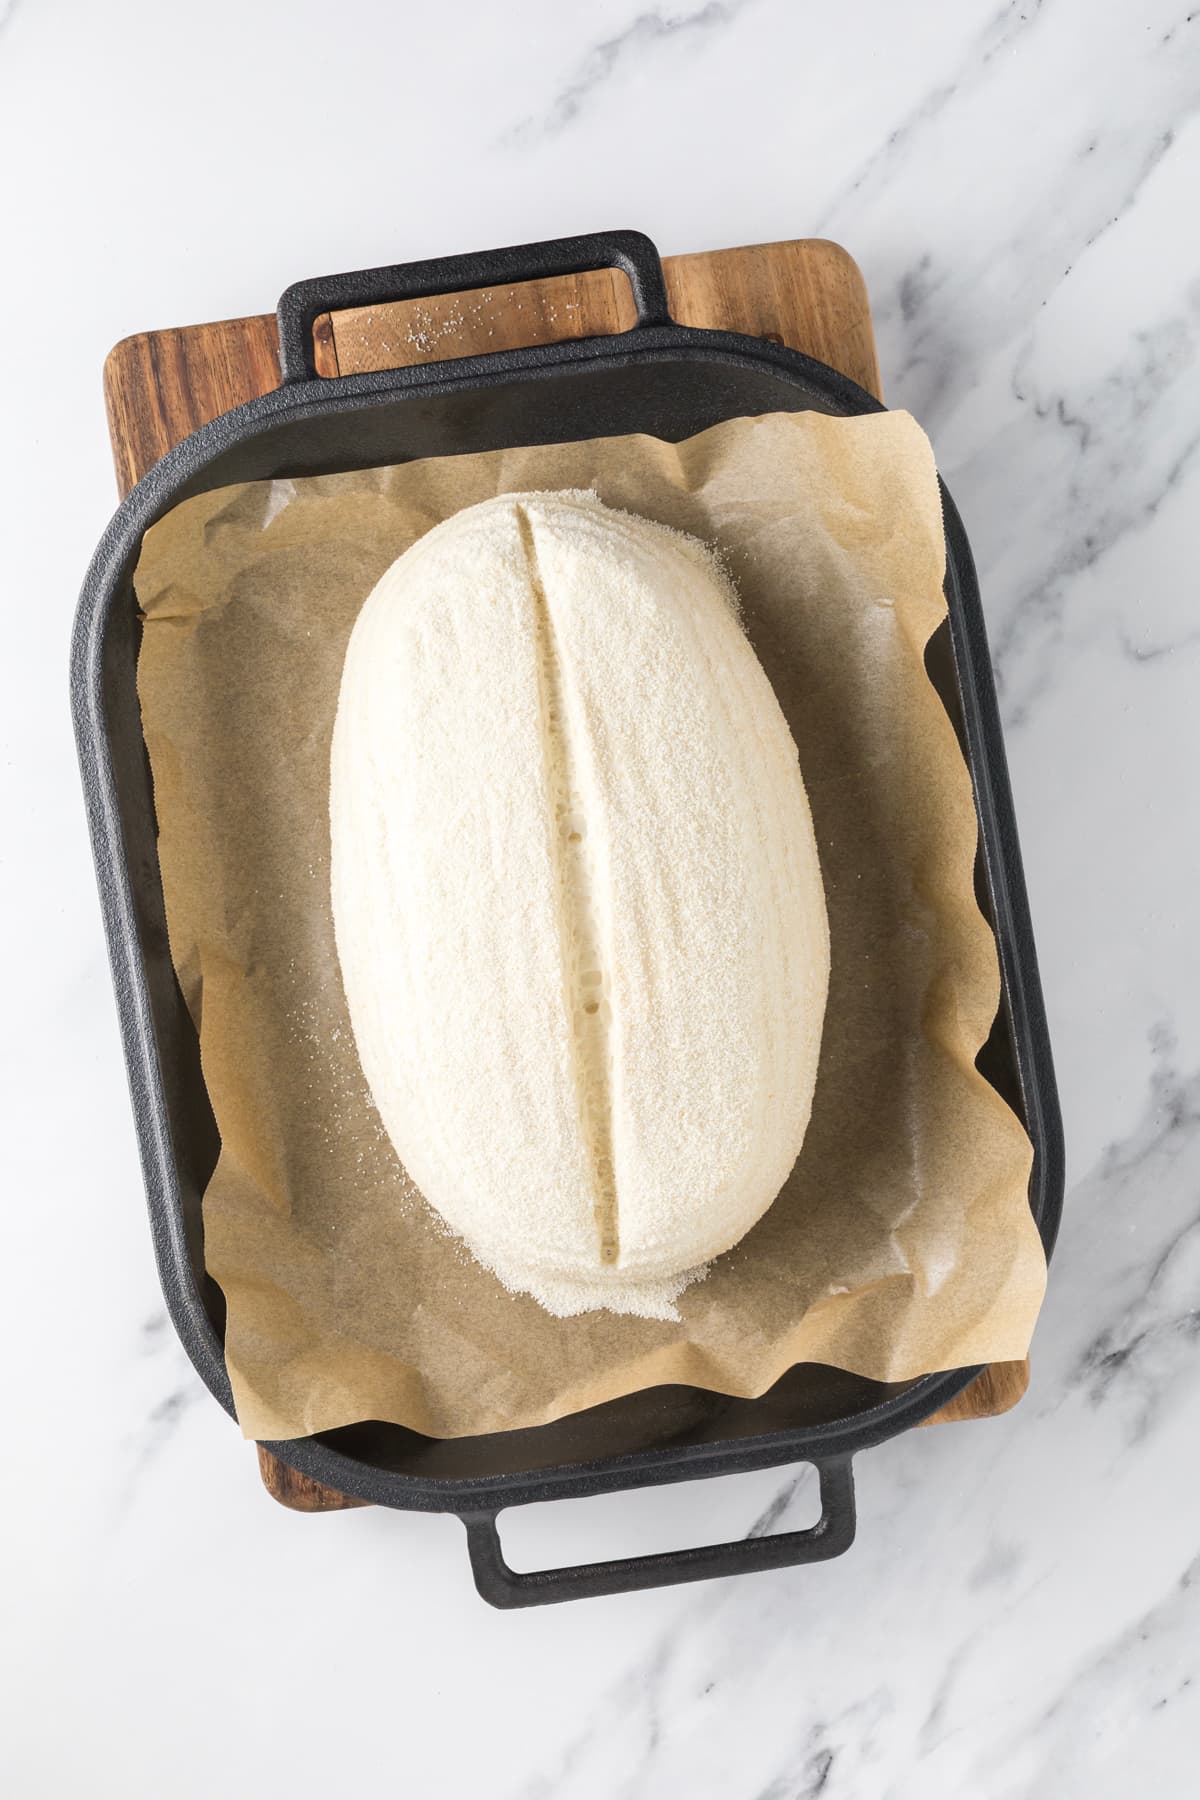
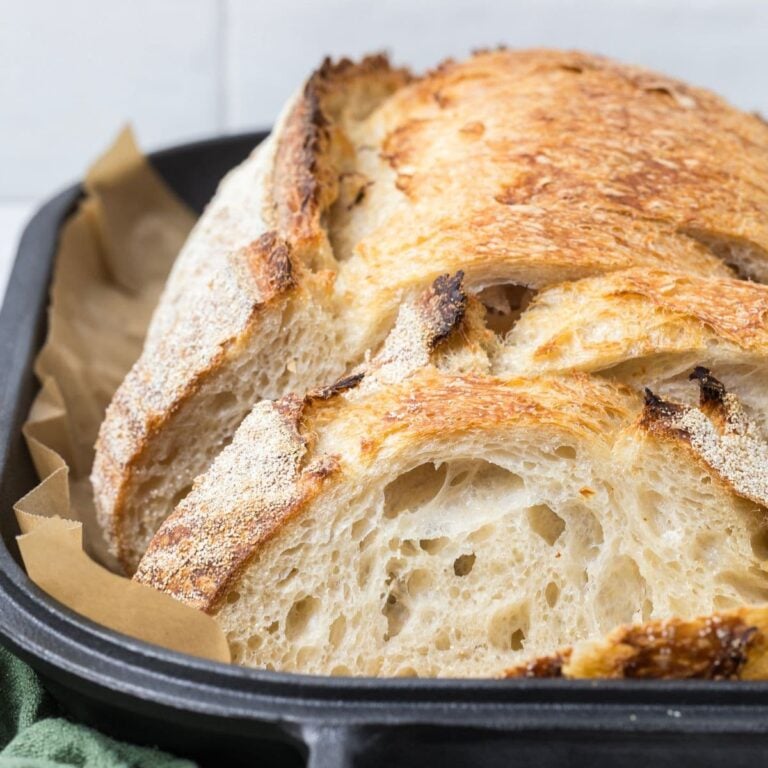
Now it’s time to bake! Once you’re ready to bake your sourdough, you’ll need to preheat your oven to 230ºC/450ºF. While your oven is preheating, place your sourdough in the freezer. This prevents it from over fermenting and also makes it easier to score.
When your oven is at temperature, gently tip your sourdough out of the banneton and onto a piece of parchment paper. If it hasn’t been in the freezer, just handle it very gently as it may be very soft.
Gently score your bread with a lame, clean razor blade or knife and carefully transfer it to your hot Dutch oven using the parchment paper as handles and then into the hot oven.
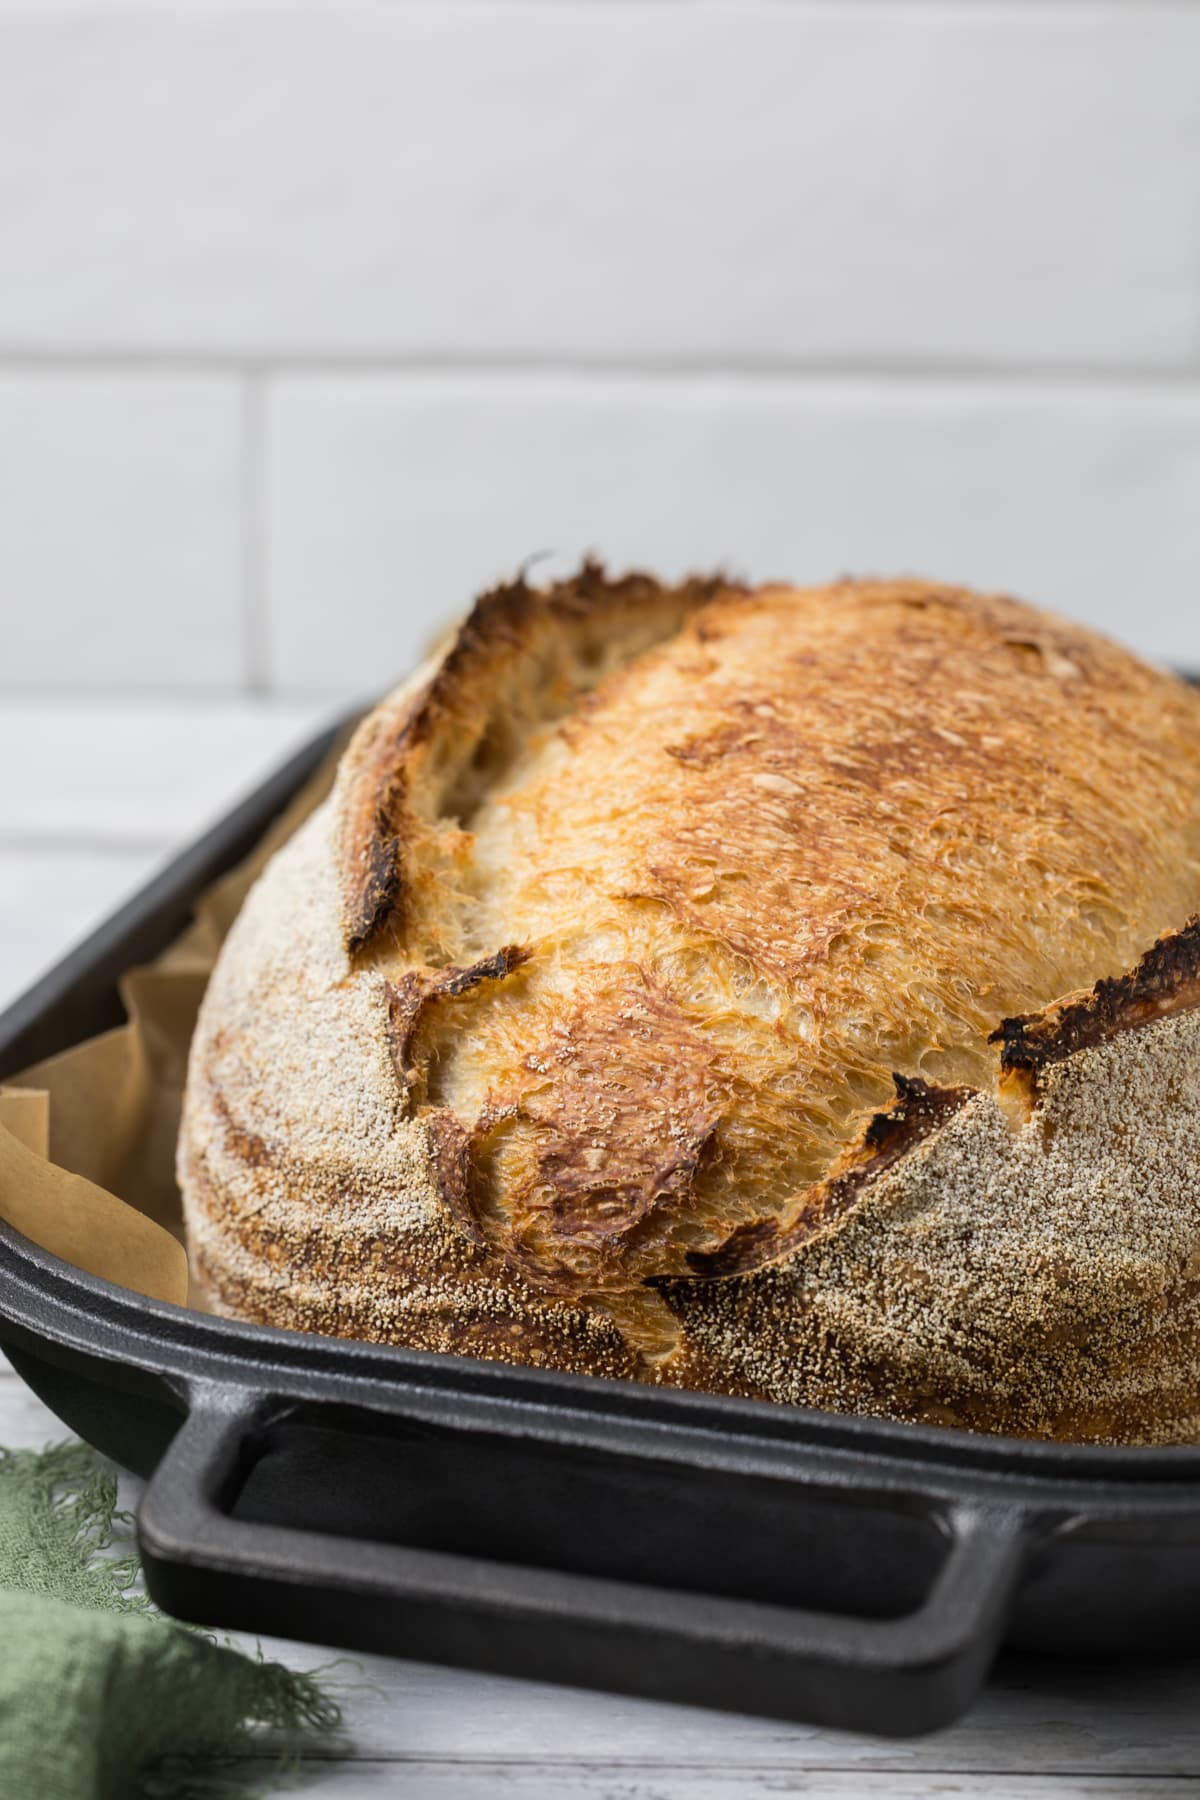
BAKE TIME:
30 Minutes with the lid on at 230ºC/450ºF plus
10-15 Minutes with the lid off at 210ºC/410ºF
You’ll find full step-by-step instructions in the recipe card at the end of this post.
Kate’s Pro Tip
Bulk Fermentation Tip
Judging bulk fermentation can be tricky, even for the most seasoned of sourdough bakers, but you can use this little trick to help you.
Take a little piece of dough and form it into a ball. Pop it in to a small shot glass and mark where the dough is on the side with a sharpie. Once the dough inside the glass doubles, your bulk fermentation should be finished and you can move onto shaping it and placing into your banneton basket or other shaping container. This technique is called an “aliquot jar“.
This is a better technique than using the poke test to judge whether bulk fermentation has finished, because the poke test is better suited to dough that has been shaped and proofed.
Baker’s Timeline for Making Sourdough Bread in One Day
This is a sample baking schedule for you to use to make your own same day sourdough bread.
Night Before – before you go to bed, feed your sourdough starter (check out these sourdough starter ratios if you need help).
7:30 am – Mix ingredients (use a higher percentage as per recipe to ensure shorter fermentation).
8:30 am – Commence stretching and folding the dough to strengthen gluten.
12:30 pm – Dough has doubled and is now ready to be shaped.
1:00 pm – Place your shaped dough into a banneton. You can now place it in the fridge for a short cold ferment. Alternatively, for a faster loaf, you can do a counter proof skipping the cold fermentation.
3:30 pm – Preheat your oven, bake your sourdough bread and allow to cool for a few hours (ideally 4 to 6) but if you need it sooner there are no hard and fast rules … you can eat it with dinner!
If you are looking for a same say sourdough bread with yeast added, you will enjoy this slow cooker sourdough discard loaf, this sourdough pane di casa or perhaps this sourdough sandwich discard loaf is more your style.
How To Store and Freeze
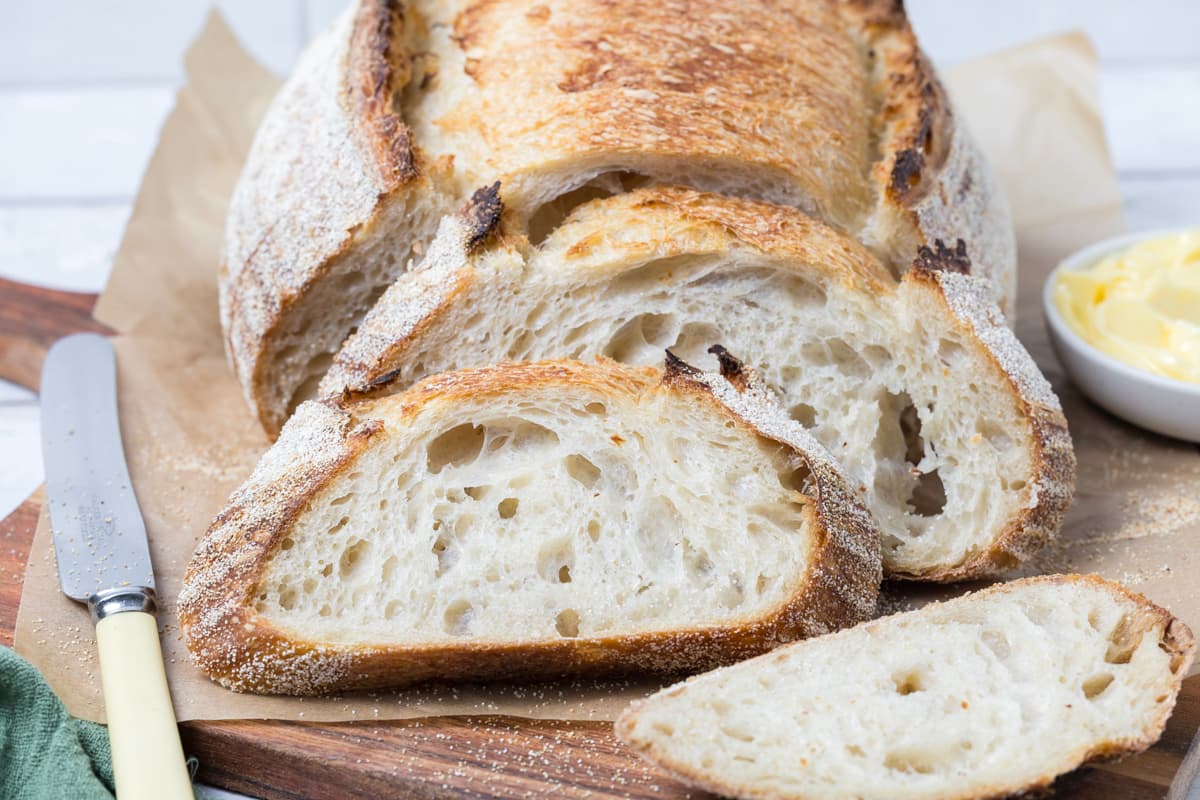
This loaf is absolute perfection to eat fresh, at least within 24 hours of baking. I like to store the leftovers from this loaf under a glass cloche for up to 3 days. It’s best to eat toasted if you’re eating it past 24 hours. This loaf freezes really well when following these instructions for freezing sourdough bread.
Frequently Asked Questions
Short answer is no you don’t have to do cold fermentation. The yeast go to sleep during cold fermentation so it’s only the bacteria that are still working away in the fridge. This is why cold fermentation gives you that deep, complex sourness that a lot of people love.
Yes you can use sourdough starter the same day as you feed it. You just need to make sure you get the ratio right so that it doubles in a reasonable time frame. You must wait for your sourdough starter to double before you use it if you want to use it at the best time.
This is an open ended question since it really depends on the amount of starter you use and the age of your starter, the temperature of your dough and your kitchen. The other ingredients in your dough will also make a difference to fermentation time.
Yes sourdough bread made with a single day process will still taste good! It still contains wild yeast and lacto acid bacteria. It won’t however have that strong sourdough depth of flavor because it has not had a long cold ferment. It won’t have the complexity of sourness that you might otherwise expect from this type of bread.
Yes you can, but you will need to add some commercial yeast because your sourdough discard will more than likely exceed the desired one day time frame.
Same Day Sourdough Bread Recipe
Equipment
- Mixing Bowl
- Digital Scales
- Banneton
- Dutch Oven
Ingredients
- 500 g Bread Flour
- 350 g Water
- 150 g Sourdough Starter
- 10 g Salt
Instructions
- Premix and FermentolyseWeigh out your sourdough starter and water into a large mixing bowl and mix together briefly. Now add your flour and salt and mix whole lot together to form a dry dough.
- Cover your bowl with cling film or a damp tea towel and let it sit for around 1 hour.
- Forming Up The DoughBring the dough together into a ball. Pull the edges of the dough into the centre until it's smoother and more formed. Once the dough has formed into a smooth ball, pop the cling film back on and let it rest for 30 minutes.
- Stretch and FoldOver the next few hours you need to create some structure for your dough by "stretching and folding". Aim to do around 4-6 sets of stretches and folds. For each set, stretch the dough up and over itself 4 times. Leave around 15 minutes in between each set. Again you do not have to be exact with time, but you need to do at least 4 sets over 2 hours.
- Bulk FermentationOnce you've finished your stretch and folds, place the cling film or damp tea towel back over your dough and let it rest and ferment (a plastic cover is a better option for this stage). Remember because you're trying to ferment your dough more quickly, you'll need to let it ferment in a warm place.
SHAPE THE DOUGH
- Once your dough has finished it's first ferment, it's time to shape it into either a boule or a batard. You'll need to flour your counter top with rice flour for this (we use rice flour because it has no gluten). Try to be quite sparing with the rice flour, you only need a very light dusting.Use a silicone dough scraper to gently ease the dough out of the bowl. You want it to land upside down on your counter so that the smooth top of the dough is on the countertop and the sticky underside is facing up. This will make it easier to shape.You want to pull the edges of the dough into the centre and then flip it over so that the sticky side is now underneath. Using the stickiness, gently pull the dough into a tight ball.You will need a banneton to put your dough into. If you do not have a banneton, then a bowl or basket lined with a floured tea towel is perfectly fine. Make sure your bowl isn't too big though, you want your dough to retain some shape.Whatever you're using needs to be liberally floured with your rice flour. If you're using a banneton – liberally sprinkle it with rice flour. If you're using a cloth or tea towel, rub the flour into it to ensure it becomes non stick.
- Shape The DoughOnce the dough is shaped into a tight ball, place it into your banneton smooth side down, so your seam is on the top – this way the top of your dough will get the pretty lines from the banneton. If you're using a cloth or tea towel in a bowl it's ok to put your dough with the smooth side up. Just make sure the dough is tight.Lift your dough around the edges to pop a little more rice flour if you feel it needs it. Just try to handle the dough as little as possible and be really gentle as you really want to preserve all the gases and air bubbles that have formed during your bulk ferment.
- ProofingNow the dough is in its "shaping container" cover it loosely with a plastic cover and let it sit on the counter to proof. You'll need to let it sit for around an hour or two. Just be careful not to let it get too puffy or you'll lose your oven spring!As a caveat, if you do have a few hours until you need to bake your sourdough then do pop it in the fridge for a short cold ferment. It does make it easier to score.
- Let's Prepare To BakeOnce you're ready to bake your sourdough, you'll need to preheat your oven to 230ºC/450ºF. While your oven is preheating, place your sourdough in the freezer.Place your Dutch Oven into the oven when you turn it on so it gets hot. Try to preheat for around 1 hour to ensure your oven is super hot – but you know your oven so just adjust this time if you need to.
- Now It's Time to Bake!When your oven is at temperature, gently tip your sourdough out of the banneton and onto a piece of parchment paper. If it hasn't been in the freezer, just handle it very gently as it may be very soft.Make sure that you make the parchment paper big enough to use the edges as a handle to lower to dough into your Dutch Oven.Score your bread with a lame, clean razor blade or knife. Carefully take your Dutch oven out of the oven. Place the sourdough into the pot using the baking paper as a handle. Put the lid on and place into the hot oven. BAKE TIME:30 Minutes with the lid on at 230ºC/450ºF plus10-15 Minutes with the lid off at 210ºC/410ºF
- When you remove your dough from the oven, carefully remove it from the dutch oven as soon as possible and place on a wire rack to cool.
Nutrition
Nutrition information is automatically calculated, so should only be used as an approximation.
Like this? Rate and comment below!


Hi. I have done the stretch and folds, just waiting for the dough to double in size, but it is getting late, and not much happening. Can I put it in the fridge till tomorrow morning?
Thanks
Monique
I think this recipe is the one!!!! I was unable to bake it right away and left it in a banneton in in the fridge overnight and for the day as I was at work. Total of at least 15-16 hours. Took it out of the fridge and left it on the table for 2 hours. It was still. perfect!
Now need to find a way to make it with some rye flour as well.
Saving this recipe!
Thank you so much!!!!!
Can I use AP flour instead of rice flour? I don’t have access to rice flour.
Semolina or any other gluten free flour would be a better choice. AP will stick to your loaf and banneton, making a big sticky mess 🙂
Thank you Kate! This great recipe produced my best sourdough boule yet! Great taste, great rise! My new favorite 😁😁😁
I autolysed with just the water and flour for 30 min, then added the salt and starter and mixed and let it set for 1/2 hour and continued as directed. Bravo Kate!
Can I make this into a loaf for sandwiches?
I just made this today and love it thank you!
I was wondering if I were to make a chocolate version of this, could I bloom the coco powder and just proceed as normal ?
Thank you!
Love this one! Fail-proof!!! I forgot to do the 4th stretch and fold (laminated with inclusions instead) and it still came out so perfect and yummy!! I use this recipe for same-day and next-day bread baking.
Amazing & easy!
Chewy crust. Airy enough but not massive holes.
A great go-to recipe!
Nice. Worked well. My sourdough was very happy and I was leaving for the weekend so I had to use it today if I was going to use it. A few different methods from what I was use to, including adding yeast, but it was worth it because I love making bread with happy sourdough. Very happy with the outcome. Have sliced it open yet but I’m quite confident it’s going to be fine, had a very nice rise inside the crock. Liked the refrigerator proof and the freezer usage pre bake.
Used this recipe to bake one of my first sourdough loaves. Results were great
This same-day sourdough recipe is amazing! It is my go-to recipe and I make it weekly with the best results. I have tried other recipes that require overnight proofing and are much more of a time committment. This recipe is quick and easy, with very little fuss and yields the best sourdough loaf. Light, airy and delicious, wonderful recipe!
Hello
Trying out this formula and method today this is a dry stiff dough at 65% hydration correct?
This is a little lower in hydration than my regular sourdough bread recipe yes. But it shouldn’t be too stiff. If it is, you can add a little more water if you prefer 🙂
Hi Kate,
Your recipes are always winners! I want to try making your Same-day Sourdough. My question: Can I use my discard for this recipe?
Appreciate your help,
Kelly
Hi Kelly, no this recipe is for active sourdough starter. If you are wanting a discard loaf, try this recipe – The Easiest Sourdough Discard Bread You’ll Ever Make! 🙂
The recipes seemed long, but the results were great. I will not be tasting it though as my granddaughter requested it. I love the look and its the first time I scored the top. My husband wanted it right out of the oven. Lol. Looks like I’ll be baking another soon as I want to taste it as well.
Works for me like a charm evey time! I use all purpose flour in place of bread flour and rice flour
👍
Great same day or next day loaf! Ive baked one day of and one went in the fridge overnight, both turned out perfect and super tasty! My new go to!
We love to hear that! Thank you so much for your comment, Samantha. 🙂
When doing a cold retard after bulk fermentation , do you bake the bread immediately or allow it to come to room temperature and rise before baking?
Yes bake the bread immediately, so cold dough, hot oven 🙂
Saved mothers day! My starter stalled out on dough day, I managed to get it to almost double and found this recipe to try and get a loaf done to serve- it was my best yet! Recipe is written to be followed, my results were amazing and I got so many compliments! This recipe is being added to my regular list, for sure
We love to hear that! Thank you for your comment, Ashley! 🙂
I’ve mixed up multiple batches of this bread, the recipe works great! Nice rise as well. Thanks for sharing!
This recipe deserves 5 stars! I have been searching for the perfect recipe and this is the one! I had perfect bread within six hours!! I have been baking sourdough for over two years and when I tell you, this is the best recipe, you must try it!
Thank you for this recipe! What temperature do you suggest for bulk fermentation when using the Brod & Taylor Proofing Box?
Generally I set my proofing box a little higher than what I would for my sourdough starter as I find that it takes a lot to warm the bowl through. Even though it sounds high, I set my box from 28C-32C (82.4F-89.6C). I just keep an eye on it to make sure it’s not getting too hot on the base of the bowl 🙂 Maybe mine is a bit on the cooler side but I find if I set it to like 26C – 28C it just doesn’t work as well 🙂 xo
Hi Kate, love the recipe, but could you give a bit more info about “warm” place, because “warm” for you may be different “warm” for me…
I live on the southcoast of NSW
Cheers, Andreas
Hi Andreas, this post on how to keep your sourdough starter warm might be helpful 🙂
I made this once before and was quite pleased with the results. I am accumulating a lot of “Discard” starter, so, how much commercial yeast would I need to add for this recipe?
Warmest regards,
Ross
This is a true sourdough loaf. If you’re wanting to use up your discard, try this sourdough pane di casa loaf 🙂
Made this today, and it turned out beautifully.. Thanks for the recipe.
PM
when you feed 1:4:4 do you need to use a bigger jar? I usually use a pint mason jar and 50g of each: starter, water, flour. Wouldn’t adding 4xa the flour and water require at least a quart if not half gallon jar?
It depends – you could do 1:4:4 and reduce the starter to 10g of starter and then just add 40g of flour and 40g of water so then you wouldn’t need a bigger jar 🙂 But if you keep the starter at 50g then yes, I’d use a bigger jar (34oz is good).