
The smell of this orange cranberry sourdough bread baking will have you smiling, even before you taste it! There is something truly special about this flavor combination, it’s a wonderful choice for the holiday season but can be enjoyed anytime!
One of the best things about this loaf is you can choose to add other things like walnuts or pistachios if you like. You can sweeten it with honey or maple syrup, or leave these out if you prefer.

This post contains affiliate links. Please see our disclosure policy.
Why You’ll Love This Recipe
Perfect Holiday Centrepiece – the traditional flavors of orange and cranberry make this sourdough loaf the perfect Thanksgiving centrepiece.
Beginner Friendly – this loaf is perfect for sourdough beginners, given that it uses dried cranberries, rather than fresh or frozen cranberries.
Makes a Lovely Gift – Combine this flavorful loaf with a jar of homemade butter, cultured butter or even this whipped honey cinnamon butter for a heartfelt holiday gift.
Ingredients
- Sourdough Starter – you want active sourdough starter that’s fed and bubbly to create this fragrant loaf of sourdough bread. Leave your sourdough discard for creating these orange and cranberry sourdough muffins or sourdough cranberry orange oatmeal cookies. If you haven’t made a starter yet, you’ll find everything you need in my post on making a sourdough starter. You can use this guide to adjust the amount of starter you use in the recipe.
- Water – room temperature water is best, try not to use cold water or else it will take much longer for your dough to ferment.
- Honey – a little honey brings sweetness to this loaf and pairs beautifully with the dried cranberries. You can substitute the honey for maple syrup if you prefer.
- Bread Flour – you can use a little whole wheat flour mixed in with the bread flour if you want some extra flavor.
- Salt
- Dried Cranberries – I’ve chosen to use dried cranberries because I find that they don’t interfere with the hydration of the sourdough. They also don’t bleed during the cold fermentation, which can stain your banneton and increase the hydration of the dough. I don’t recommend using fresh cranberries or frozen cranberries for this reason.
- Whole Orange – You’ll need the zest and juice of a whole orange.
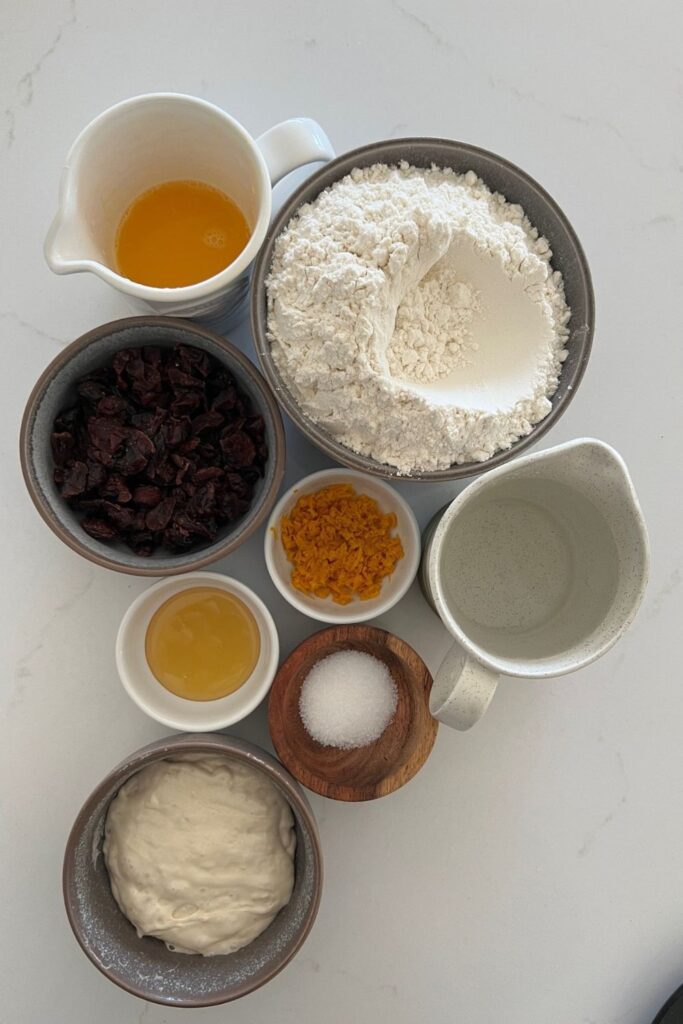
Soak The Cranberries
This step is optional, but it really gives the bread so much more flavor! Add the juice of an orange to a small bowl and add the dried cranberries. Allow them to soak until it’s time to add them to the bread dough. If you don’t want to soak the cranberries, you can add them dried, you just won’t get the same flavor.
Autolyse – Premixing The Dough
First weigh out your sourdough starter and water into a large ceramic or glass bowl. Mix the water and starter together briefly.
Now add the honey and orange zest and stir to combine with the water and the starter.
Then add your flour and salt and mix whole lot together to form a shaggy dough.
Cover your bowl with cling film or a damp tea towel and let it sit for approximately 1 hour at room temperature.
Forming Up The Dough
After the dough has been through autolyse you need to bring it together into a ball. Work your way around the bowl, grabbing the dough from the outside, stretching it up and over itself, into the centre, until a smooth ball is formed.
You shouldn’t need more than about 20-25 stretches to form the ball. You’ll notice that the dough is fully hydrated after soaking all the water up. It will be fairly sticky but as you bring it into a ball, it will become smoother and shinier.
Once the dough has formed into a smooth ball, pop the cling film back on and let it rest for 30 minutes.

Stretch & Fold + Adding the Cranberries
Over the next few hours you need to create some structure for your dough by “stretching and folding“, as well as incorporating the cranberries.
**if you soaked the cranberries in orange juice, drain off as much liquid as you can before you add them to the dough. The liquid can be discarded**
For each set, stretch the dough up and over itself 4 times. Leave around 15 minutes in between each set. Again you do not have to be exact with time, but you need to do at least 4 sets over 2 hours.
Add the cranberries around the 2nd or 3rd set of stretch and folds. Just add a handful of cranberries to the dough for each stretch and fold.
They will become incorporated over the next few hours. Alternatively, you could laminate the dough.
Aim to do around 4-6 sets of stretches and folds.

Bulk Ferment
Once you’ve finished your stretch and folds, place the cling film or damp tea towel back over your dough and let it rest and ferment.
You can find a full guide to bulk fermentation here.
Shaping The Dough
Once your dough has finished its first ferment, it’s time to shape it into either a boule or a batard. You can see my easy shaping instructions for a batard here.
Placing Into A Banneton
Once the dough is shaped into a tight ball, place it into your banneton smooth side down, so your seam is on the top – this way the top of your dough will get the pretty lines from the banneton.
If you’re using a cloth or tea towel in a bowl it’s ok to put your dough with the smooth side up. Just make sure the dough is tight.
Lift your dough around the edges to pop a little more rice flour if you feel it needs it. Just try to handle the dough as little as possible and be really gentle as you really want to preserve all the gases and air bubbles that have formed during your bulk ferment.
If you don’t have rice flour, corn meal or semolina works really well with this dough.

Cold Ferment
Now the dough is in its “shaping container” cover it loosely with a plastic bag or damp tea towel and place into the fridge.
Try to leave it in the fridge for a minimum 5 hours, but this dough can remain in cold proof for up to 24 hours.
Preparing To Bake
Once you’re ready to bake your sourdough, you’ll need to preheat your oven to 230ºC/450ºF.
Place your Dutch Oven into the oven when you turn it on so it gets hot. Try to preheat for around 1 hour to ensure your oven is super hot – but you know your oven so just adjust this time if you need to. Leave your dough in the fridge until the very last minute – placing a cold dough into a hot oven will give you a great “spring”.
Bake Time!
Now it’s time to bake!
When your oven is at temperature, take your sourdough out of the fridge. Gently place it onto a piece of parchment paper.
Make sure that you make the parchment paper big enough to use the edges as a handle to lower to dough into your Dutch Oven.
Gently score your bread with a lame, clean razor blade or knife. At minimum a large cross is sufficient, but you can get as artistic as you like. Try to score it fairly deep to ensure the dough opens up.
Carefully take your dutch oven out of the oven. Place the sourdough into the pot using the parchment paper as a handle. Put the lid on and place into the hot oven.
BAKE TIME:
30 Minutes with the lid on at 230ºC/450ºF plus
10-15 Minutes with the lid off at 210ºC/410ºF
Finishing The Bake
When you remove your dough from the oven, carefully remove it from the dutch oven as soon as possible and place on a wire rack to cool.

Baking Timeline
| TIME | PROCESS |
|---|---|
| 9 am | Premix and autolyse for around an hour, forming up the dough and leaving to rest for another 30 minutes before stretch and folds. |
| 11 am | 1st stretch and fold |
| 11.30 am | 2nd stretch and fold – add half the drained cranberries. |
| 12 pm | 3rd stretch and fold – add other half of the drained cranberries. |
| 12.30 pm | 4th stretch and fold |
| 1 pm | Bulk fermentation at room temperature remembering that the honey will speed up fermentation. |
| 6 pm | Shape dough into a batard, place into banneton and then into fridge for cold fermentation. |
| 9 am | Wake and bake! The next morning, you can get up, make a coffee and bake your sourdough cranberry orange loaf! It will be cool in time for a late Thanksgiving lunch. |
What Else Can I Add To Orange Cranberry Sourdough Bread?
While this elegant flavor combination is perfect as it is, here are some other ideas for ways you can add even more flavor to your sourdough bread:
- You can easily add walnuts or pistachios to this sourdough cranberry orange loaf. You can add the nuts to the dough when you stretch and fold, or alternatively you can chop the nuts and add them to the base of the banneton before placing your dough on top. The nuts will stick to the dough during the cold ferment.
- Replace the honey with maple syrup for a vegan alternative.
- Replace the orange zest with lemon zest for a citrus alternative.

How to Store + Freeze
Like most sourdough bread, this sourdough orange and cranberry loaf is best eaten fresh or within 24 hours of baking. It can be stored at room temperature for a few days, however, after 24 hours, it will lose it’s crisp crust and soft crumb.
The loaf can be frozen as a whole loaf or as individual slices. Never frozen sourdough bread before? My guide to freezing sourdough bread will walk you through the process.
Frequently Asked Questions
Yes you can use orange juice instead of water in sourdough bread. However, I find that you will get a better crumb structure and stronger orange flavor if you leave the water and use orange zest instead.
I have used dried cranberries in this recipe. I have soaked the cranberries in fresh orange juice, however I’ve also made it without soaking with success too.
I like the flavor and texture of the dried cranberries. They hold their shape and don’t bleed into the dough.
You can use fresh or frozen cranberries, however they can cause some issues with bleeding into the dough and difficulties with shaping. If you have lots of fresh or frozen cranberries to use up, try making this cranberry orange jam or sourdough cranberry cake.
I don’t recommend using all purpose flour for this recipe. Bread flour is a better choice because it is higher protein. You will need the higher protein flour, particularly if you are soaking the dried cranberries in orange juice. If you do want to use all purpose flour, I recommend adding some vital wheat gluten to the dough.

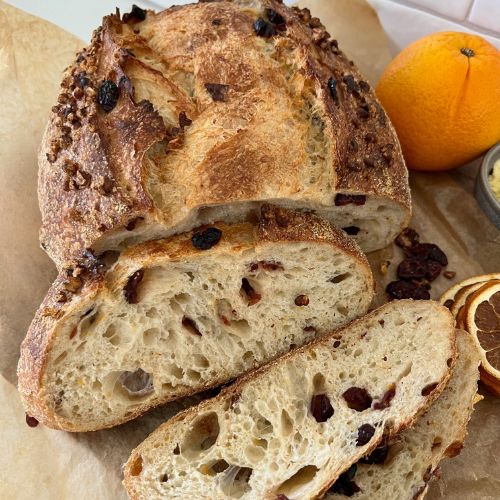
Orange Cranberry Sourdough Bread
Equipment
- Mixing Bowl
- Digital Scales
- Banneton
- Dutch Oven
Ingredients
- 50 g Sourdough Starter, (Fed and Bubbly)
- 350 g Water
- 20 g Honey
- 500 g Bread Flour
- 10 g Salt
- 100 g Dried Cranberries
- Zest of whole orange
- Juice whole orange, (optional)
Instructions
- Soak The CranberriesThis step is optional, but it really gives the bread so much more flavor! Add the juice of an orange to a small bowl and add the dried cranberries. Allow them to soak until it's time to add them to the bread dough.If you don't want to soak the cranberries, you can add them dried.
- Autolyse – Premixing The DoughWeigh out your sourdough starter and water into a large ceramic or glass bowl. Mix the water and starter together briefly.
- Now add the honey and orange zest and stir to combine with the water and the starter.
- Then add your flour and salt and mix whole lot together to form a shaggy dough. I find a dough scraper the easiest way to mix it as you can keep the sides of bowl clean.
- Cover your bowl with cling film or a damp tea towel and let it sit for around 1 hour.
- Forming Up The DoughAfter the dough has been through autolyse you need to bring it together into a ball. Work your way around the bowl, grabbing the dough from the outside, stretching it up and over itself, into the centre, until a smooth ball is formed. You shouldn't need more than about 20-25 stretches to form the ball.You'll notice that the dough is fully hydrated after soaking all the water up. It will be fairly sticky but as you bring it into a ball, it will become smoother and shinier.
- Once the dough has formed into a smooth ball, pop the cling film back on and let it rest for 30 minutes.
- Stretch & Fold + Adding the CranberriesOver the next few hours you need to create some structure for your dough by "stretching and folding", as well as incorporating the cranberries.**if you soaked the cranberries in orange juice, drain off as much liquid as you can before you add them to the dough. The liquid can be discarded**For each set, stretch the dough up and over itself 4 times. Leave around 15 minutes in between each set. Again you do not have to be exact with time, but you need to do at least 4 sets over 2 hours.Add the cranberries around the 2nd or 3rd set of stretch and folds. Just add a handful of cranberries to the dough for each stretch and fold. They will become incorporated over the next few hours (see notes for alternative method).Aim to do around 4-6 sets of stretches and folds.
- Bulk FermentOnce you've finished your stretch and folds, place the cling film or damp tea towel back over your dough and let it rest and ferment. See notes below for more info on this step.
- Shaping The DoughOnce your dough has finished it's first ferment, it's time to shape it into either a boule or a batard. You'll find full shaping instructions for a batard here and a boule here.
- Placing Into A BannetonOnce the dough is shaped into a tight ball, place it into your banneton smooth side down, so your seam is on the top – this way the top of your dough will get the pretty lines from the banneton. If you're using a cloth or tea towel in a bowl it's ok to put your dough with the smooth side up. Just make sure the dough is tight.Lift your dough around the edges to pop a little more rice flour if you feel it needs it. Just try to handle the dough as little as possible and be really gentle as you really want to preserve all the gases and air bubbles that have formed during your bulk ferment. If you don't have rice flour, corn meal works really well with this dough.
- Cold FermentNow the dough is in its "shaping container" cover it loosely with a plastic bag or damp tea towel and place into the fridge. I use a large plastic bag to cover it – I just reuse it each time. Try to leave it in the fridge for a minimum 5 hours.
- Preparing To BakeOnce you're ready to bake your sourdough, you'll need to preheat your oven to 230C/450F. Place your Dutch Oven into the oven when you turn it on so it gets hot. Try to preheat for around 1 hour to ensure your oven is super hot – but you know your oven so just adjust this time if you need to.Leave your dough in the fridge until the very last minute – placing a cold dough into a hot oven will give you a great "spring".
- Bake Time!Now it's time to bake!When your oven is at temperature, take your sourdough out of the fridge. Gently place it onto a piece of baking paper. Make sure that you make the baking paper big enough to use the edges as a handle to lower to dough into your Dutch Oven.Gently score your bread with a lame, clean razor blade or knife. At minimum a large cross is sufficient, but you can get as artistic as you like. Try to score it fairly deep to ensure the dough opens up.Carefully take your dutch oven out of the oven. Place the sourdough into the pot using the baking paper as a handle. Put the lid on and place into the hot oven. If you want to you can spritz your dough with extra water before you put the lid on.BAKE TIME:30 Minutes with the lid on at 230C/450F plus10-15 Minutes with the lid off at 210C/410F
- Finishing The BakeWhen you remove your dough from the oven, carefully remove it from the dutch oven as soon as possible and place on a wire rack to cool.
Notes
- Soaking The Cranberries: You do not have to soak the cranberries in orange juice if you don’t want to. Soaking the cranberries gives them a juicier texture and adds more orange flavor to the dough, but it’s not essential.
- Notes on Flour: This recipe is written using strong Bread Flour. Bread flour has a higher protein content than All Purpose flour. If you choose to use All Purpose flour you may have a different result because of this.
- Notes on Sourdough Starter: This recipe is based on you having an active starter that you have fed a few hours before starting your bake. For information on whether your starter is ready, go here.
- Notes on Incorporating Cranberries: You can incorporate the cranberries using a series of stretch and folds (I recommend leaving the dough in the bowl as it can get messy) or you can laminate them in. You will find instructions for laminating ingredients here.
- Notes on Bulk Fermentation: If your home is warm then your dough will ferment a lot faster and could be done in as little as a few hours. If it’s colder, it will take longer, possibly overnight.
I would recommend that you try to do your first few bulk ferments during daylight hours so that you can watch your dough closely.
Once you’re more familiar with the process – and the temperature of your home – you will be able to do overnight ferments. You will know your dough is ready to move to the next stage when it has *just* doubled in size. It will be fairly wobbly and full of bubbles. You should be able to see large air bubbles under the surface of the dough.
You don’t want to let it go any further than doubled as it will be over fermented.
If you want to do an overnight ferment, but your home is warm, consider using a little less starter (ie 25g).
Less starter means your dough will take longer to ferment and you will reduce the risk of over fermenting your dough. You’ll find more information on these topics here:
When is my bulk ferment finished? What is the difference between cold ferment and bulk ferment? Why does the amount of starter matter?
- Walnut Topping: You can see in some of the photos, I’ve added a walnut topping to this dough. I just crushed some walnuts and placed them in the bottom of the banneton before placing my dough on top. They stick to the dough during the cold fermentation process.
- Notes on Baking: If you’re worried about the base of your bread burning, place a baking sheet on shelf underneath your Dutch Oven – it works! If you’re worried about your bread not being cooked all the way through, turn the oven off and place your dough straight onto the oven rack. Leave the door ajar and let your bread rest there for a few hours. Make sure you don’t close the door or your sourdough will sweat and you’ll get a wrinkly, soggy crust. Remember not to cut into your loaf too soon – you’ll need to let it cool for at least a few hours (4-6 is best).
Nutrition
Nutrition information is automatically calculated, so should only be used as an approximation.
Like this? Rate and comment below!









This is delicious and now on repeat at my house.
I soaked the cranberries overnight in the fresh orange juice I made after grating my zest so they were nice and soft after draining.
The first round I forgot to add the zest as noted in your recipe so I added them with the cranberries. That worked out fine so I do that each time I bake. The walnuts in the basket is such an easy way to elevate this to bakery style. The only drawback (which is not really a negative at all) is you are limited in making decorative cuts as they won’t be seen.
Great recipe!!
I used 100g starter, 50g walnuts and the zest of two oranges. The orange flavour is aromatic and a perfect match for the cranberries. This loaf is not overly sweet. We enjoyed it with Lurpak butter fresh and softened cream cheese as toast. Another delicious loaf I will definitely make again soon.
I have made this loaf several times, and it is always beautiful and delicious! I just entered a loaf in our local state fair baking competition and won a first place blue ribbon and a “best in show” ribbon!
I LOVE this so much! Congratulations! Thank you so much for sharing with me. So good! xox